Fig 2 fig 3 – PDR Mounts awm125-vesa User Manual
Page 5
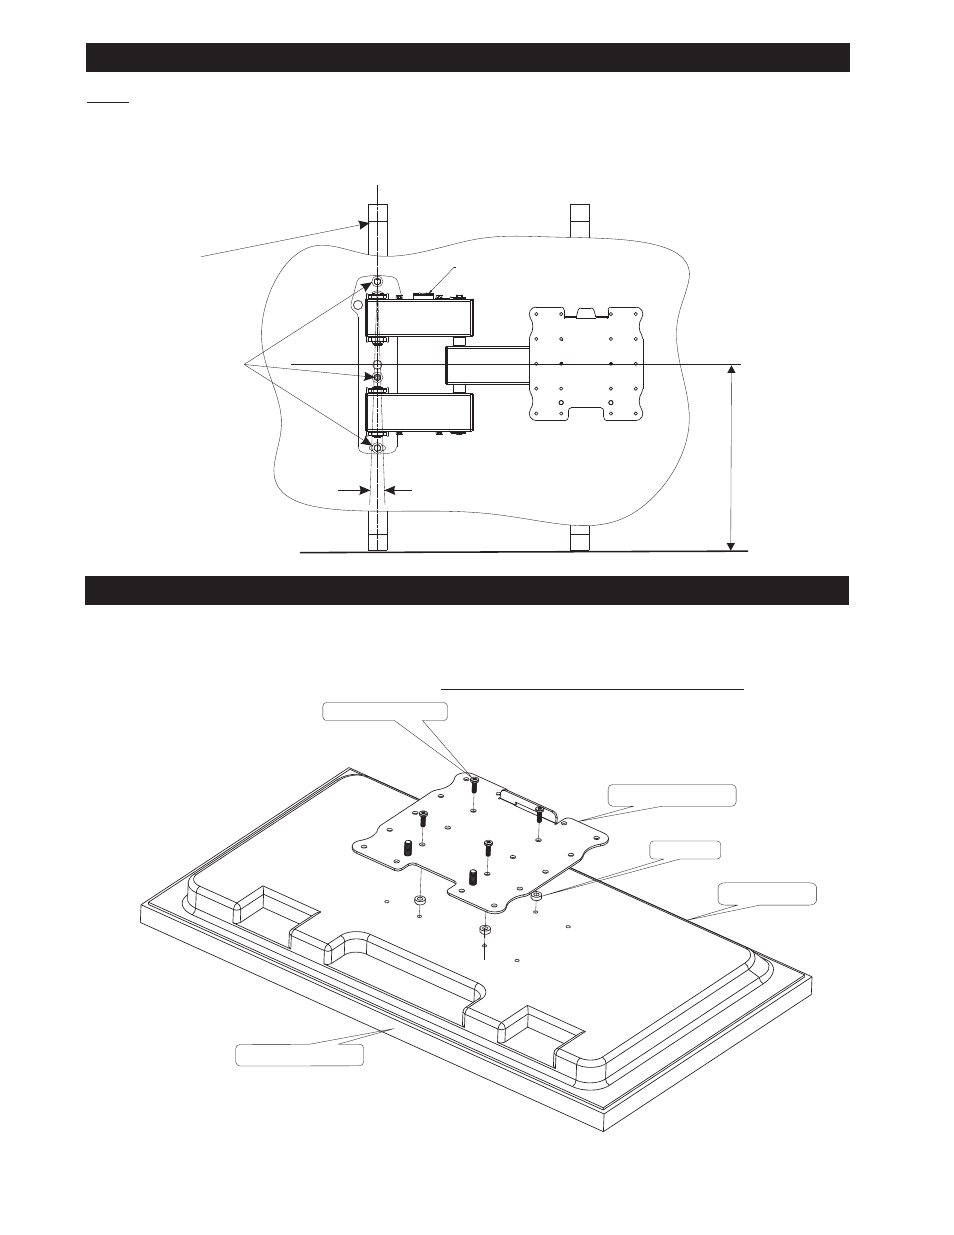
1. FASTEN MOUNT TO THE WALL
Fig 2
Fig 3
2. ATTACH THE VESA ADAPTER PLATE TO THE DISPLAY
Determine the exact mounting location of the wall mount prior to the installation, considering the swing of the articulating arm.
CENTER of the wall stud capable of at least (4) times the weight of the display and
mount. The center of the
AWM125 should be mounted at the same horizontal
center line as the desired display center line (viewing horizontal center line).
1:Position the
AWM125 mount to the desired position. Mark and Pre drill the top and bottom holes with a 3/16” (5mm) hole .
2: Insert the lag bolt and washer (item 1 and 2) into the top hole and secure to the
AWM125 mount.
3: Next insert the second lag bolt and washer
into the slotted bottom hole. Position with a level and tighten the bottom bolt.
4:Fully extend the arm and swing the mount from left to right . Check that the mount is level in both positions. If necessary, loosen the bottom bolt and set to a level position.
5:Pre drill and Install the center lag bolt and tighten.
SEE Fig 2
Be sure all lag bolts are tightened.
The
AWM125 mount must be secured to the
AWM125
(item 1 and 2)
1: Lay the display face down on a padded surface.
2: Using the hardware
supplied ( PDM-0095) attach the VESA adapter plate to the display.
Check the depth of the mounting holes to assure you are using the proper length screws supplied .
Make note to attach the top of the mounting plate to the top of the display.
SEE fig 3
Spacers supplied (3) may be necessary to avoid an uneven back surface of the display.
3: Make sure to tighten all fasteners before mounting on the AWM125 arm.
Care should be taken to not over tighten bolts into the display.
kit
5
WOOD STUDS
(std construction 2 x 4
studs and 1/2” wallboard)
VIEWING
HORIZONTAL
CENTER LINE
FLOOR LINE
Level not supplied
Adjustment for level
Mounting lag bolts
Spacer
Top of mounting plate
Top of display
Mounting hardware
Bottom of Display