Assembly instructions 3/4, Step 3 step 4, Fe g g – Home Styles 5558-83 User Manual
Page 3
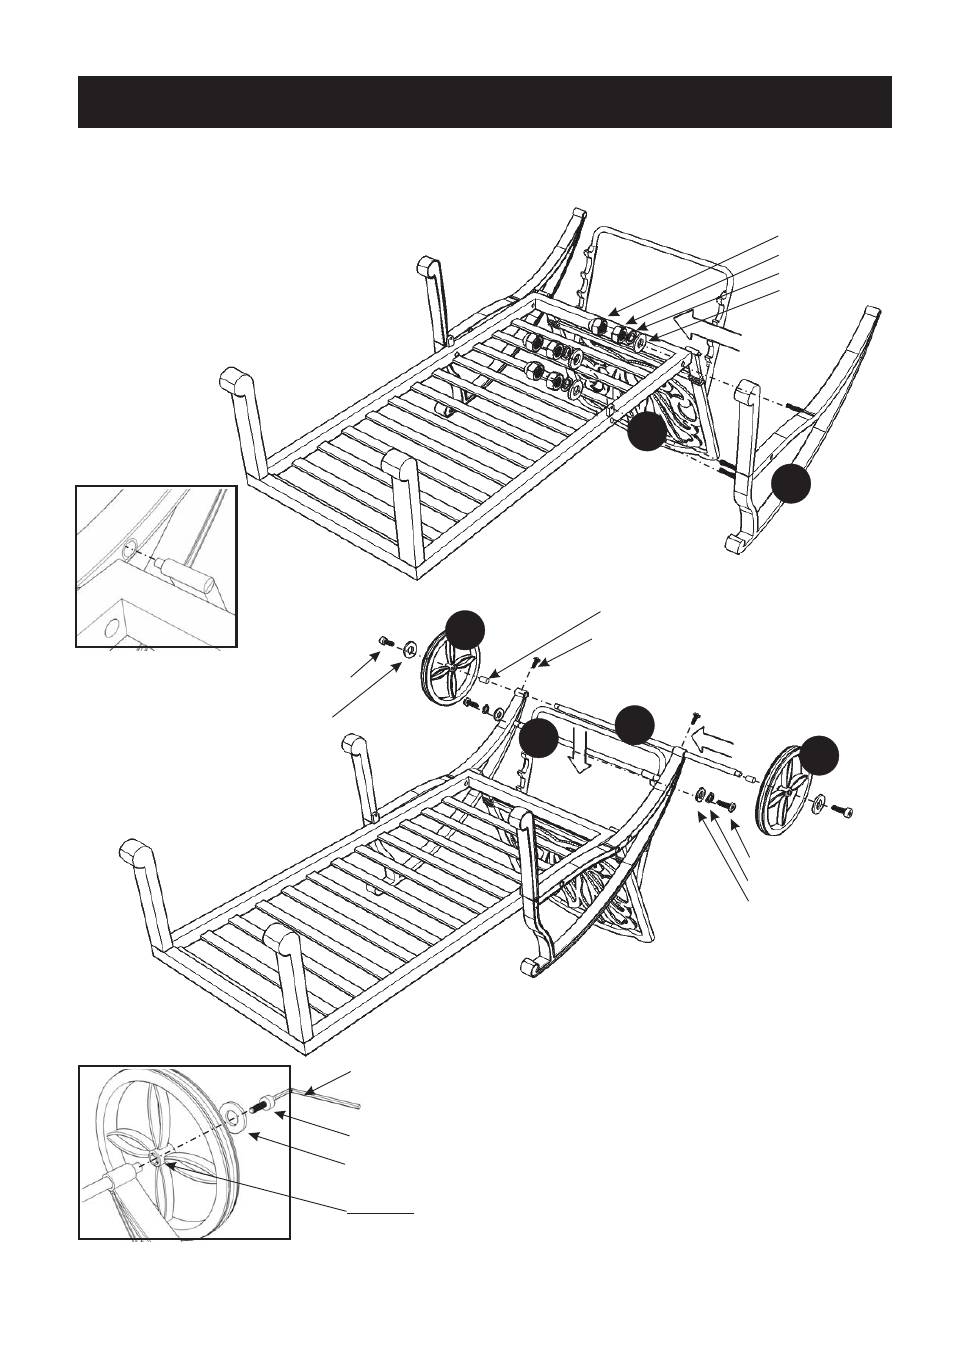
Assembly Instructions 3/4
STEP 3
STEP 4
C
D
Place Back Frame (D) into position.
(See Figure 3)
Attach Arm (C) to Seat (A) with
Flat Washers, Spring Washers,
Nuts and Nut Caps.
Attach Support (E) to unit with
Flat Washers (small), Spring Washers (small)
and Head Cap Bolts (long).
Slide Axle (F) into unit,
aligning it in a centered position (left to right).
Lock Axle (F) in place by inserting
Head Cap Bolts (short) into the
per-drilled holes of unit
Attach Wheels (G) to unit with
Plastic Rings, Flat Washers (large) and
Head Cap Bolts (large).
(See Figure 4)
Nut Cap
Nut
Flat Washer
Spring Washer
Figure 3
Figure 4
F
E
G
G
Head Cap Bolt (short)
Plastic Ring
Plastic Ring is on inside of wheel
Large Hex Wrench
Head Cap Bolt (long)
Spring Washer (small)
Flat Washer (small)
Head Cap Bolt (large)
Flat Washer (large)
Head Cap Bolt (large)
Flat Washer (large)
- 5050-34 (4 pages)
- 5516-88 (2 pages)
- 5000-89 (3 pages)
- 5518-28 (3 pages)
- 5002-89 (2 pages)
- 5033-88 (2 pages)
- 5003-89 (2 pages)
- 5559-34586 (1 page)
- 5559-34586 (2 pages)
- 5559-3458 (2 pages)
- 5559-3086 (2 pages)
- 5559-3258 (2 pages)
- 5559-3596 (2 pages)
- 5559-83 (4 pages)
- 5660-5985 (2 pages)
- 5660-5985 (3 pages)
- 5660-5984 (2 pages)
- 5660-5984 (3 pages)
- 5660-5983 (2 pages)
- 5660-5983 (3 pages)
- 5660-5982 (2 pages)
- 5660-5982 (3 pages)
- 5660-5981 (2 pages)
- 5660-5981 (3 pages)
- 5660-308 (4 pages)
- 5661-25L (2 pages)
- 5601-3658 (2 pages)
- 5670-3058 (3 pages)
- 5670-3058 (2 pages)
- 5670-3058 (2 pages)
- 5670-359 (3 pages)
- 5670-359 (2 pages)
- 5800-998 (3 pages)
- 5555-8312 (3 pages)
- 5555-36 (2 pages)
- 5554-8312 (3 pages)
- 5552-8312 (3 pages)
- 5660-9982 (3 pages)
- 5660-9982 (4 pages)
- 5555-89 (1 page)
- 5554-325 (2 pages)
- 5554-802 (1 page)
- 5555-328 (2 pages)
- 5554-308 (2 pages)