Tjernlund X2D XCHANGER Reversible Basement Fan 8504164 Rev A 05/10 User Manual
Page 5
4
INSTALLATION (TOOLS REQUIRED)
• Reciprocating saw
• 5/16” nut runner or socket
• Siding tools (dependent on exterior finish)
• Drill and 1/2” bit
• Phillips screwdriver
• Level
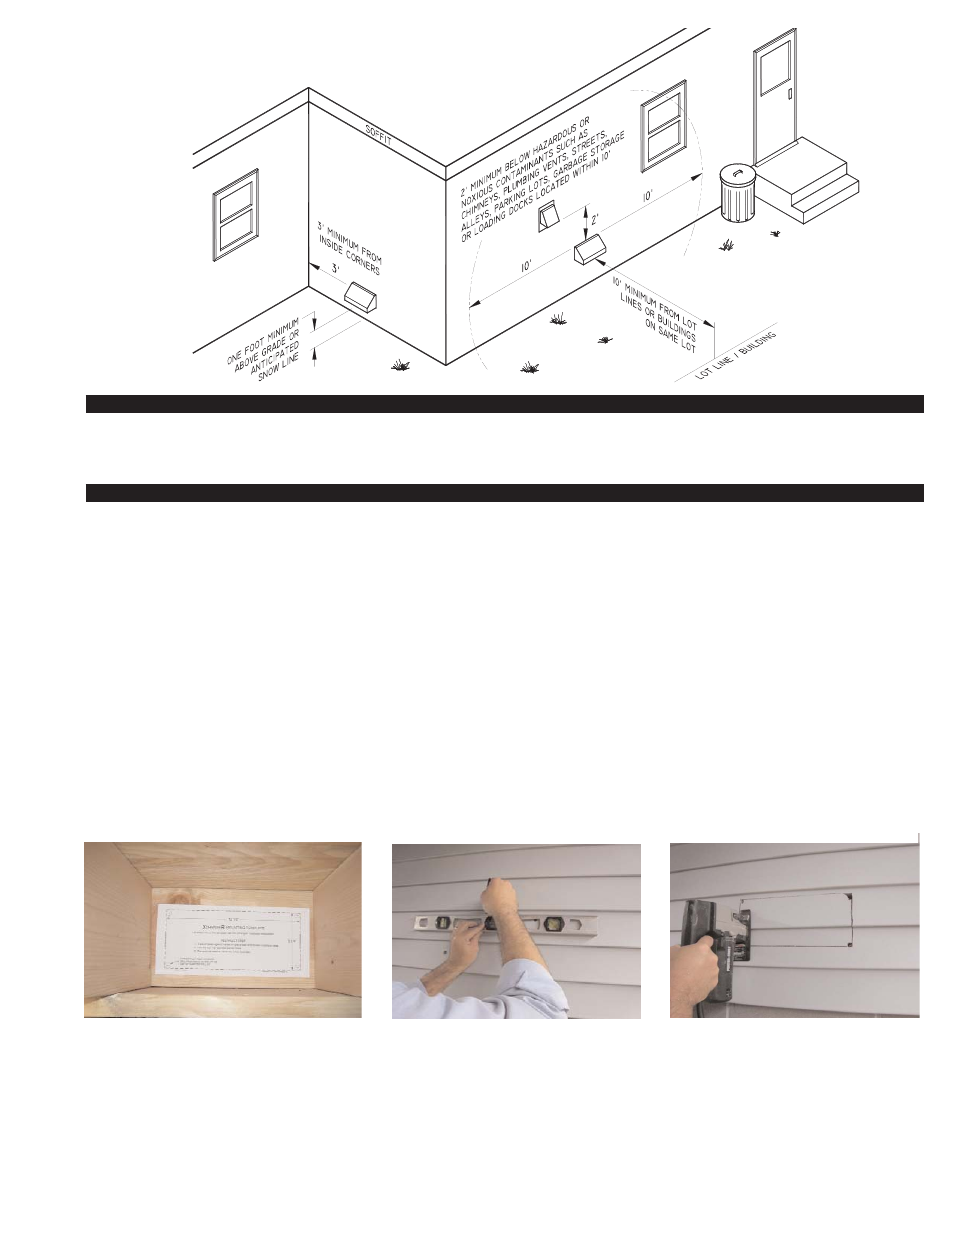
INSTALLATION
NOTE: Before cutting opening through wall, confirm X
CHANGE
R
TM
hood termination clearances are met as noted on bottom of page 3.
1. A) Center template and tape to the rim joist between the floor joists/trusses X
CHANGE
R
TM
will be mounted through, (See
Diagram B).
B) If X
CHANGE
R
TM
is not installed between floor joists or trusses, attach the template to the wall it will be exiting, ensuring
X
CHANGE
R
TM
will be level.
2. CAUTION: When cutting or drilling into wall, do not damage electrical wiring and other hidden utilities. Using a 1/2” bit, drill pilot
holes noted on the template from inside through rim joist, wall board, siding, etc., keeping drill bit perpendicular to the wall. 1/2” bit
must be long enough to penetrate through exterior.
3. Use a level to mark (4) holes drilled in step 2 and connect the holes on building exterior, (See Diagram C). Use a saw to
remove material between marks, (See Diagram D).
DIAGRAM B
DIAGRAM C
DIAGRAM D
CENTER TEMPLATE BETWEEN JOIST OR PLACE ON
WALL XCHANGER WILL EXIT.
DRILL (4) 1/2” CORNER HOLES THROUGH
WALL FROM INTERIOR AND CONNECT HOLES
ON EXTERIOR WITH A LEVEL.
CUT OPENING ALONG MARKED LINES.
DIAGRAM A