Tjernlund AS1 AireShare Room-to-Room Ventilator Rev A 02/08 8504136 User Manual
Page 2
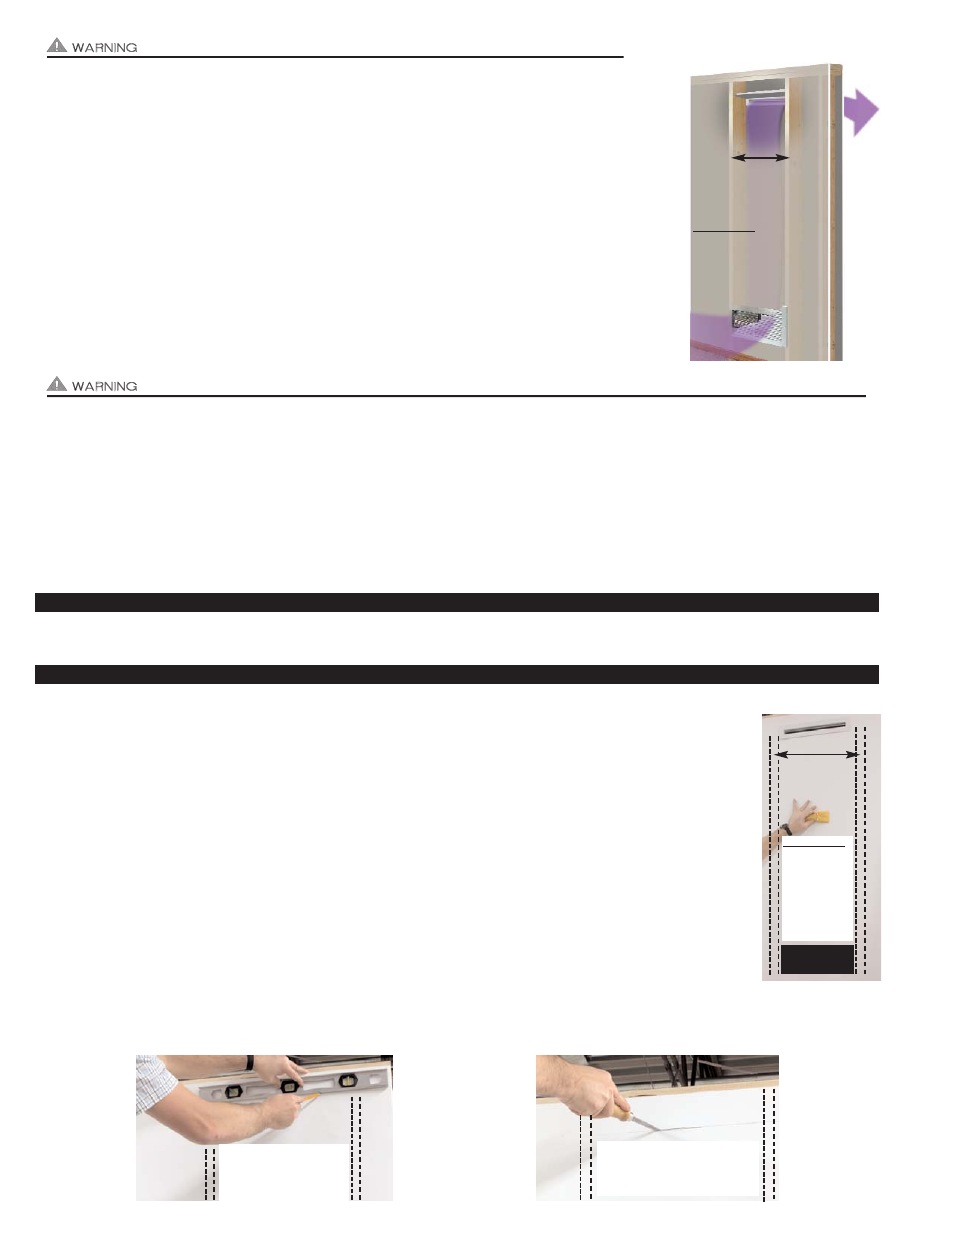
DIAGRAM C
DIAGRAM D
LEVEL AND MARK A
LINE BETWEEN STUDS
WHERE DIFFUSER IS
TO BE INSTALLED.
CAREFULLY MAKE A LEVEL
HORIZONTAL CUT IN SHEET-
ROCK BETWEEN STUDS NO
LONGER THAN 14”.
• The AireShare™ may not be used to exhaust hazardous or explosive materials or vapors.
• The AireShare™ may not be installed in a ceiling.
• The AireShare™ may not be installed in an outside wall.
• The AireShare™ may not be installed in a wall rated as a “fire wall.”
• The AireShare™ may not be used to move air from one floor (story) to another floor.
• The AireShare™ may not be used to move moisture-laden air from sources such as bathrooms
and kitchens.
• The AireShare™ may not be used in a window.
WARNING: To reduce the risk of fire, electrical shock and injury to persons, the AireShare™ must
be installed with the AS1 Diffuser that was provided with the AS1. Do not use this product without
the AS1 Diffuser or with any Diffuser other than the AS1 Diffuser.
WARNING: To reduce the risk of fire or electrical shock, do not use this fan with any solid state
speed control devices.
Disrupt power at circuit breaker to outlets within the stud wall you will be working.
When sawing through sheetrock you must stop if you detect the saw blade coming in contact with any wiring or plumbing. Investigate
further to determine if it is possible to safely continue to use this wall cavity space. Switch to another stud wall cavity if necessary.
BEFORE YOU START:
Determine the stud wall section that you want to use to mount the Blower and Diffuser. It may be preferable to select a stud wall section
that contains an electrical outlet for wiring. IMPORTANT: Wall studs must be spaced a minimum of 16” o.c., (See Diagram A). Mark
inside edges of studs the Aireshare
TM
will be installed between and verify there is at least 14” between the inside edges. Slide a stud
finder down the wall between the studs to verify the stud wall cavity is completely open, (See Diagram B).
TOOLS REQUIRED
Sheetrock Saw
Phillips & Straight Screwdrivers Level
Tape Measure Utility Knife or Scissors
Wire Stripper
INSTALLING DISCHARGE DIFFUSER
IMPORTANT: Install Diffuser first if mounting the Blower down low and the Diffuser high so sheetrock from the
Diffuser cut out does not fall into wall cavity and damage Blower. Install the Blower first if mounting the Blower high
and Diffuser low so sheetrock from the Blower cut out does not fall into wall cavity and damage Diffuser.
NOTE: Typical installations will have the Diffuser high and the Blower low, but there may be instances where it
is desirable to have the Blower mounted high and the Diffuser low to take air from the ceiling level.
1. Determine if you would like a high or low discharge. The Diffuser may be mounted as close as 3" above the top
of Blower cut out opening or as close as 3" to the ceiling.
2. Level and mark a line between studs where you want the top of the Diffuser, (See Diagram C)
3. Using a hand sheetrock saw carefully make a horizontal cut along the line. Cut the sheetrock completely until you
come in contact with the opposite stud. NOTE: If studs are spaced greater than 16” o.c., the horizontal cut line
should not exceed 14”, (See Diagram D).
DIAGRAM A
Wall studs must be
spaced a minimum
of 16” o.c.
IMPORTANT: Wall cavity
between studs must be com-
pletely open between Blower
Intake and Diffuser
DIAGRAM B
Wall studs must
be spaced a
minimum
of 16” o.c.
BLOWER
OPENING
DIFFUSER
IMPORTANT:
Wall cavity
between studs
must be com-
pletely open
between
Blower intake
and Diffuser