Instructions, Warning, Tine or scrap grapple bucket installation – Modern AG Grapple User Manual
Page 10: Removing the tine or scrap grapple bucket
10 - Grapple
ASSemBly SeCTiON
ATTACHmeNT TO Prime mOver
Improper attachment of the Tine or Scrap Grapple
Bucket could result in injury or death. Do not operate
this product until you have positive indication that
the attachment is securely mounted.
1. position the attachment on a level surface.
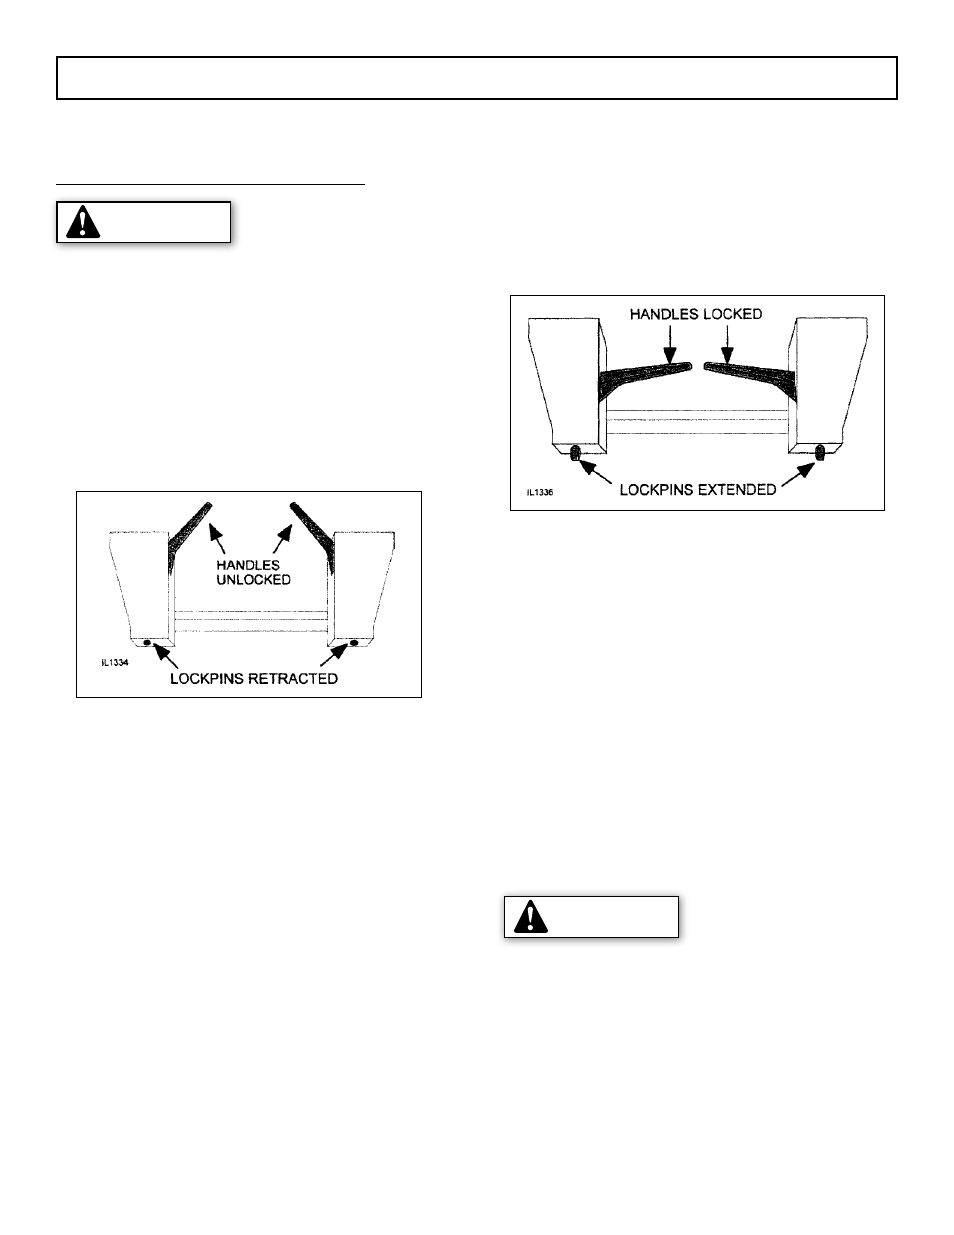
2. The quick attach coupler handles should be in
the unlocked position with lock pins retracted,
Figure 2.
Figure 2. Quick Attach Coupler Handles - Unlocked
3. Enter the prime mover. Fasten seat belt, start
engine. Disengage the parking brake.
4. Follow the attaching procedure in the prime mover
owner’s manual. Align the attachment mechanism
with the mounting on the grapple bucket, attach
to the prime mover or loader.
5 . Engage the parking brake and shut down the
prime mover. Be sure to relieve pressure to the
auxiliary hydraulic lines.
6.
Unfasten safety restraints and exit the prime
mover.
7. Make sure the hydraulic couplers are clean. Connect
the hydraulic lines to the prime mover. Twist the
collar of the quick couplers one-quarter turn to
secure hydraulic connections. If attachment unit is
being installed on a tractor loader, purchase proper
couplers and hoses as required and attach to the
loader as per the manufacturers instructions.
8.
Engage the latching mechanism to secure
attachment to loader. The lockpins must be
completely extended and secured into the retaining
slots provided on the attachment. Figure 3.
Figure 3. Attachment Coupler Handles - Locked
9. Re-enter the primer mover. Fasten seat belt and
re-start engine.
10. Carefully raise the loader and cycle the rollback/
tilt cylinders to check clearances and to ensure
that the attachment is securely mounted.
11.
Cycle the grapple clamp hydraulic cylinders
several times full stroke to work the air out of the
cylinders.
NOTE: When shipped, the hydraulic cylinder(s) on this
product contained air. Failure to remove all the air from
the hydraulic cylinder(s) can cause uneven, jerky cylinder
movement when the hydraulic controls are operated
and possibly allow unwanted cylinder movement when
those controls are not being operated.
Attachment coupler handles must always be rotated
to lOCK POSiTiON to prevent coupler latch from
disengaging and attachment from falling off.
WArNiNG
WArNiNG
10
11
INSTRUCTIONS
INSTRUCTIONS
(continued)
TINE OR SCRAP GRAPPLE BUCKET INSTALLATION
Attachment to Prime Mover
TINE OR SCRAP GRAPPLE BUCKET INSTALLATION
Attachment to Prime Mover - (continued)
3. Enter the prime mover. Fasten seatbelt, start engine. Disengage the parking brake.
4. Follow the attaching procedure in the prime mover owner's manual. Align the attachment mechanism with the
mounting on the grapple bucket, attach to the prime mover or loader.
5. Engage the parking brake and shut down the prime mover. Be sure to relieve pressure to the auxiliary hydraulic
lines.
6. Unfasten safety restraints and exit the prime mover.
7. Make sure the hydraulic couplers are clean. Connect the hydraulic lines to the prime mover. Twist the collar of the quick
couplers one-quarter turn to secure hydraulic connections. If attachment unit is being installed on a tractor loader,
purchase proper couplers and hoses as required and attach to the loader as per the manufacturers instructions.
8. Engage the latching mechanism to secure attachment to loader. The lockpins must be completely extended and
secured into the retaining slots provided on the attachment. Figure 3.
9. Re-enter the primer mover. Fasten seatbelt and re-start engine.
10.Carefully raise the loader and cycle the rollback/tilt cylinders to check clearances and to ensure that the attachment
is securely mounted.
11.Cycle the grapple clamp hydraulic cylinders several times full stroke to work the air out of the cylinders.
NOTICE: When shipped, the hydraulic cylinder(s) on this product contained air. Failure to remove all the air
from the hydraulic cylinder(s) can cause uneven, jerky cylinder movement when the hydraulic con-
trols are operated and possibly allow unwanted cylinder movement when those controls are not
being operated.
1. If possible, find a level solid location to place the attachment. This makes it easier to disconnect and to re-connect
later on.
2. Lower the attachment to the ground.
3. Engage the parking brake and shut down the prime mover. Be sure to relieve pressure to the auxiliary hydraulic
lines.
4. Unfasten safety restraints and exit prime mover.
5. Disconnect the attachment hydraulic lines from the prime mover. Connect quick couplers together to keep clean.
6. Disengage attachment-locking mechanism (mechanical type).
7. Enter prime mover, fasten safety restraints and start the prime mover.
8. Disengage attachment-locking mechanism (hydraulic type).
9. Disengage the parking brake, and back away from the attachment.
1. Position the attachment on a level surface.
2. The quick attach coupler handles should be in the unlocked position with lock pins retracted, Figure 2.
Figure 2. Quick Attach Coupler Handles - Unlocked
Improper attachment of the Tine or Scrap Grapple Bucket could result in injury or death. Do
not operate this product until you have positive indication that the attachment is securely
mounted.
WARNING!
Serious injury or death may result from disengaging the attachment when the attachment
is in an unstable position or carrying a load. Place the attachment in a stable position
before disengaging.
WARNING!
Hoses for the attachment must be disconnected before the quick attach is disengaged.
Pulling the attachment with the hoses could result in damage to the prime mover or the
attachment.
CAUTION
Attachment coupler handles must always be
rotated to LOCK POSITION to prevent coupler
latch from disengaging and attachment from
falling off.
WARNING!
Figure 3. Attachment Coupler Handles - Locked
REMOVING THE TINE OR SCRAP GRAPPLE BUCKET