Copernicus E3IN1 User Manual
Page 7
E3IN1 - Version A - Released 01January 2015 - Copernicus Educational Products Inc.
4
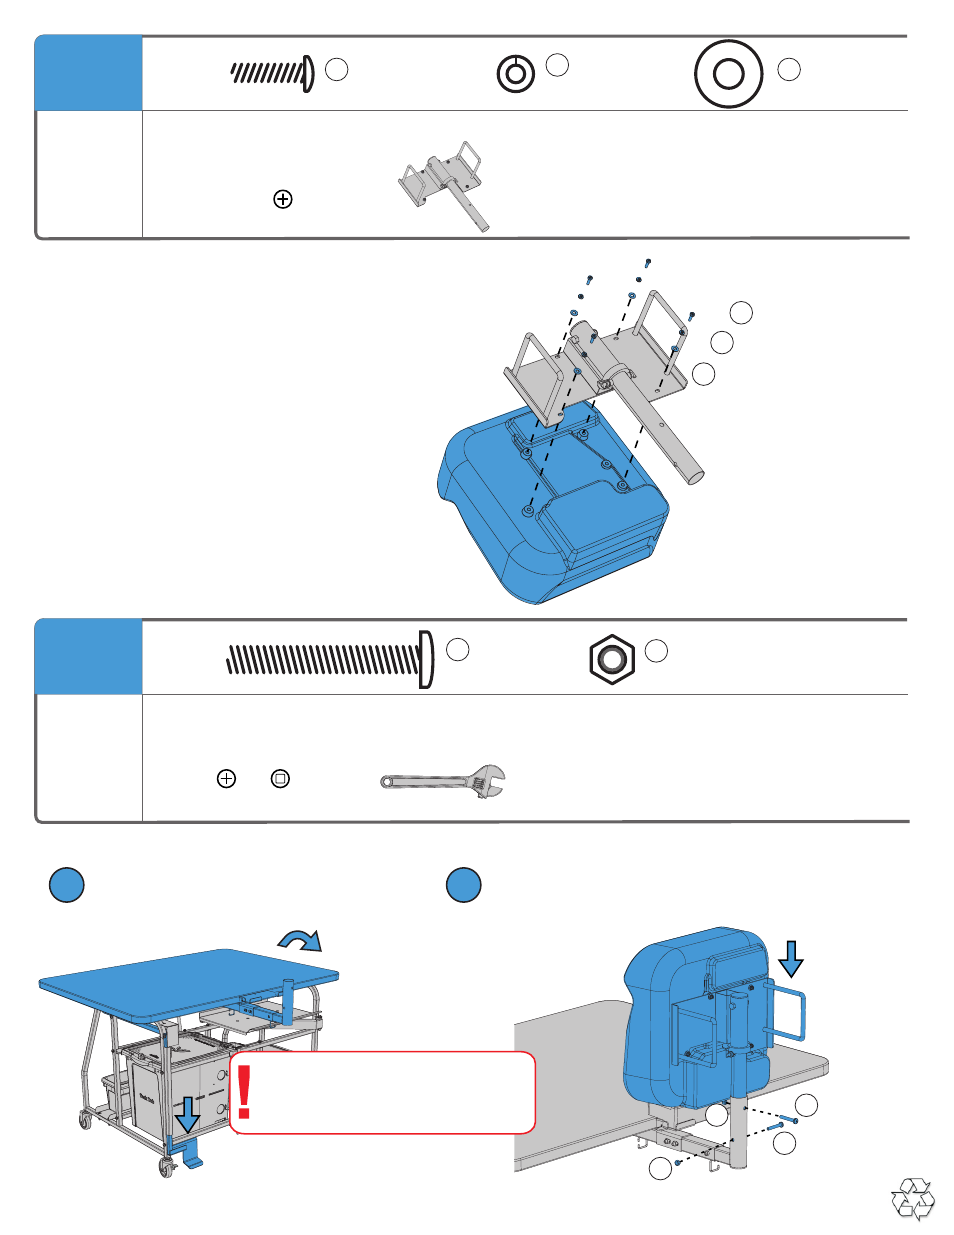
4x
Attach the projector to the Projector Mount
You will need:
(Not to Scale)
Actual Size:
5
Secure the Projector Mount to the Projector Arm on the Frame.
You will need:
(Not to Scale)
Actual Size:
Secure the Projector mount to Frame.
Tighten hardware.
Lay projector on a flat surface, then attach the
Projector Mount. Tighten hardware.
C
F
4x
E
4x
C
E
F
2x
B
D
2x
B
B
Screwdriver
Screwdriver
OR
Projector Mount
1x
D
D
1
2
First change unit from Easel mode
to Table mode.
Adjustable wrench
Hold Pedal down while changing
between Table and Easel Mode
until the transition is complete.
See also other documents in the category Copernicus Products for children:
- AC401 (1 page)
- AUD1 (9 pages)
- AUD5 (13 pages)
- BC300 (1 page)
- BTHC1 (9 pages)
- BTHC2 (11 pages)
- CD400 (1 page)
- DCS1 (12 pages)
- DCS2A (14 pages)
- ELS1 (3 pages)
- GR220 (2 pages)
- IPT102 (14 pages)
- IR400 (51 pages)
- IS2 (16 pages)
- IS602 (40 pages)
- LLS300 (19 pages)
- LW430 (5 pages)
- PDR11 (12 pages)
- PDR20 (1 page)
- RC005 (7 pages)
- RC108 (4 pages)
- RC105 (11 pages)
- RC106 (9 pages)
- RC107 (11 pages)
- SOSE1 (15 pages)
- SRC1 (10 pages)
- STEM100 (18 pages)
- SWT (8 pages)
- TAG2 (19 pages)
- TD5000 (12 pages)
- TEC500 (13 pages)
- TEC500C (12 pages)
- TEC510 (17 pages)
- TEC520 (18 pages)
- TEC57 (8 pages)
- TEC700 (12 pages)
- TEC707 (14 pages)
- VBC5600 (2 pages)
- VE550 (2 pages)
- XS005 (4 pages)