CDI Torque COMPUTORQ II Electronic Torque Wrench User Manual
Page 4
OPERATING INSTRUcTIONS
•
TO SET A TARGET TORqUE VALUE:
1. Press Button #4 (set-up) three times.
The first zero (0) on the digital display will blink.
2. To set a nominal target value into wrench memory,
press Button #2 (store/send). As this button is
repeatedly pressed, numbers zero through nine (0-9)
will be displayed.
3. When the correct number is displayed on the first
digit, press Button #4 (setup). This will “hold” that
number and cause the second digit to blink.
4. Again, press button #2 (store/send) until the value
desired is displayed (0-9).
5. Press Button #4 (set-up) to “hold” this value and
cause the third digit to blink.
6. Continue the same steps above to set the values for
the third and fourth digits.
7. After pressing Button #4 (set-up) on the last digit, the
decimal point will be blinking. This “point” can be
placed in three different locations by pressing Button
#2 (store/send). Press Button #4 (set-up) when the
decimal point is in the desired location.
•
TO SET PERCENTAGES OF TOLERANCES:
1. Press Button #4 (set up), until the first
digit of two in the upper right corner is
blinking.
2. This will be the first of two digits in the (+) maximum
tolerance percentage. Again, as before, press Button
#2 (store/send) until the first digit is set at the
FlASHING desired value. Press Button #4 (set-up)
to accept this value and move to the next blinking
number.
3. Repeat the above procedure for the
second digit. When the desired digit is
displayed, press Button #4 (set-up). The
maximum tolerance is now entered.
4. The first digit of the (-) minimum tolerance should
be flashing. Press Button #2 (store/send) to scroll
through numbers (0-9). Press Button #4 (set-up) to
accept this value and move to the second flashing
digit. Press Button #2 (store/send) to scroll through
numbers (0-9) until the second desired number is
displayed.
NOTE:
Review the entire LCD at this time.
If everything is as desired, press Button #3
OPERATING INSTRUcTIONS
(recall) to accept
all parameters into wrench memory.
These parameters will remain in memory until they are
changed.
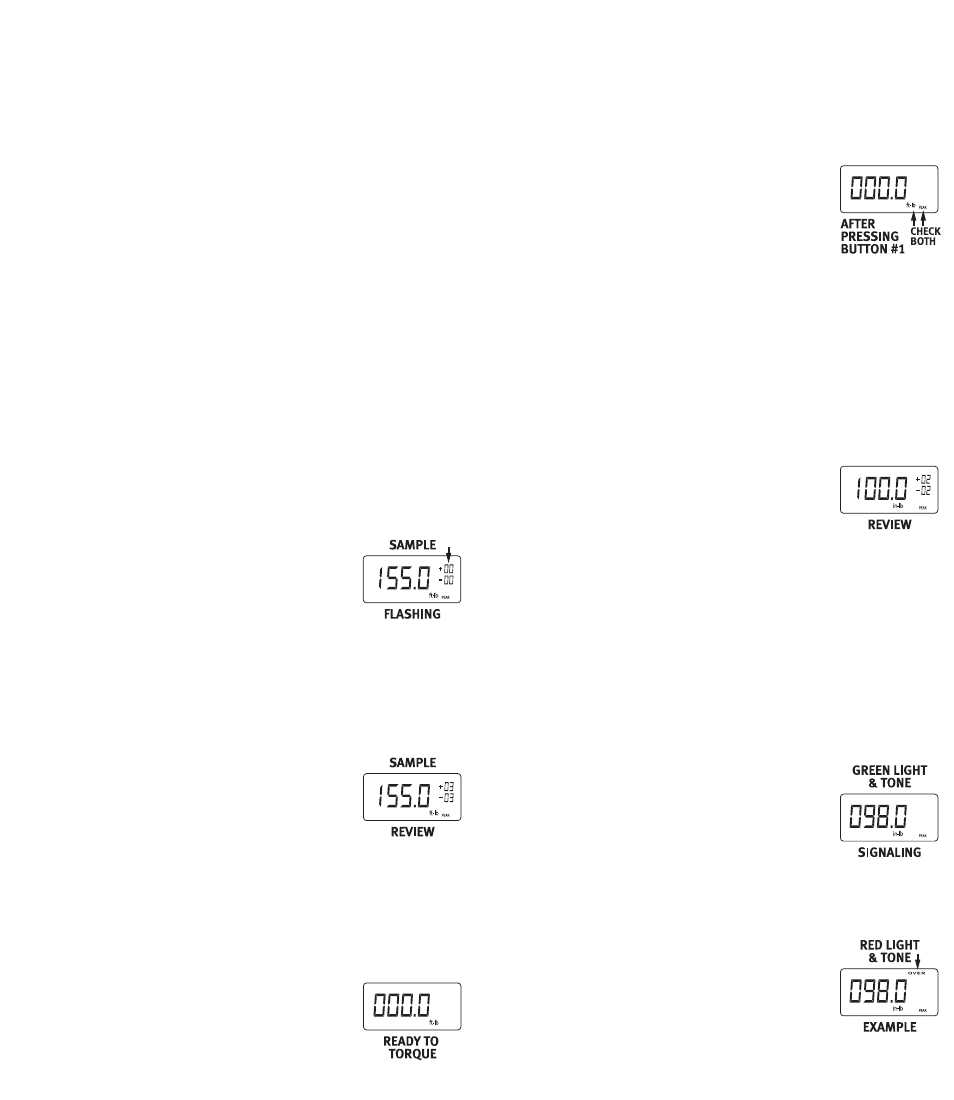
EXAMPLE SET-UP
To set a 250 in.lb. Computorq II to a
nominal “target” value of 100 in.lbs. +/-2%
the following steps would be necessary:
1. Press Button #1 to turn the wrench “on”
( check to see if “peak” is active
2. Press Button #4 twice and verify if the active torque
units are in in. lbs.
3. Press Button #4 one more time to activate the first
blinking “0”.
4. Press Button #2 until the number “1” is displayed.
5. Press Button #4 five times to scroll through the three
remaining zeros and the decimal point placement.
6. Press Button # 4 one more time to scroll through
the first zero of the (+) maximum
percentage. The second digit should be
blinking.
7. Press Button #2 until the number “2” is
displayed on the second digit.
8. Press Button #4 twice to the second digit of the (-)
minimum percentage.
9. Press Button #2 until the number ‘2” is displayed on
the second digit.
* Review Entire LCD at this time.
10. Press Button #3 to place all above parameters into
memory of wrench.
PLEASE NOTE: The wrench will sound an audible signal
and a green light will flash when the
applied torque to the wrench reaches the
lower acceptable torque limit of 98 in.lbs.
(100 in.lbs. - 2%). The green light and
audible tone will continue until the torque
value reaches the maximum preset limit of 102 in.lbs.
(100 in.lbs. RED LIGHT + 2%). The red & green lights
will flash and intermittent tones will sound if the &
TONE torque value exceeds the maximum
percentage allowed. Loud audible tones
and flashing lights will continue even
when an over torque (of the range of the
wrench) condition occurs. The display
will then show “OVER” in small letters in the extreme
000.0
171.5
000.0
171.5
000.0
171.5
000.0
171.5
000.0
171.5
000.0
171.5
000.0
171.5