O.o.o.o, Key pad functions, Operating instructions – CDI Torque COMPUTORQ II Electronic Torque Wrench User Manual
Page 3: Ooo.o o, Ooo.o 2
1
CLEAR
ZERO
dNm cmkg in-oz in-lb ft-lb
LO BAT
TRACK
PEAK
RECALL
SETUP
AUTO POWER OFF
STORE
SEND
2
3
4
COMPUTORQ II
OVER
o.o.o.o
000
000
6.00’
6.00’
6.00’
1
o.o.o.o
1
CLEAR
ZERO
STORE
SEND
2
RECALL
SETUP
3
4
STORE
SEND
2
RECALL
SETUP
3
4
TRACK
ooo.o
o
TRACK
2.ooo
TRACK
ooo.o
2
2”
BATTERY
BATTERY
OFF ON
0 0 0 1
LINE FEED
CARRIAGE
RETURN
UNITS
BLANK
VALUE
SIGN
BLANK
SEQUENCE #
1 2 3 , 4 5
I N - L B
CR LF
+
A
B
C
D
E
F
G
H
I
J
K
L
M
N
O
P
Q
R
S
T
U
V
INSTRUCTIONS LEGEND
LIGHT ON
BUZZER SOUNDS
INPUTTING THE LENGTH OF THE ADAPTOR
ACCEPTED
GO BACK TO MAIN MENU
CENTER OF SQUARE DRIVE TO
CENTER OF THE OPEN END.
BOX END OR FLARE NUT DRIVES
PRESS
PRESS + HOLD
UNITL
BUZZER SOUNDS
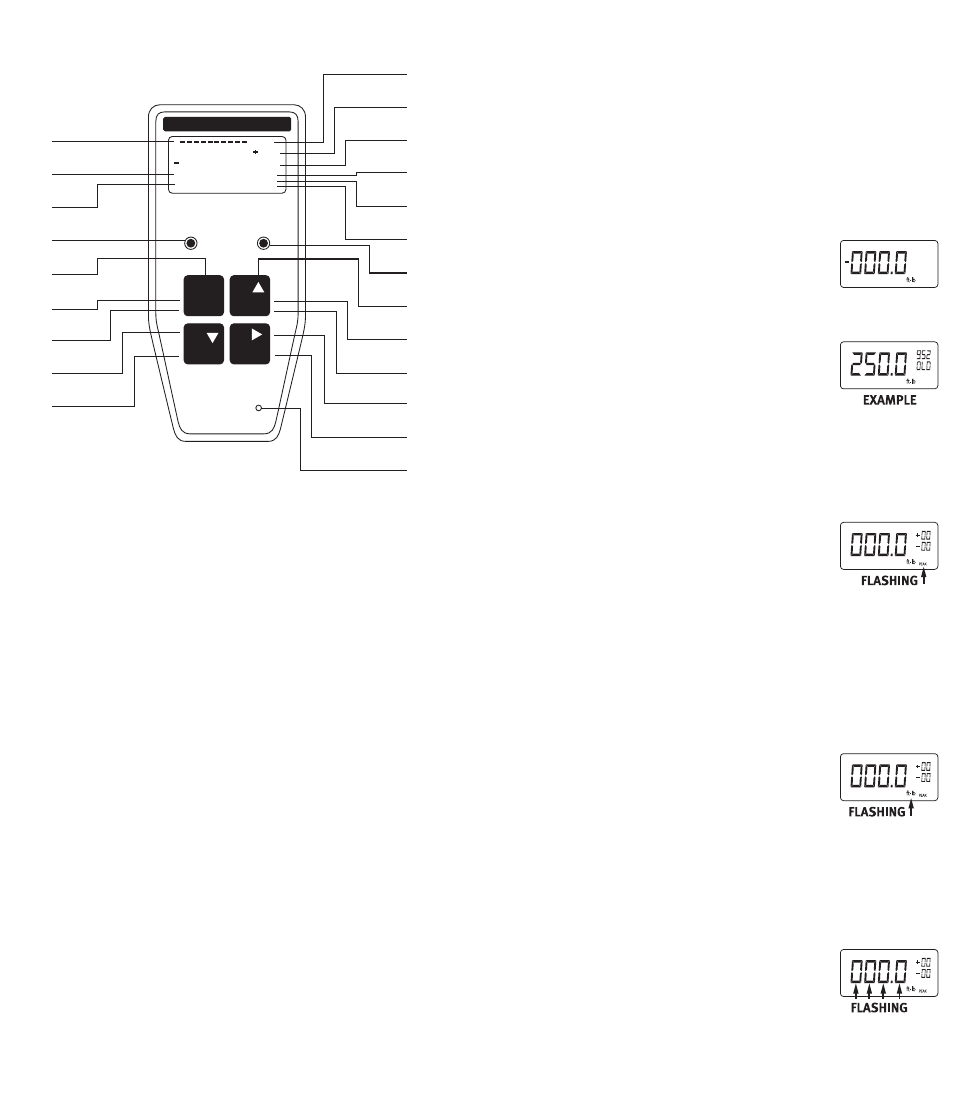
kEY PAd FUNcTIONS
ANALOG BAR GRAPH
SUPER TWIST LIqUID CRYSTAL DISPLAY
7 TORQUE UNITS (Ft.Lb., In.Lb., In.Oz., Nm, dNm,
MKG, CmKG
GREEN “GO” LIMIT LED
POWER ON/OFF
CLEAR LCD DISPLAY
ZERO TARE
ENTER (ACCEPT INFORMATION)
RECALL TORqUE DATA STORED IN MEMORY
OVER TORqUE “WARNING”
SPECIFIC TORqUE NUMBER IN MEMORY BEING
RECALLED AND SHOWN ON LCD
NUMBER OF TORqUE VALUES IN MEMORY
LOW BATTERY INDICATION
TRACK MODE
PEAK HOLD MODE
RED “OVER TORqUE” LIMIT LED
SCROLL UP (INCREASE VALUE DURING SET-UP)
STORE DATA TO WRENCH
SEND DATA TO COMPUTER/DATA LOGGER/
PRINTER
SHIFT TO NEXT FLASHING DIGIT (DURING SET-UP)
SET-UP PARAMETERS
(TOLERANCE LIMIT/TORqUE UNIT)
AUDIO BUZZER
OPERATING INSTRUcTIONS
Please Note: There is an “off-on” slide switch located on
the right side of the wrench The wrench is shipped from
the factoiy with the switch in the “off” position. Before
use, slide the switch up or “on” Place the switch in the
“off” position only if the wrench is to be stored or not
used for a period of time. Otherwise, leave the switch in
the “on” position.
ELECTRONIC WRENCH SETUP
•
TO TURN WRENCH “ON”
Press Button #1 (on/off).
Slide battery selector switch “Up” (on) or press Button
#1 (on/off) if slide switch is already in
the “Up” position.
The red and green lights will flash.
Zeros will flash and then be displayed on
the LCD along with the unit of torque measure.
The wrench is ready to use.
NOTE: If button #1 is pressed
and held when first
turning the wrench “on”, the torque range capacity
and current software version of program will be
displayed. When first turning the wrench
on (sliding the switch “up”), the LCD will
flash “data good” then flash all zeros.
•
TO CHANGE MODE OF OPERATION: “TRACK” OR
“PEAK”
1. Press Button #4 (set-up) one time.
Either “Track” or “Peak” will be flashing.
2. To change the mode, press Button #2 (store/send).
Continued pressing of Button #2 (store/send) will
toggle between “Track” and “Peak”
3. Press Button #3 (recall) to accept the
desired “flashing” mode change into
wrench memory.
• TO CHANGE UNIT OF TORQUE MEASURE: In.lb., In.oz.,
NM, dNM, MKG, CmKG, ft.lb.
1. Press Button #4 (set-up) two times.
The unit of measure will flash on the display.
2. To change the unit of measure, press
Button #2 (store/send). Continue
pressing Button #2 (store/send) until
the unit of measure desired is blinking
on the LCD.
3. Press Button #3 (recall) to accept this change into the
wrench memory.
000.0
171.5
000.0
171.5
000.0
171.5
000.0
171.5
000.0
171.5
A
B
C
D
E
F
G
H
I
J
K
L
M
N
O
P
q
R
S
T
U
V