Alumax L-CSSY User Manual
Page 6
INSTALLATION MANUAL
6
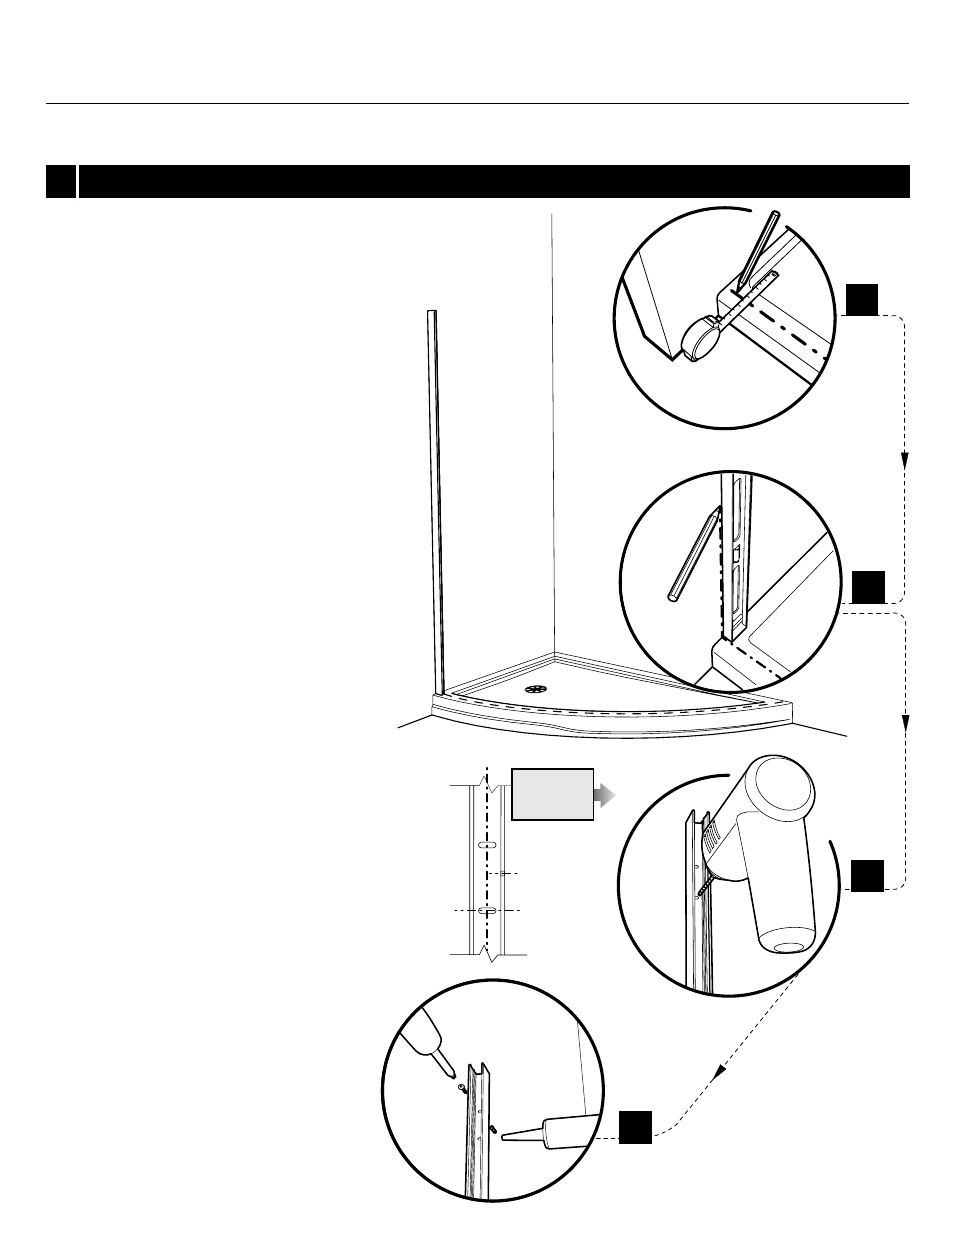
FIXED PANEL INSTALLATION
1a.
Using a measuring tape, mark the center of the
threshold of the base.
1b.
Using the marking established in the previous step,
run a second line up the wall. Use a level to ensure
verticality of this line.
1c.
Place the wall jamb onto the wall while ensuring
that the wall jamb slotted holes are centered to the
center line. The side holes of the wall jamb should
face the interior of the shower. Proceed to drilling,
using a Ø1/8˝ drill bit, through the wall using the wall
jamb slotted holes as reference.
1d.
Insert a drop of silicone into each hole made in the
previous step. Insert a wall plug into each hole and
from there the wall jamb can be repositioned and
permanently fastened using #8-1 1/4.
1
1a
1b
1d
1c
INTERIOR
SHOWER SIDE
- 300c (9 pages)
- 300cv (8 pages)
- 300d (9 pages)
- 338 (9 pages)
- 340 (9 pages)
- 340 Deluxe (9 pages)
- 390c Supplement (5 pages)
- 390cv Supplement (4 pages)
- 391 (12 pages)
- 392 (11 pages)
- 393 (11 pages)
- 394 (11 pages)
- 640S (8 pages)
- 640 (8 pages)
- 640D (7 pages)
- 641 Side Panel (6 pages)
- 694 (6 pages)
- 700c (7 pages)
- 733 (8 pages)
- 738 (8 pages)
- 738 Towel Bar (1 page)
- 740D (8 pages)
- 790c Supplement (4 pages)
- 791 (11 pages)
- 792 (12 pages)
- 793 (12 pages)
- 793 Buttress Supplement (1 page)
- 794 (11 pages)
- 794s (9 pages)
- 795 (10 pages)
- 890 (9 pages)
- 890c (8 pages)
- 1040 (9 pages)
- Deluxe Towel Bar (1 page)
- Transportation Latch (1 page)
- DesignLine Hinge (5 pages)
- P-DR1W-48-60 (14 pages)
- P-DR1W-72 (15 pages)
- P-DR1WT-60 (14 pages)
- P-DR2W-48-60-CRP (18 pages)
- P-DR2W-48-60-CW (19 pages)
- P-DR2W-72-CRP (19 pages)
- P-DR2W-72-CW (19 pages)
- P-DR3W-60 (32 pages)
- P-DRA1Y (16 pages)