Alumax 791 User Manual
Page 8
Page 7 of 10
G03711063
12-21-05
9
- 790 DOORS ONLY
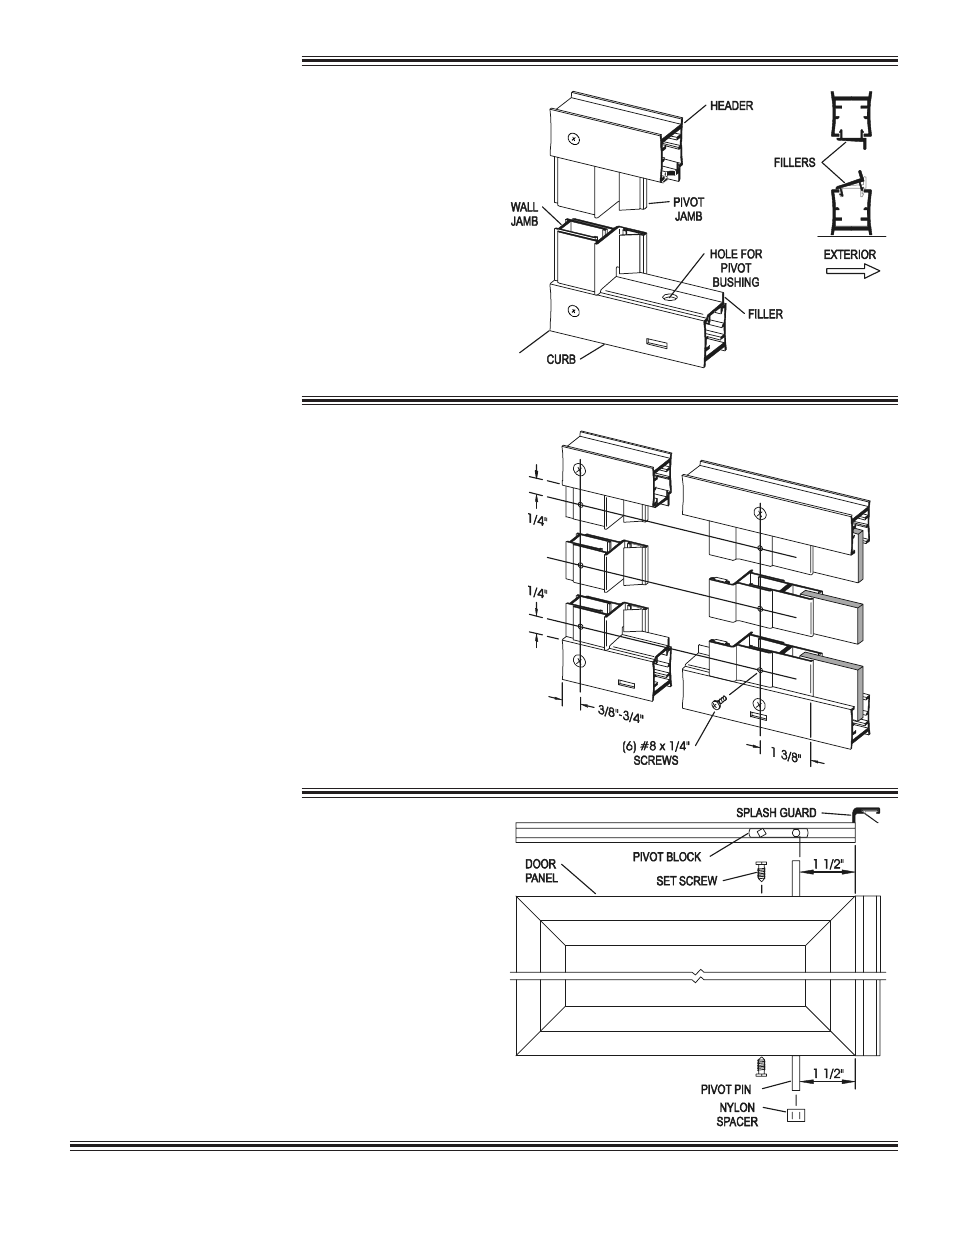
Snap the fillers [ P] into the curb [ A] and
header [ H] between the door jambs with the raised
lip to the exterior and the pivot holes toward the
pivot jamb. Center the curb filler in the curb
between the pivot and strike jamb (use masking
tape to hold in position).
NOTE: The snap-in fillers should be exactly 3/8"
longer than the door panel width.
10
- 790 DOORS ONLY
11
- 790 DOORS ONLY
Insert the two #10-24 x 7/16" square head
set screws [ W] into the threaded holes in the pivot
blocks in the top and bottom rails of the glazed
door panel [ L]. Position the pivot pins 1 1/2" from
the pivot side of the door (the side opposite the
magnetic strip). Tighten the set screws just enough
to prevent the pivot blocks from moving (finger
tight plus a quarter turn). A 3/16" wrench (not
supplied by A
LUMAX
) will fit the set screw heads.
Press the white nylon spacer [ X] over the bottom
pivot pin on the door panel.
Pull the bottom end of the pivot jamb [
M
]
tight to the curb filler [
P
] and plumb the jamb.
Drill two 1/8" holes thru the pivot jamb and into
the wall jamb [ B] 3/8" to 3/4" from the wall and
approximately 1/4" vertically from the ends of the
jamb. Drill a third hole centered between the first
two and enlarge the outer holes with a 3/16" drill
for clearance on the self-tapping screws. Attach
the pivot jamb permanently with three #8 x 1/4"
truss head screws [ J].
Slide the header filler [ P] tight against the pivot
jamb. Push the strike jamb [
N
] tight against the
fillers top and bottom. With the pivot jamb plumb
and both fillers tight between the two door jambs,
the strike jamb also will be plumb and parallel to
the pivot jamb. Attach the strike jamb to the 180°
post [ G] in the same manner as the pivot jamb.