Alumax 341 Side Panel User Manual
Page 4
EPH-N00-06062
2-3-00
Page 4 of 6
4
6
Cut the inline panel vinyls [H
H
H
H
H] to the length of the
long edges of the inline glass panel [JJJJJ] and press them
onto the edges of the panel. Stand the panel upright on
the tub track [A
A
A
A
A] and press it into the mounted inline
panel rail [G
G
G
G
G]. Press the second panel rail over the other
edge of the glass panel and vinyl with the bottom of the
panel rail flush against the tub track.
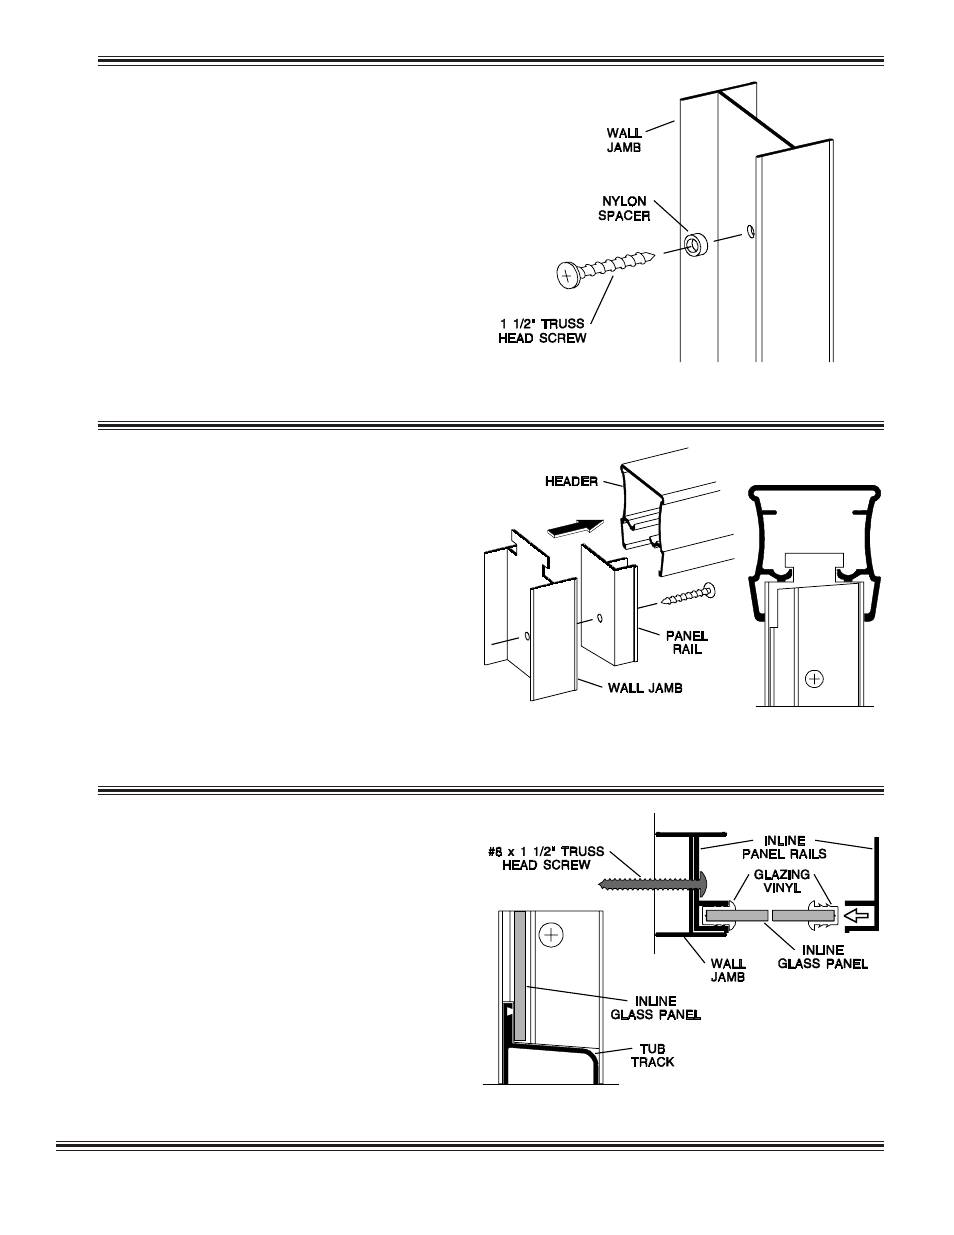
Place one of the wall jambs [B
B
B
B
B] against the wall
opposite the inline panel (the door opening side) and
attach with two #8 x 1 1/2" truss head screws [D
D
D
D
D]
inserted through the top and bottom holes. Slip a
nylon spacer [E
E
E
E
E] over a #8 x 1 1/2" truss head screw and
install in the center hole of the wall jamb. Check jamb
for plumb and tighten screws. Set a wall jamb into
place against the opposite wall and attach temporarily
with tape.
NOTE: Frameless units will use two jamb bumpers
per side located on the top and bottom mounting
screws.
NOTE: Do not overtighten the jamb screws.
Measure the wall-to-wall opening at the top of the
wall jambs [B
B
B
B
B] and cut the header [F
F
F
F
F] 1/16" short of this
dimension. Check the header for fit.
Slide the safety tee-lock of the second wall jamb into the
end of the header. The header is reversible so that either
face may be turned to the exterior of the unit. Holding
the header at an angle, engage the other end onto the
mounted wall jamb. Pivot the header into place, then
slide the loose wall jamb to the wall and press into
position on the tub track.
Set one of the inline panel rails [G
G
G
G
G] into the second wall
jamb with the pocket to the exterior. Attach the jamb
and inline rail to the wall per instructions in Step #4
#4
#4
#4
#4.
5