Lower drive belt, Upper drive belt, Battery service – Craftsman 247.27022 User Manual
Page 20: Safe handling
Attention! The text in this document has been recognized automatically. To view the original document, you can use the "Original mode".
3. Using a 1 /2” socket wrench, remove two self
tapping screws, lock washer and hex nut that hold
the deck belt cover to the deck. See Figure 17. For
this, you will have to work from the top left side of
the riding mower. Remove the belt cover.
4. Using a 9/16” wrench, loosen the hex nut on the
idler pulley. See Figure 17.
5. Remove belt from around deck pulley, idler pulley,
and the engine pulley.
6. Place the new belt around the deck pulley and the
engine pulley making sure that the belt is routed
inside the belt keepers. There are two belt keepers
under the grass catcher, one on the idler and the
other under the deck belt cover. See Figure 17.
7. Reinstall deck belt cover and secure with two each
of self-tapping screw, lock washer and hex nut.
NOTE: Belt keeper “A” must be mounted on the outside
of the belt
8. Make sure to align the belt keeper in line with the
frame. See Figure 17.
NOTE: An imaginary line between the belt keeper and
idler pulley should be parallel to frame. See Figure 17.
9. Replace the grass catcher and pivot the hood
assembly back.
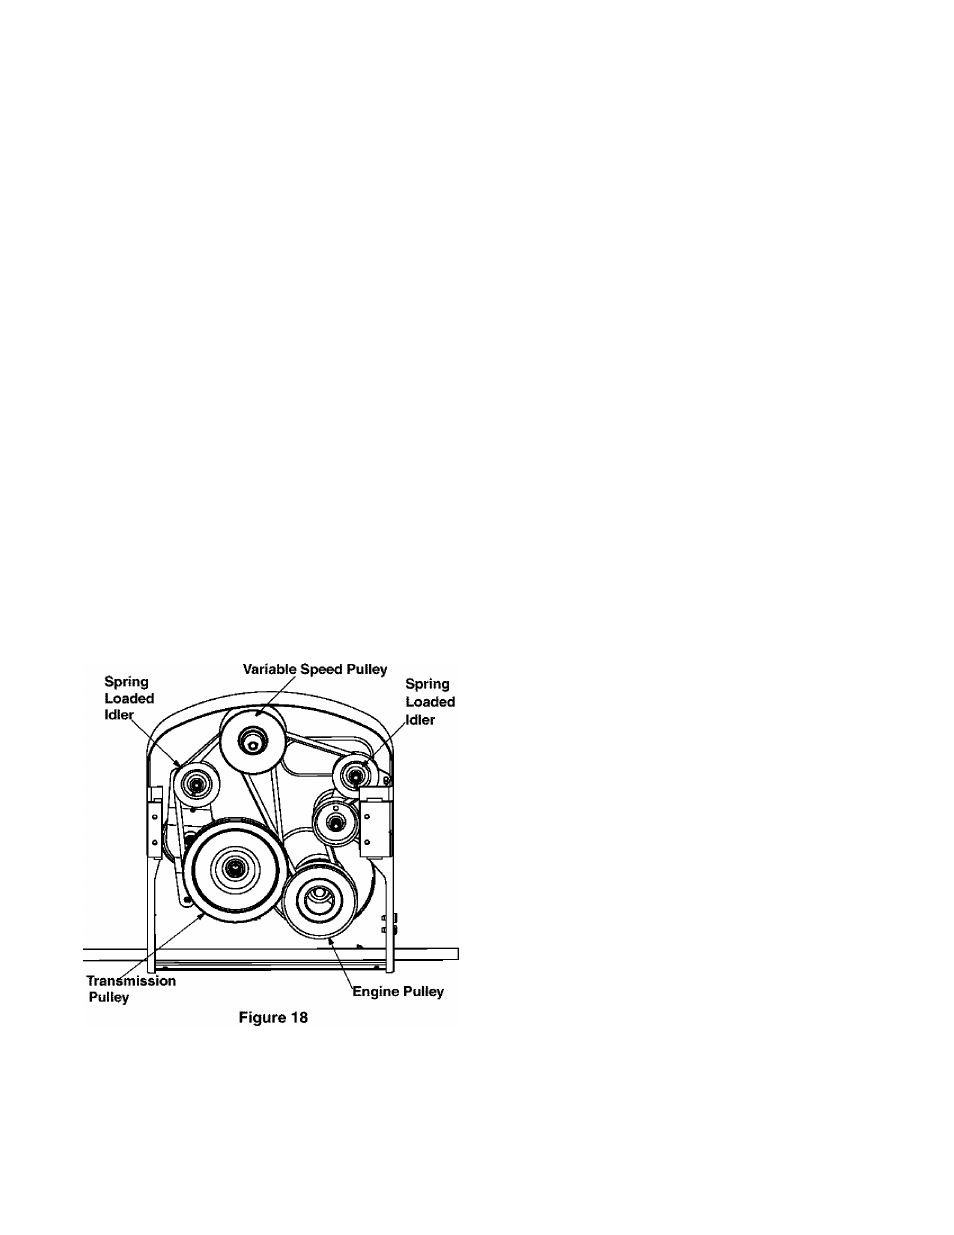
Lower Drive Belt
1. Remove the rear deck belt guard following first five
steps for deck belt removal. Remove belt from the
engine pulley. See Figure 18 .
2. Push the spring loaded idler, located on the left side
of the transmission, to the right. Remove belt from
around the idler and then the transmission pulley.
See Figure 18 .
3. Using a 9/16” socket, remove bolt, spacer and the
flat washer from the variable speed pulley.
4. Drop the pulley down and remove the belt.
5. Replace new belt and reassemble.
IMPORTANT:
Make sure that the belt is
routed inside of
belt keeper,
and the belt keeper is reassembled in the
same location from where it was removed.
Upper Drive Belt
1. Remove the engine pulley using a 5/8” socket
wrench with a 6” extension. The engine pulley is
located in front of the transmission.See Figure 18 .
2. Drop the engine pulley down and remove the belt
from around it.
3. Push the idler bracket to the right and remove the
belt. See Figure 18 .
4. Replace belt and reassemble.
Battery Service
The battery is located under the hood assembly. The
positive battery terminal is marked (+); the negative
battery terminal is marked (-).
Safe Handling
•
Shield eyes and protect skin and clothing when
handling battery acid (electrolyte) or a battery
containing acid.
•
Keep sparks, flame, cigarettes and other sources of
ignition away. Remember that battery contains
explosive gases.
•
Work in a well-ventilated area when filling
(activating), charging and using the battery.
WARNING: Do not short battery terminals
by making a connection between either two
battery posts or between the positive terminal,
marked + on the battery, and the riding mower
frame. Before installing battery, remove metal
bracelets, wristwatch bands, rings etc. from
your person.
Always keep the rubber boot positioned over the
positive terminal to prevent shorting.
Connect positive terminal first to prevent sparks
from accidental grounding.
Do not use the riding mower battery to start other
vehicles.
A
A
WARNING: Battery posts, terminals and
related accessories contain lead and lead
compounds. Wash hands after handling.
Always keep battery cables and terminals clean
and free of corrosive build-up.
After cleaning, apply a light coat of petroleum jelly
or grease to both terminals.
If removing the battery for any reason, disconnect
the NEGATIVE (black) wire from its terminal first,
followed by the POSITIVE (red) wire.
20