Connecting a vcr and tv with a, Cable box, For optimum picture quaiity) – Sony KV-32V26 User Manual
Page 9
Attention! The text in this document has been recognized automatically. To view the original document, you can use the "Original mode".
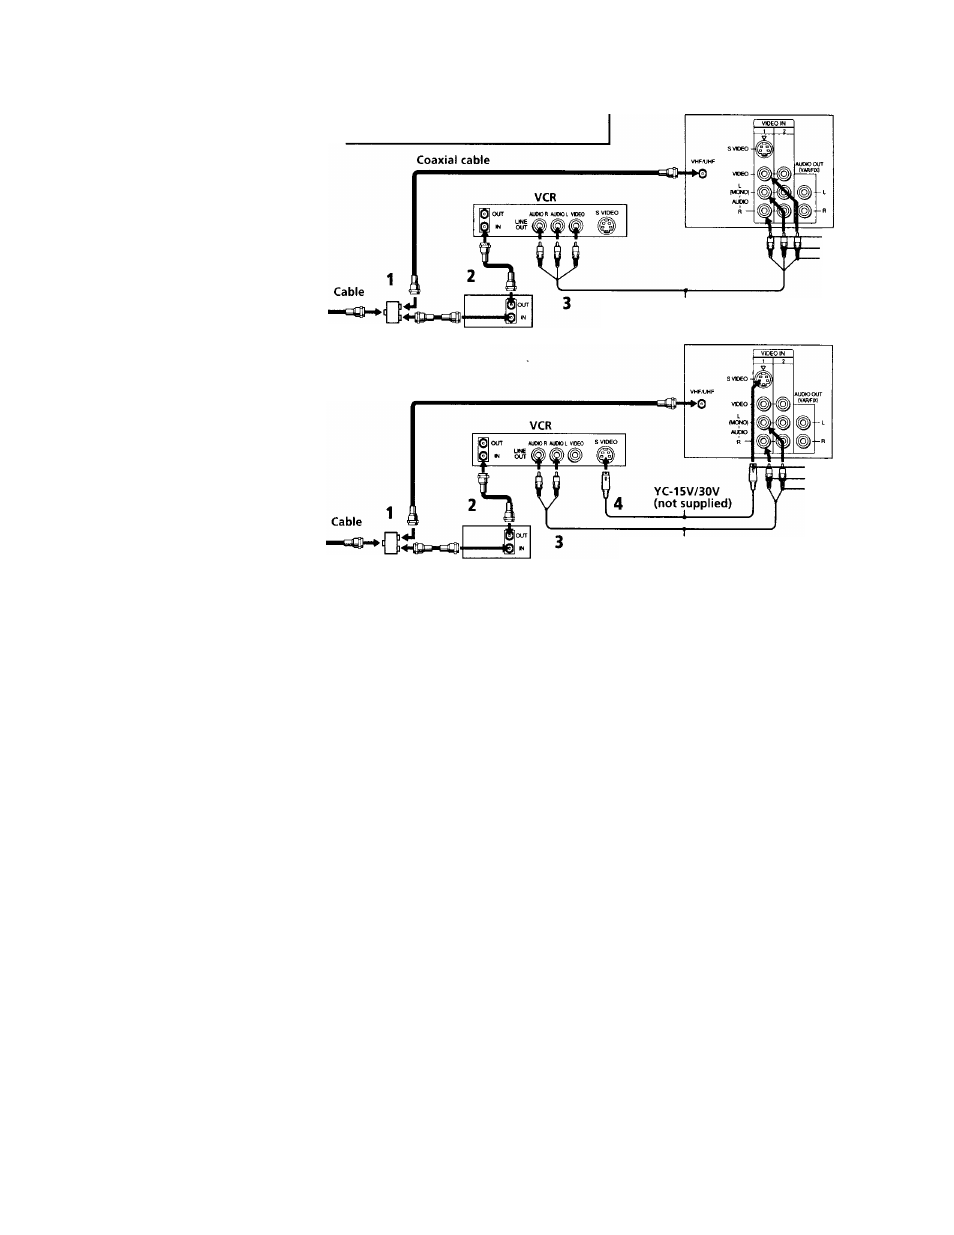
Connecting a VCR and TV with a
cable box
1 Connect the single (input) jack of the
Splitter to your incoming cable connection,
and connect the other two (output) jacks
(using coaxial cable) to IN on your cable
box and VHF/UHF on your TV.
2
Using a coaxial connector, connect OUT
on your cable box to IN on your VCR.
3
Using AUDIO/VIDEO connectors,
connect AUDIO and VIDEO OUT on your
VCR to AUDIO and VIDEO IN on your
TV (Yellow-VIDEO, White-AUDIO Left,
Red-AUDIO Right).
ConnectingJo an S Video equipped
VCR with a cable box
(for optimum picture quaiity)
1-2
Perform as described above.
3
Using AUDIO connectors, connect AUDIO
OUT on your VCR to AUDIO IN on your TV
(White-AUDIO Left, Red-AUDIO Right).
4
Using an S VIDEO connector, connect S VIDEO
on your VCR to S VIDEO on your TV.
Note:
• To view scrambled channels through your
cable box, select VIDEO 1 by pressing TV/
VIDEO on the remote control.
VCR must be connected and turned on to operate PIP
(KV-27S26, 27V26, 29RS26, 29RS26C, 29V66M.32S26,
32TW26, 32V26, 34RS26C, 35526, 37R526 only).
Disconnect all power sources before making any connections.
(Rear of TV)
AUDIO-R (red)
AUDIO-L (white)
VIDEO (yellow)
Splitter
(not supplied)
Cable box
VMC-810S/820S (not supplied)
(Rear of TV)
Coaxial cable
S VIDEO
AUDIO-R (red)
AUDIO-L (white)
RK-74A (not supplied)
Splitter
(not supplied)
Cable box