Tools needed to install the antenna, Assembling the antenna, Mounting the antenna on the mast or pole – Sony SAT-A3 User Manual
Page 108: Tools and materials needed to install the cables, Connecting the antenna to the grounding block, Aiming the antenna, Installing ttia antenih, Installing the cabfes
Attention! The text in this document has been recognized automatically. To view the original document, you can use the "Original mode".
Installing ttia AnteniH
.
u.
This section contains instmctions fotUnstalling the antenna. There
are two procedures you need to complete:
□
Assembling the Antenna
□
Mounting the Antenna on the Mast or Pole
Tools needed to install the antenna:
Phillips screwdriver
Assembling the Antenna
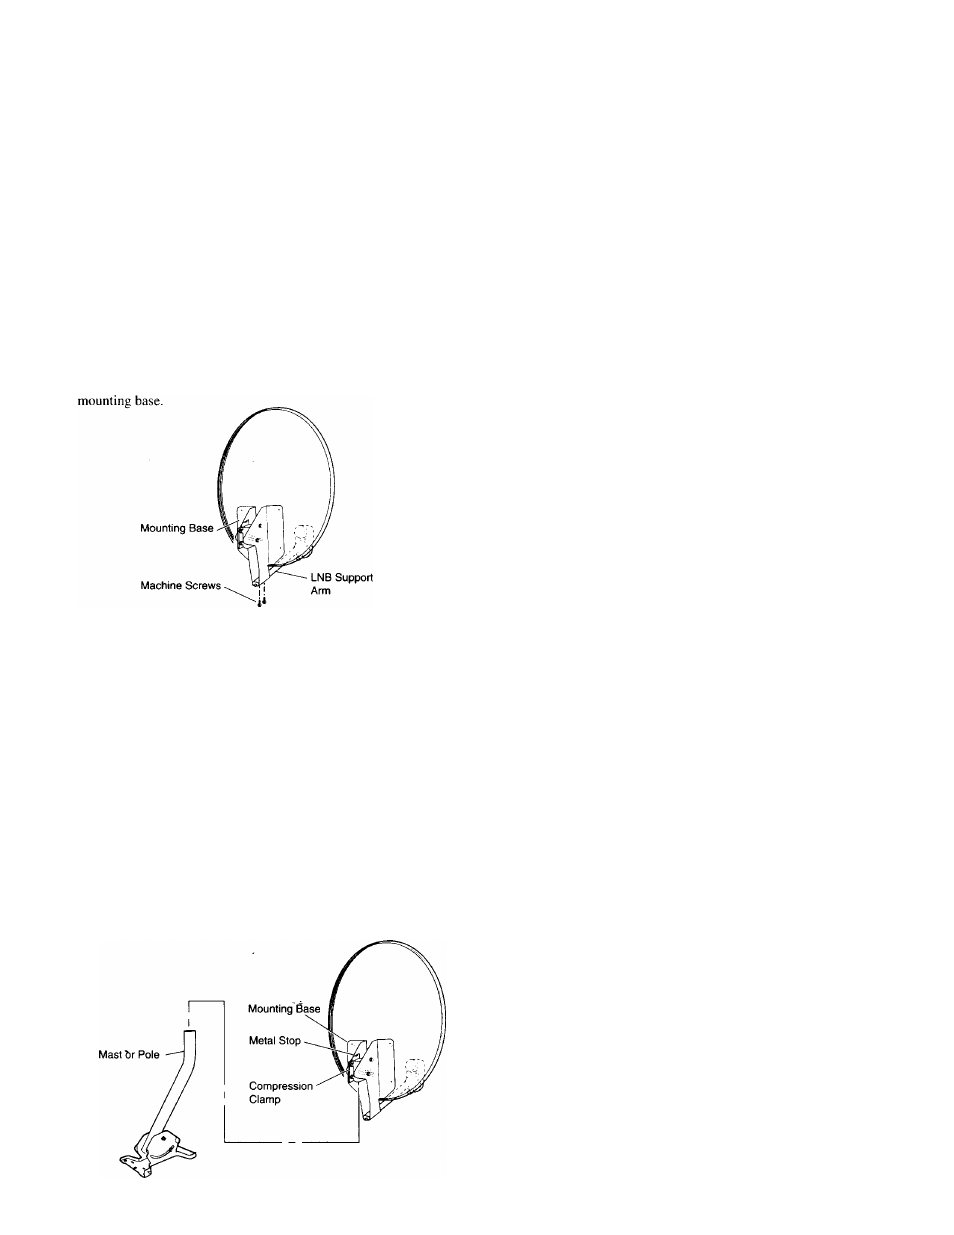
Assemble the antenna by bolting the LNB support arm onto the
1
Place the end of the LNB support arrti into the bottom of the
mounting base. Line up one tab on the mounting base with the
notch on the end of the support arm and insert the other tab
into the oblong hole in the support arm. The two screw holes
should now be aligned.
2
Screw the two machine screws thru the mounting base and
into the LNB support arm. Tighten evenly (torque 36-45 lb-
in). Do not overtighten.
The antenna is assembled and is now ready to be mounted on the
mast or pole you installed earlier.
Mounting the Antenna on the Mast or
Pole
Mount the antenna by attaching the compression clamp on the
antenna mount to the mast or pole.
1
Loosen the two screws that hold the compression clamp closed.
2
Lower the antenna onto the mast or pole until it rests against
the metal stops.
Note
•
To mount the antenna below the top of a metal pole, the metal stops
must be removed with pliers. Make sure the antenna tilts freely
before securing the holts.
3
Tighten the two clamp screws evenly. Do not over tighten
because they will need to be loosened when you aim the
antenna.
The antenna is now in place and is ready to have cables attached.
Follow the instructions in the next section to install the cables.
Installing the Cabfes
This section contains instructions for installing RG-6 coaxial
cables which connect the antenna to the receiver. There are two
procedures you need to complete:
□
Connecting the Antenna to the Grounding Block
□
Connecting the Grounding Block to the Receiver
Tools and materials needed to install the cables:
Cable clips (8)
Cable ties (4) 11"
Drill bit (Vs")
* Grounding block
Phillips screwdriver
Power drill
* RG-6 Solid BC coaxial cables (25 ft., 75 ft.)
* Silicon sealant (1 oz.)
* Included in the Installation Kit.
Connecting the Antenna to the Grounding
Block
The antenna is connected to the receiver with two RG-6 coaxial
cables. The first RG-6 coaxial cabfe you install connects the
antenna to the grounding block at the side of your house.
Notes
•
RG-6 Solid BC coaxial cable must be used. Other cables may not
only reduce signal quality and signal strength, but may not work.
•
Attach separate RG-6 Solid BC coaxial cables to both LNB
connectors if you installed the SAN-I8D2 satellite antenna.
1
Attach an RG-6 coaxial cable with a weatherproof rubber boot
to the LNB (torque 18 lb-in). For additional protection against
water seepage, apply silicone sealant to the top and bottom
edges of the weatherboot after the weatherboot is snugly
placed against the LNB.
2
Secure the RG-6 Solid BC coaxial cable to the LNB support
arm with the snap-in cable guide. Attach the guide to the RG-6
coaxial cable opposite the hole on the LNB support arm.
14