Instruction manual – SOLIS Comfort Line Plus User Manual
Page 8
14
15
Installation
The installation must be carried out by a qualified specialist.
1. Drill two holes 6 mm in diameter 140 mm apart (see picture 2). Insert rawlplugs into the holes and
fix the hanger to the bottom hole with a screw. Then hang the bracket up and secure with a screw
in the top hole.
2. Remove front cover (3) (see picture 3).
3. Electrical connection:
Connection to the mains: attach the mains connection to the connector strip (1) and clamp it down
with a wire clamp (see picture 4).
When flush-mounted: open up the base as intended (2) and connect power supply (230/240V) to
the connector strip (1) (see picture 4).
4. Check the installation diagram and make sure the panel and front cover are secure.
5. Turn on power and master switch.
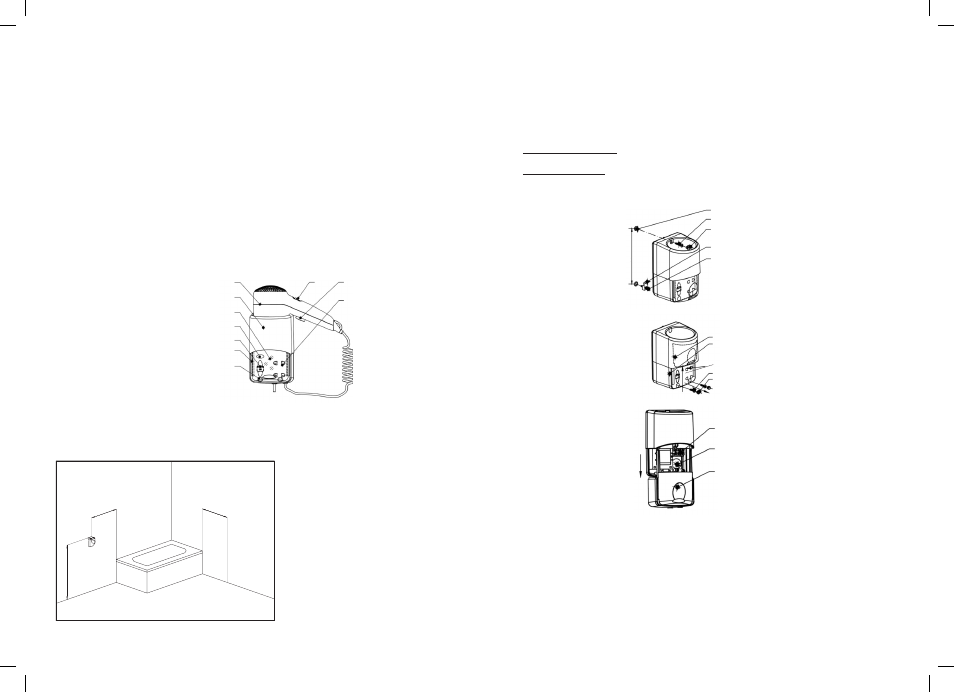
Pic. 2
1. Rawlplug
2. Screw
3. Cover panel
4. Hanger
5. Screw
Pic. 3
1. Transparent front cover
2. Panel
3. Front panel
4. Screw 2
5. Cover plate
Pic. 4
1. Clamp
2. Wire entry opening
3. Holder top section
How to use
Switch on the power and remove the dryer from the holder. The dryer will work when the power button
(9) is pushed in. Move heat setting button (10) up or down to alter the heat setting. If the unit is not
being used for a long period of time, switch off the master power switch to disconnect it from the mains.
How to use the electric razor outlets
Lift up the transparent front cover. The electric razor outlets can only be used if the main power switch
is switched on. Pull down the panel in order to turn off the power if the outlet is not being used.
INSTRUCTION MANUAL
Thank you very much for purchasing our product, which will bring convenience and pleasure
to you in the future.
This wall-mounted blow dryer can be used for drying hair or skin. There are two outlets for an electric
razor (120V/240V) and a master power switch contained in the wall unit. With its smart combination of
style and the latest technology, it is the ideal choice for hair drying at home or at a hotel.
Features
• Master switch allowing the unit to be completely switched off when not in use
• Two heat settings
• Turn the unit on and off with ease by pushing in or releasing the power switch.
• The electric razor outlets should only be used when the front panel is closed.
Components
Pic. 1
1. Hair dryer
2. Holder
3. Transparent front cover
4. Indication light
5. Main power switch
6. Micro switch
7. Cover plate
8. Electric razor outlet
9. Power button
10. Heat setting button
Positioning diagram
Warning: do not install this unit above a shower basin or near any bathroom fittings. Check that your
installation matches the following diagram.
min. 6
0 cm
min. 6
0 cm
ca
. 1
3
0 c
m
9
8
10
1
2
3
4
5
6
7
Pic. 1
1
2
3
4
5
14
0 m
m
Pic. 3
Pic. 2
1
2
3
Pic. 4
1
2
4
5
3
Solis_ComfortLinePlus_Betriebsanleitung.indd 14-15
25.09.09 18:10