For your safety, read before lighting, Lighting instructions, Match lighting – CFM UVHK31MP User Manual
Page 13
13
20008056
For Your Safety, Read Before Lighting
WARNING: If you do not follow these instructions exactly, a fire or explosion may result causing property damage,
personal injury or loss of life.
A. This appliance has a pilot which must be lighted by hand.
When lighting the pilot, follow these instructions exactly.
B. BEFORE OPERATION smell all around the appliance
area for gas. Be sure to smell
next to the floor because some
gas is heavier than air and will
settle on the floor.
WHAT TO DO IF YOU SMELL
GAS:
•
Do not try to light any appliance.
•
Do not touch any electrical switch;
do not use any telephone in your building.
•
Immediately call your gas supplier from a neighbor’s tele-
phone.
•
Follow the gas supplier’s instructions.
•
If you cannot reach your gas supplier, call the fire depart-
ment.
C. Use only your hand to push in
or turn the gas control knob.
Never use tools. If the knob
will not push in or turn by hand,
don’t try to repair it. Call a
qualified service technician.
Force or attempted repair may
cause a fire or an explosion.
D. Do not use this appliance if
any part of it has been under
water. Immediately call a
qualified service technician to
inspect the appliance and to
replace any part of the control system or gas control which
has been under water.
T118
Lighting Instr
Piezo
10/28/03 djt
Piezo
Fig. 6
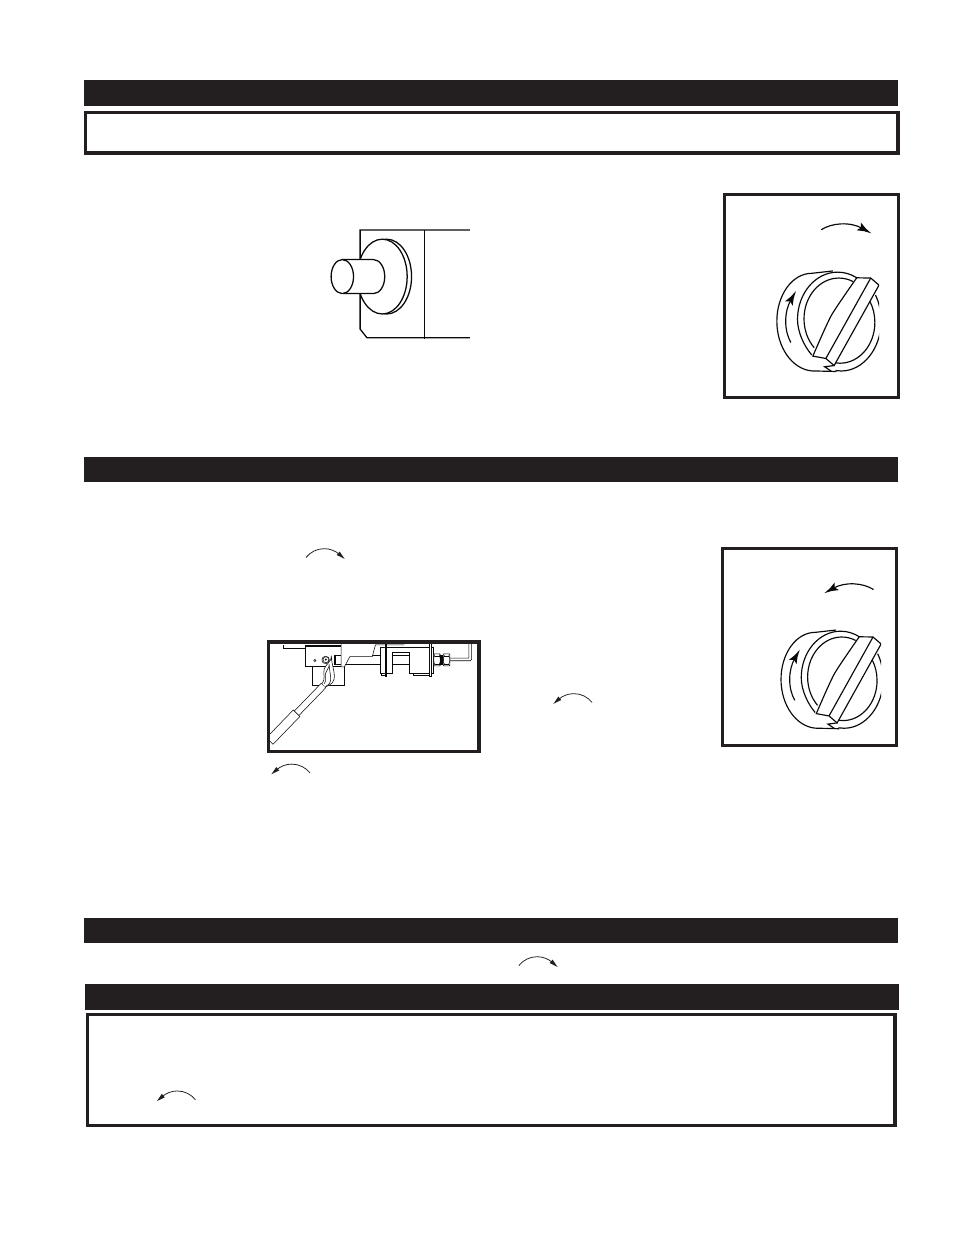
To Turn OFF Gas to Appliance
Depress the control knob slightly and turn it clockwise
to the OFF position. Refer to Figure 7.
1/IGN
2
3
4
Off
T127
Manual knob
10/29/03 djt
Clockwise
Fig. 7
Lighting Instructions
1. STOP! Read the safety information above before proceed-
ing.
2. Refer to Figure 7. To turn off the gas supply, depress the
knob slightly and turn clockwise
to the OFF position.
3. Wait five (5) minutes to clear out any gas. Then smell for
gas, including near the floor. If you smell gas, STOP! Fol-
low “B” in the safety information above. If you don’t smell
gas, go to the next step.
4. Refer to Figure 8.
Locate the pilot. It is at
the right of the front main
burner next to the control
knob.
5. Refer to Figure 9.
Push in the control knob
and turn counterclockwise
to the 1/IGN position.
Hold the control knob in for a few seconds.
6. While still holding in the control knob, press the ignitor push-
button several times. This will cause a spark at the pilot
which will ignite the pilot gas.
7. Hold the control knob for 20 seconds to prevent the flame
failure detector from shutting off the gas while its probe is
warming up.
8. Release the control knob.
•
If the knob does not pop up when released, stop and im-
mediately call your service
technician.
•
If the pilot will not stay lit after
several tries, turn the gas
control knob to OFF and call
your service technician or gas
supplier.
9. When the pilot remains lit, turn
the control knob counterclock-
wise
to the setting you
prefer.
10. Refer to the table on Page 5
for setting positions.
11. This appliance is fitted with a transient pilot burner for the
sole purpose of safe, momentary ignition of the main burner
in conjunction with the piezo ignitor. When in operation with
the main burner, it contributes to the base heat release and
is turned off by turning the control knob to the OFF position.
12. The control knob should not be left at the ignition setting
after the pilot has been ignited.
1/IGN
2
3
4
Off
T127
Manual knob
10/29/03 djt
Counterclockwise
Fig. 9
T129
manual lighting
10/29/03 djt
Fig. 8
Match Lighting
If the pilot cannot be ignited with the piezo, it can be manually
lit with the use of a match and lighter rod.
1. Place the match in the holder and light. With the right
hand, depress and turn the control knob counterclock-
wise
(Fig. 9) to the “IGN” position. Hold in for 20
seconds.
2. Take the lighter rod and lighted match and ignite the pilot
.(Fig. 8)
3. Continue to hold the control knob for an additional 20 sec-
onds to ensure pilot is maintained.
4. Proceed with Step 8 in Lighting Instructions.