Replacement parts, Installation, Trouble - shooting – Kraus KEF-14606CH User Manual
Page 2
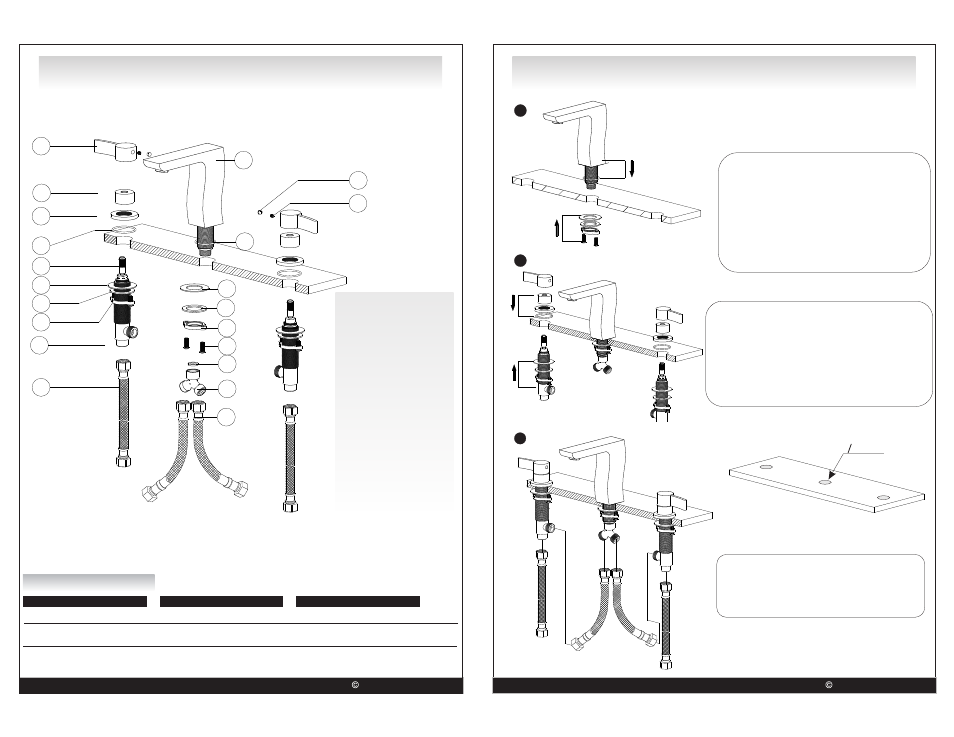
Replacement Parts
Keep this manual for ordering replacement parts.
Trouble - Shooting
Problem
Cause
Action
Leaks underneath handle
Aerator leaks or has an inconsistent
water flow pattern.
Water will not shut off completely.
Adjusting ring or cap has come loose.
Aerator is dirty or misfitted.
Dirty or worn out plastic washer in the
cartridge.
Tighten the adjusting ring or cap.
Unscrew the aerator to check rubber packing
or replace the aerator.
Remove handle and cartridge to check if ceramic
disk is damage permanently or dirty.
Re-install cartridge.
Contact Us Toll-Free at 1-800-775-0703; or visit our website at www.kraususa.com 2008-2011 Kraus USA Inc.
Installation
Contact Us Toll-Free at 1-800-775-0703; or visit our website at www.kraususa.com 2008-2011 Kraus USA Inc.
1
2
3
1
2
3
4
5
6
7
8
9
10
11
12
13
14
15
16
17
18
19
20
21
Handle
Valve cover
Base plate
O-ring
Handle connector
Washer
Brass washer
Fixing ring
Valve
Water lines
Faucet body
O-ring
Washer
Brass washer
Fixing ring
Mounting screws
Washer
Three way connector
Water lines
Decorative cap
Set screw
1.
2.
3.
4.
5.
6.
7.
8.
9.
10.
11.
12.
13.
14.
15.
16.
17.
18.
19.
20.
21.
Fit O-ring 12 into the bottom groove of faucet
body 11. Insert faucet body 11 into specified
drill hole (1 ¼“- 1 ½”) on the counter top.
Install washer 13 and brass washer 14 to the
threaded tail pipe of the faucet body 11 from
underneath the counter top and then screw
the fixing ring 15 to securely tighten the faucet
body. Fix faucet body 11 correctly and install
the three way connector 18 by screwing onto
the threaded tail pipe of the faucet body 11.
Install valve 9 into specified drill hole underneath
the counter top. Place o-ring 4 into the base plate
3. Screw base plate 3 and the valve cover 2 into
valve 9. Adjust the height and position of valve 9,
then screw fixing ring 8 to tighten valve 9
underneath counter top securely. Install handle 1 to
handle connector 5 of valve 9. Tighten set screw
21 with alley key and then place decorative cap 20
on handle 1.
1 3/8’’
O
Screw waterlines 19 into three way connector
18 and valve 9. Connect waterlines 10 onto
the bottom of valve 9 and then to main water
supply line.