Installing the sprocket box, Assembly instructions – Great Plains EWF13 Assembly Instructions User Manual
Page 3
3
Assembly Instructions
5/2/06
EWD13 and EWF13 Sprocket Box Update 152-208M
Great Plains Mfg., Inc.
16514
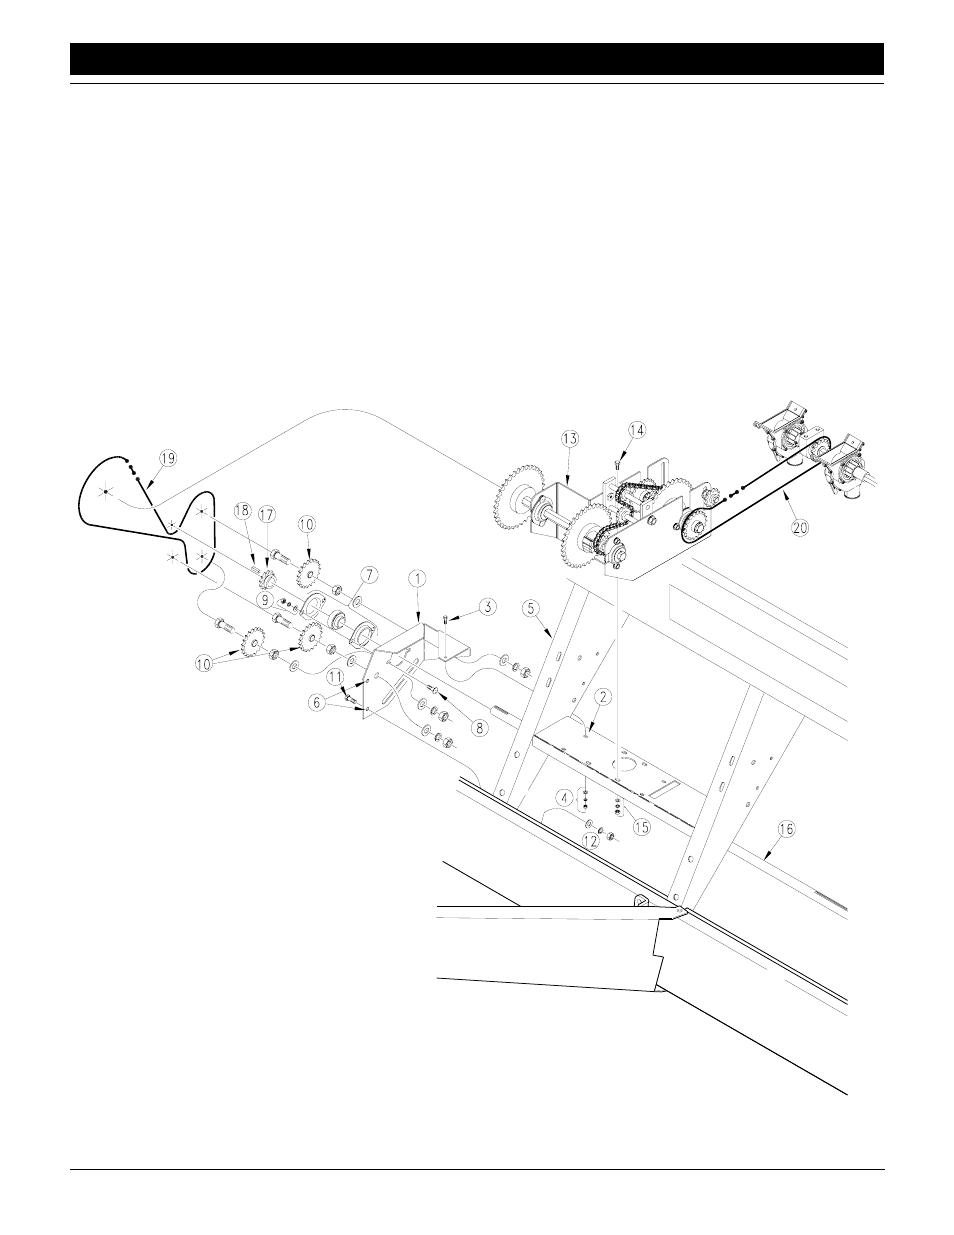
Figure 1-6
Idler Plate and Gearbox Installation
Installing the Sprocket Box
1.
Drill two 13/32-inch holes for idler bracket. First, bolt the idler
bracket (1) to the mounting plate (2) using a 1/4-inch bolt (3),
washer, lock washer and nut (4) at the location shown. The
idler bracket will wrap around the right-hand side of the
frame plate (5). Use the two bolt holes (6) in the bracket as
a guide for where to drill. When finished drilling, unbolt the
idler bracket from the mounting plate.
2.
Assemble bearings (7) on the idler bracket using 5/16-inch
bolts (8), washers, lock washers and nuts (9).
3.
Assemble idlers (10) on idler bracket. Bolt the idlers to the
bracket in the order shown (sprocket, 5/8-inch nut, flat wash-
er, bracket, flat washer, lock washer, nut).
4.
Mount the idler bracket on the mounting plate and through
the frame-plate holes drilled in step 1. Mount the idler brack-
et to the frame plate using 3/8-inch bolts (11), washers, lock
washers and nuts (12).
5.
Install sprocket box. Bolt the box (13) to the mounting plate
through four holes using 5/16-inch bolts (14), washers, lock
washers and nuts (15).
6.
Install new jackshaft. Slide jackshaft (16) through side wall
and clutch, under mounting plate and through idler bracket.
Install the 12-tooth sprocket (17) on the end of the shaft and
secure with the 1/4-inch key (18).
7.
Route 119-pitch chain (19) over sprocket-box input and
idlers as shown. Route 83-pitch chain (20) over gearbox out-
put, idler and seed-cup-shaft input as shown.
8.
Reconnect clutch-link arm and reinstall gauge-wheel-to-
jackshaft chain. Reassemble acremeter.