Quoizel CKWR1745F Weaver User Manual
Page 3
3of3
6 CORPORATE PARKWAY
GOOSE CREEK SC 29445
www quoizel com
,
.
.
.
Thank you for purchasing a Quoizel product.
Need assistance with parts or assembly? Call Quoizel customer service at 1-631-273-2700
or visit us on-line at
2014 QuoizelInc.
Assembly Instruction Sheet #IS-CKWR1745F
For Style CKWR1745F
STEP 1
attach Stem to Socket Assembly
-
A. Thread Stem (D) into the Socket Assembly (C), hand
tighten until sung.
Figure 1
Stem
Socket
Assembly
STEP 2
assemble Socket Assembly,
Column and Base together
-
A. Pass the Column (E), Base (F), Flat Washer (G)
and Lock Washer (H) through the Stem (D), secure
by using Spanner (J) thread the Hex Nut (I) onto
the Stem (D). Hand tighten until sung.
Make sure insert the Stud on the top of Column (E)
into the Hole on the bottom of Socket Assembly
(C), insert the Stud on the bottom of Column (E)
into the Hole on the top of Base (F).
Figure 2
Column
Socket
Assembly
Stud
Hole
Stud
Hole
Base
Flat
Washer
Lock Washer
Hex Nut
Spanner
Stem
STEP 3 - Install Bulb
A. This fixture uses standard bulb with medium base.
Maximum 100 watts.
B. Insert bulb and screw snugly into place.
Figure 3
Bulb
Socket
Figure 4
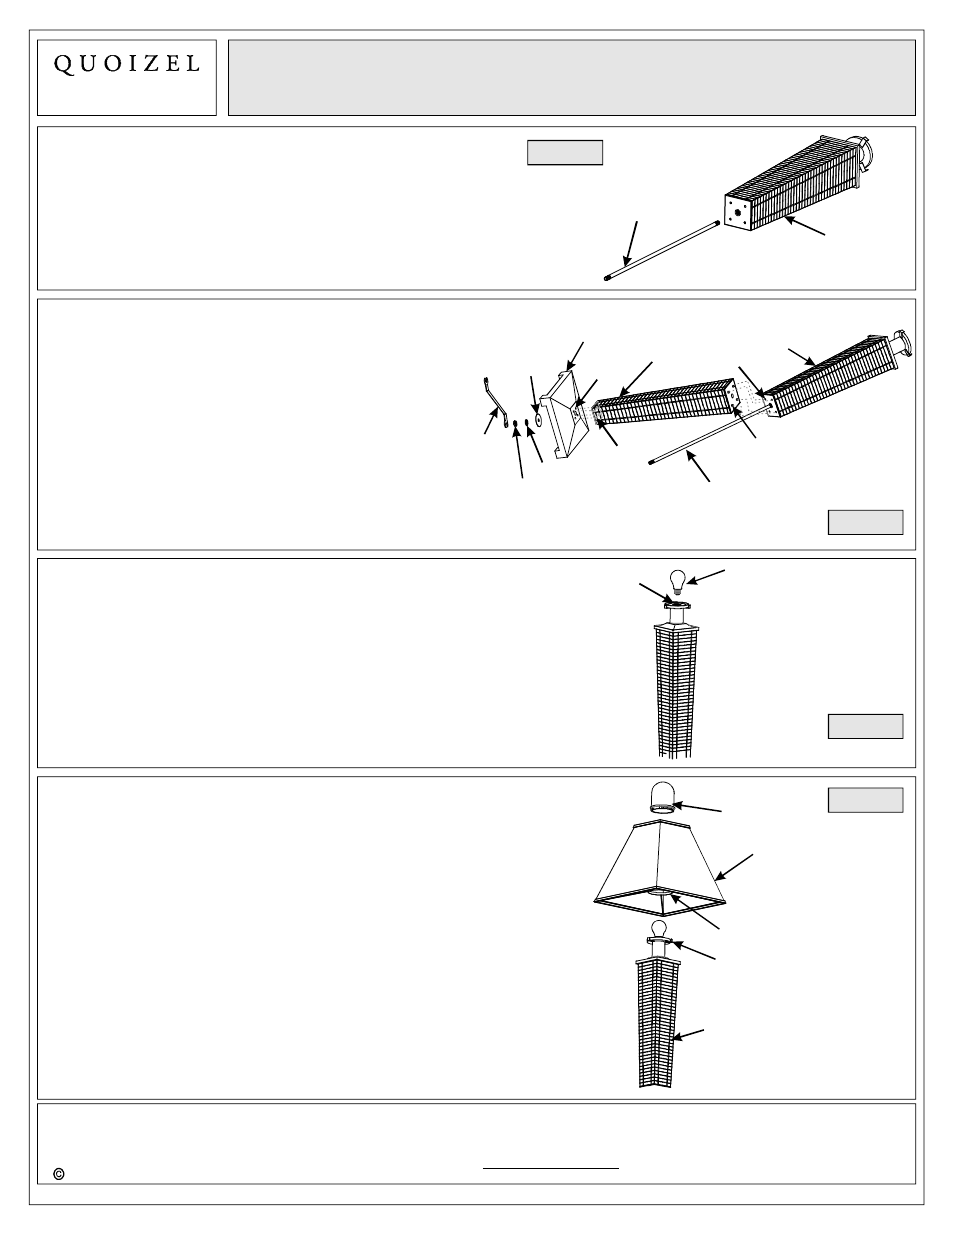
STEP 4
Install Shade and Bulb Shield
-
A. Place the Ring in the Shade (B) into the Tab on the top
of Socket Assembly (C) properly.
B. Thread the Bulb Shield (A) onto the Cup on the top of
Socket Assembly (C), hand tighten until sung.
Your fixture is now assembled and ready to use.
Enjoy!
Socket Assembly
Ring
Tab
Bulb Shield
Shade
March2014