Ab c, Step 6 - install crystal to fixture, Step 5 - install bulb – Quoizel BRX1612C Bordeaux User Manual
Page 4: Step 4 - attach ceiling canopy to mounting screw, Caution for bulb replacing
A
B
C
A
A
A
A
A
A
A
A
A
A
A
B
B
B
B
B
A
B
C
Thank you for purchasing a Quoizel product.
Need assistance with parts or assembly? Call Quoizel customer service at 1-631-273-2700
or visit us on-line at www.quoizel.com
4of4
6 CORPORATE PARKWAY
GOOSE CREEK SC 29445
www quoizel com
,
.
.
.
2013 QuoizelInc.
November2013
Assembly Instruction Sheet #IS-BRX1612C
For Style BRX1612C
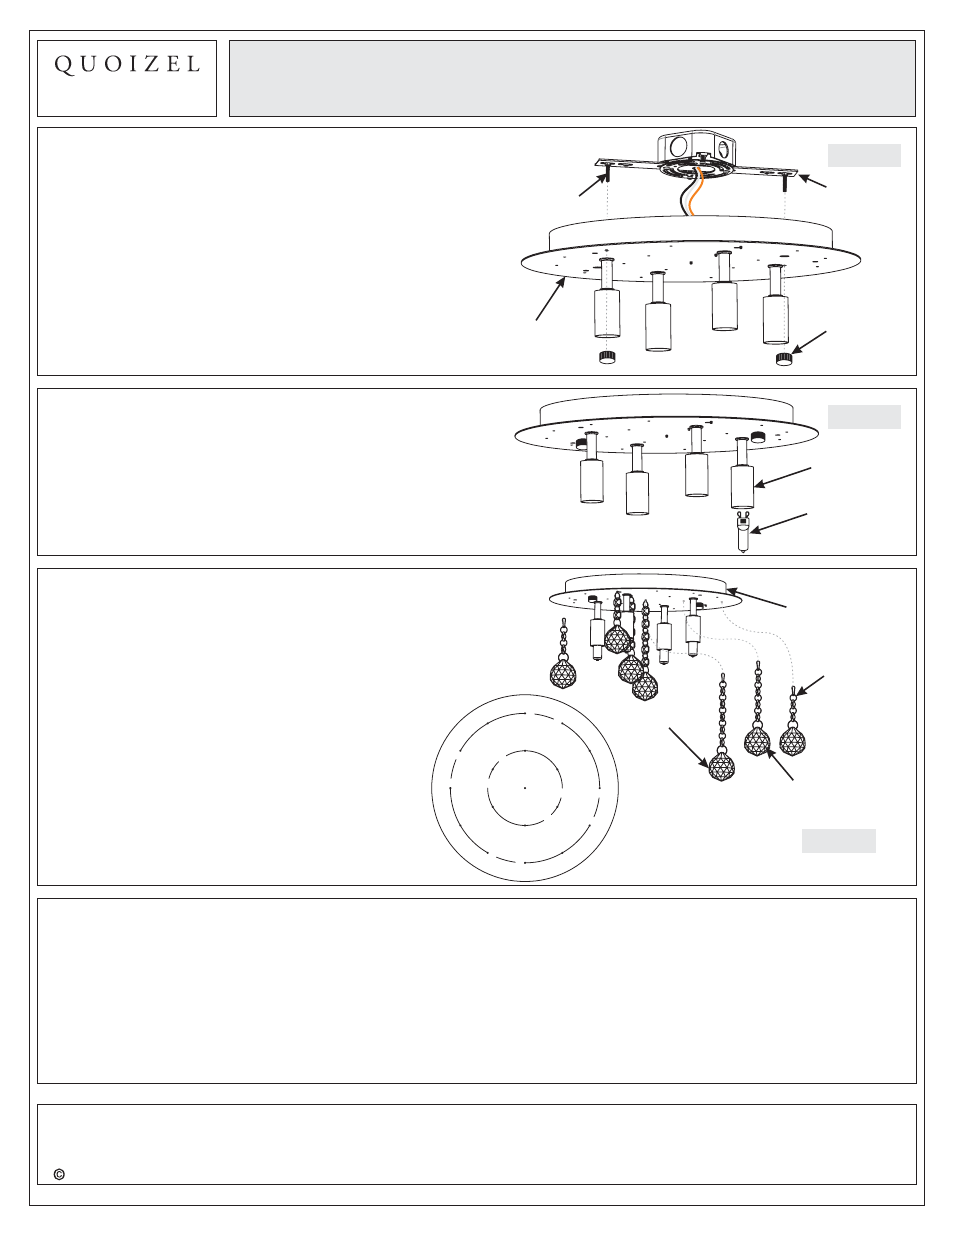
STEP 6
- Install Crystal to Fixture
A. Insert
(G) to the hole on the
center of Ceiling Canopy,
Ceiling Canopy
Ceiling Canopy
Your fixture is now assembled and ready to use.
Enjoy!
Crystal 5.63"L Part C
Crystal 5"L Part B (F) to the
hole in the middle ring of
, Crystal
3.63"L Part A (E) to the hole on the outside ring of
.
Figure 7
STEP 5
- Install Bulb
A. This fixture uses Frosted G9 Xenon Bulbs. Maximum 40
watts.
B. Insert bulb and seat properly into place.
Do not touch the bulb with bare hands use
a cloth or glove.
IMPORTANT:
Figure 6
Bulb
Socket
Ceiling
Canopy
Crystal 3.63"L
Part A
Crystal 5"L
Part B
Crystal 5.63"L
Part C
STEP 4
- Attach Ceiling Canopy to Mounting
Screw
A. Place the Ceiling Canopy over the Mounting Screws
and secure with Mounting Balls (B). Hand tighten until
snug.
Figure 5
Mounting
Screw
Crossbar
Ceiling
Canopy
Mounting
Ball
CAUTION FOR BULB REPLACING
A. When replace bulb, turn off power and allow lamp to cool. For safety purpose, wear gloves and eye protection.
B. If bulb is scratched or cracked, DO NOT use the lamp to avoid breakage during use or installation.
C. Use only in fixtures rated for lamps wattage and voltage.
D. Lamp operate under high pressure generating intense heat. Prevent contact with liquid and combustible
materials.