Installation instructions, Step 4, Step 5 – Quoizel DH5105AN Duchess User Manual
Page 3: Step 6
3 OF 4
INSTALLATION INSTRUCTIONS
Outlet Box
Crossbar
Outlet Box
Screw
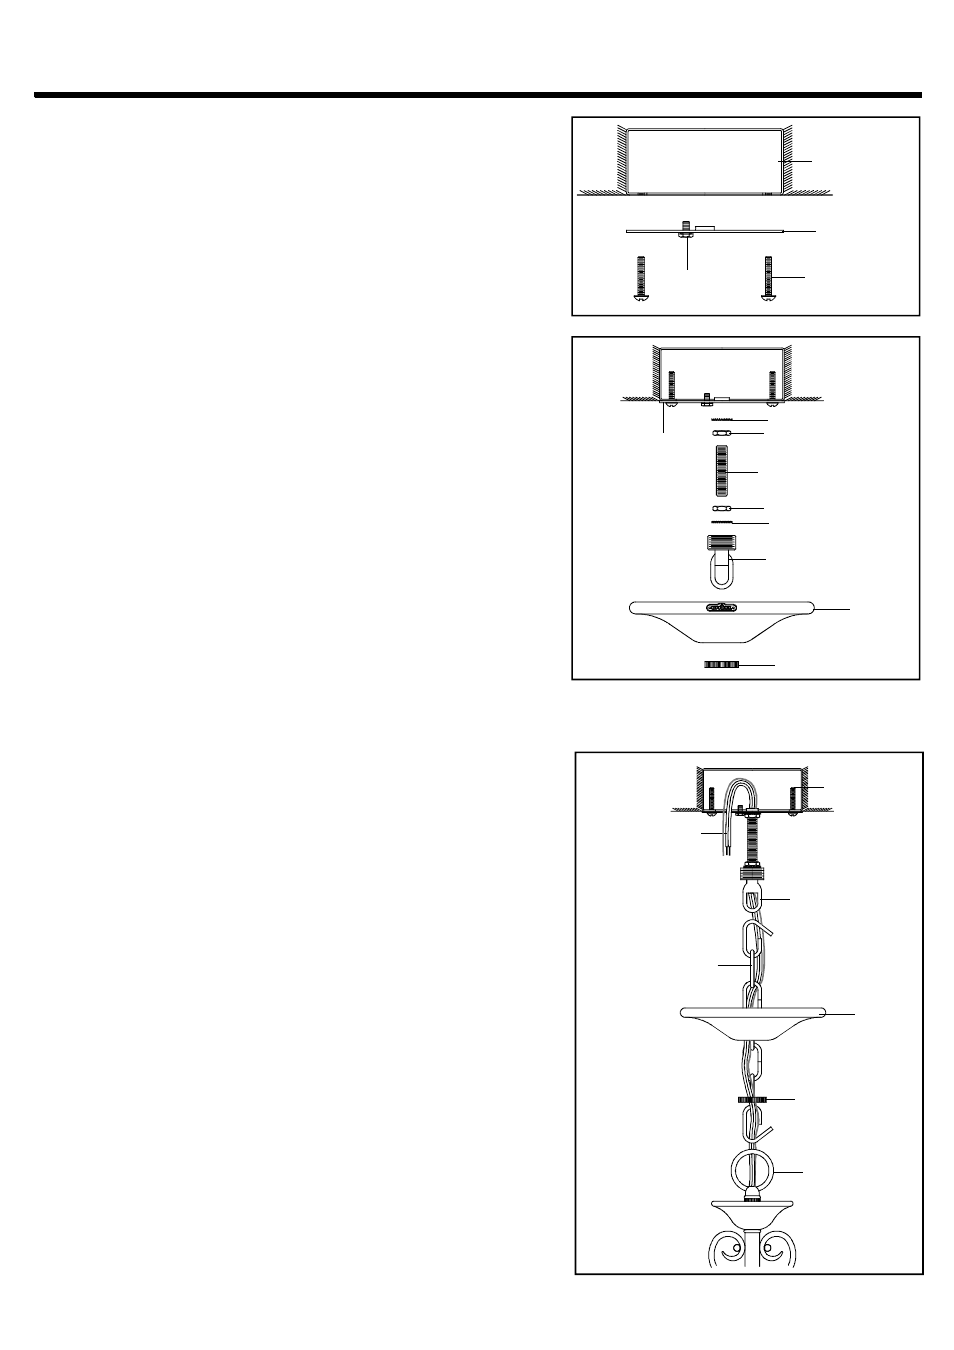
STEP 4
:
a Attach the Crossbar to the Outlet Box with the head of the
Green Ground Screw facing you. Secure it with Outlet Box
Screws (not included)
Tighten until snug
.
.
.
STEP 5:
*
Pliers is required for this step.
a. Thread one Hex Nut to one end of the Nipple until it is at
least 0.25
” from the end. Pass one Lock Washer over the
end of the Nipple and thread the Canopy Chain Loop onto
the Nipple. By using pliers, thread the Hex Nut against the
Canopy Chain Loop and hand tighten until snug.
b. Thread another Hex Nut to the middle of the Nipple. Place
another Lock Washer over the Nipple and then thread the
Nipple into the Crossbar until the Nipple is about 0.375
”
above the Crossbar.
c. Remove the Canopy Lock Ring from the Canopy Chain
Loop. Place the Canopy over the Canopy Chain Loop
against the ceiling to determine the correct position of the
Nipple. Thread the Canopy Lock Ring onto the Canopy
Chain Loop. Adjust the Nipple to allow the Ceiling Canopy
to rest against the ceiling when held in place by the
Canopy Lock Ring.
d. Remove the Canopy Lock Ring and the Ceiling Canopy.
Tighten the Hex Nut against the Crossbar to secure in
place.
STEP 6:
*
a. Adjust the Fixture Chain to your desired length by
removing the links if needed.
Pliers is required for this step.
b. With the Fixture Chain still not attached to the Fixture Loop
and the Canopy Chain Loop, pull the supply wires through
the Fixture Chain alternating links. After the wires are
through the Fixture Chain, pull the Supply Wires and the
Ground Wire through the Canopy Lock Ring and the
Ceiling Canopy in order.
c. Attach one end of the Fixture Chain to the Fixture Loop and
close the chain loop. Lift the fixture and chain up and
attach the other end of the Fixture Chain onto the Canopy
Chain Loop. The fixture will now hang safely. Close the
Chain Loop at the Ceiling Canopy Loop.
d. Feed the Supply Wires and Ground Wire through the
Canopy Chain Loop and Nipple into the Outlet Box. Cut the
wires leaving approximately 8
” of wire extending from the
Outlet Box.
e. Refer to Step 7 for wire connections.
f. Raise the Ceiling Canopy and Canopy Lock ring up the
Fixture Chain and over the Canopy Chain Loop. Tighten
the Canopy Lock Ring onto the Canopy Chain Loop until
tight.
Lock Washer
Crossbar
Hex Nut
Nipple
Supply Wires
and Ground Wire
Canopy
Chain Loop
Ceiling
Canopy
Fixture Chain
Canopy
Lock Ring
Fixture Loop
STYLE NUMBER DH510 5AN, DH5105 PN
:
Green Ground
Screw
Hex Nut
Lock Washer
Canopy Chain Loop
Ceiling
Canopy
Canopy Lock Ring
Outlet Box