Winchester Repeating Arms 1892 User Manual
Page 10
16
17
r
ebounDinG
h
Ammer
The Model 1892 features a rebounding hammer
designed to prevent the hammer from moving forward
and striking the firing pin unless the trigger is pulled.
After firing your rifle the hammer immediately moves
to the rebound position. The hammer can also be
manually lowered from full-cock to the rebound
position as detailed on page 17 under “Lowering
the Hammer.”
h
Ammer
p
ositions
The rebounding hammer on the Model 1892 has
two positions:
• Rebound Position — This position (Figure 8,
page 16) takes the place of the dropped and
half-cock positions found on the original
Model 1892 rifles.
The rebounding feature of the hammer essentially
eliminates the dropped hammer position. The
hammer only travels to the dropped position
momentarily after the trigger has been pulled
with the hammer fully-cocked. The hammer then
automatically moves to the rebound position.
The rebound position is the recommended
position of the hammer at all times and should
be in that position except (1) when firing is
imminent (2) or immediately after the action
has been cycled.
• Full-Cock Position — This is the position that
the hammer is moved to when firing is imminent
(Figure 9, page 16). It is also the position the
hammer moves to when the action is cycled using
the finger lever.
ALWAYS KEEP THE “SAFETY” IN THE ON SAFE
POSITION WHEN THE HAMMER IS IN THE FULL-COCK
POSITION UNLESS FIRING IS IMMINENT. ALWAYS
KEEP THE MUZZLE POINTED IN A SAFE DIRECTION.
FAILURE TO FOLLOW THESE WARNINGS COULD
RESULT IN SERIOUS INJURY OR DEATH.
l
owerinG
the
h
Ammer
At any time the hammer can be moved to the
full-cock position either manually or by cycling the
finger lever fully. Unless shooting is imminent it is
important to keep the hammer in the rebound
position. To lower the hammer from the full-cock
position to the rebound position, perform the
following operation.
WHEN LOWERING THE HAMMER TO THE REBOUND
POSITION, ALWAYS KEEP THE MUZZLE POINTED IN
A SAFE DIRECTION. ALWAYS KEEP THE “SAFETY”
IN THE ON SAFE POSITION. FAILURE TO FOLLOW
THESE WARNINGS COULD RESULT IN SERIOUS
INJURY OR DEATH.
1. Place the “safety” in the on safe position.
2. Place your thumb on the hammer spur and firmly
hold the hammer back slightly with your thumb.
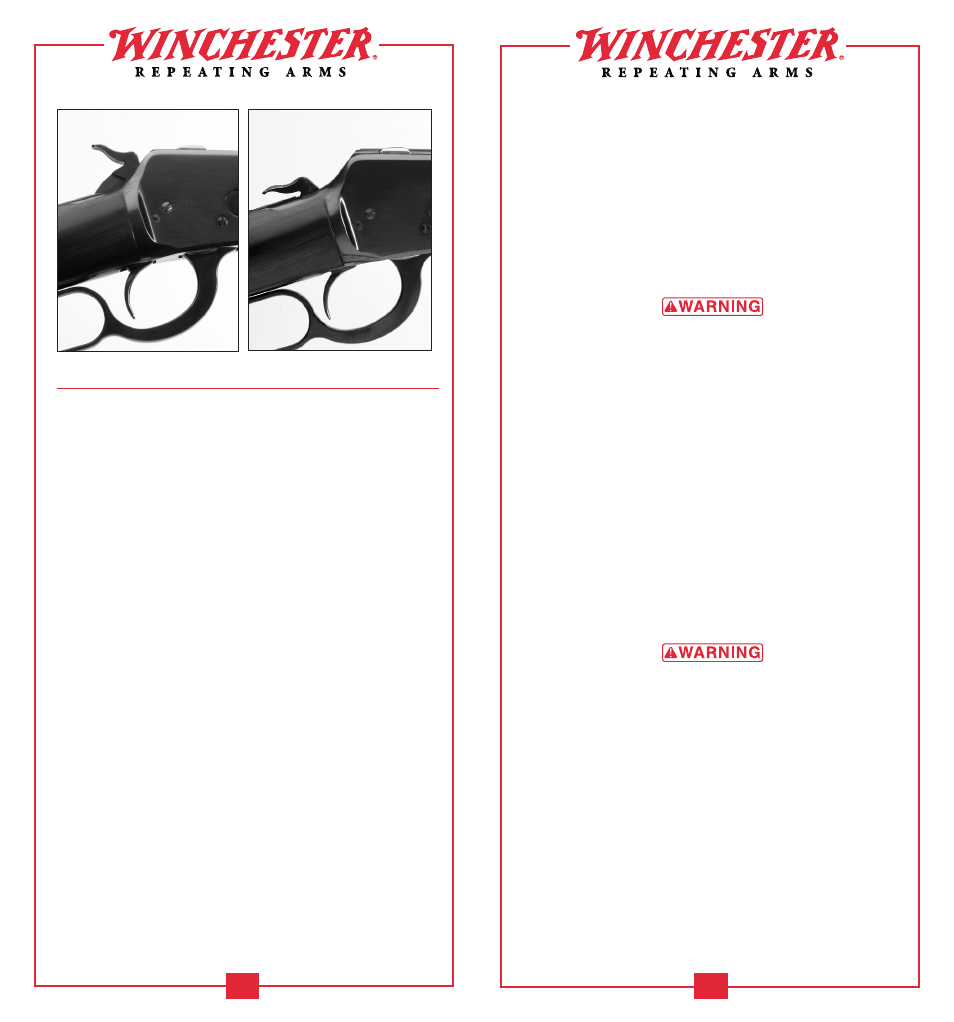
FIGURE 8
The hammer in the
rebound position.
FIGURE 9
The hammer in the
fully-cocked position.