SONIQ QPC60B User Manual
Page 2
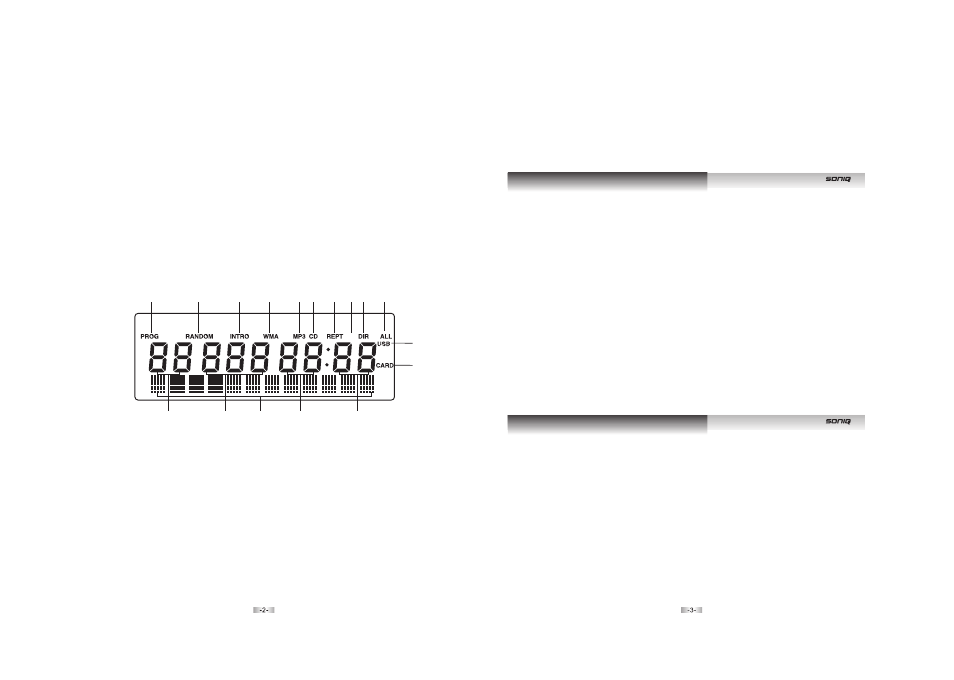
1. "PROG" shows during Programming and in programmed play.
2. "RANDOM" shows when in RANDOM playback.
3. "INTRO" shows when in INTRO playback.
4. "WMA" shows when the file played is in WMA format.
5. "MP3" shows when the disc played is an MP3-CD.
6. "CD" shows when the disc played is a CD-DA.
7. "REPT" shows when in various repeat modes.
8. "1" shows together with "REPT" when in single track repeat mode.
9. "DIR" shows together with "REPT" when in album repeat mode.
10. "ALL" shows together with "REPT" when in all tracks repeat mode.
11. This shows when the player reads data from USB data traveller.
POWER SUPPLY
NOTE:
Insert the AC cord to the AC socket of the player, and plug the other end to
an applicable wall outlet.
q
BATTERY OPERATION
1. Remove the battery compartment cover gently.
2. Install 8 x 'C' size batteries (UM-2 or equivalent) while observing the
correct polarities.
3. Replace the battery compartment cover.
=
The AC cord must be detached from the AC socket of the player.
=
Leaking batteries may damage the battery cabinet and the player as a
whole, so they should be removed from the cabinet when becoming flat
or when the player is not to be played on batteries for some time.
q
AC OPERATION
NOTE: If the AC plug of this unit does not fit in with your AC outlet, a plug
adaptor should be used. Consult your local dealer on the type of plug
adaptor.
13
14
17
15
16
FAMILIARIZE WITH THE DISPLAYED CONTENTS IN THE LCD
TO PLAY THE RADIO
3. Tune to the desired station by rotating the TUNING control (rotate that control
back and forth until you get the strongest and clearest reception).
=
When you are receiving an FM broadcast, fully extend the TELESCOPIC
ANTENNA and rotate it for the best reception.
=
For AM broadcast, rotate the whole set until the best reception is heard.
1. Set the FUNCTION switch to the RADIO position, the POWER Indicator will
light up.
2. Select the desired band with the BAND switch.
4. The built-in AM antenna and external FM TELESCOPIC ANTENNA are
directional.
5. Adjust the volume level to a comfortable listening level.
6. To turn off the radio, set the FUNCTION switch to the OFF, USB/CARD,
CD/MP3/AUX position.
12. This shows when player reads data from SD/MMC card.
13. This figure is the album number of the disc played.
14. This figure is track number of the current album on a MP3 disc or the current
track number on a CD disc.
15. This figure is the elapsed minutes of the track played.
16. This figure is the elapsed seconds of the track played.
17. English Text display. The information of the current track is displayed
scrolling forward in MP3 playback.
1
2
3
4
5
LOCATION OF CONTROLS
14. TUNING CONTROL
1. VOLUME CONTROL
15. SPEAKERS
2. SKIP DOWN BUTTON
16. USB PORT
3. SKIP UP BUTTON
17. LCD DISPLAY
4. PLAY/PAUSE BUTTON
18. SD/MMC CARD SLOT
5. POWER INDICATOR
19. PHONES JACK
6. USB/CARD BUTTON
20. FUNCTION SWITCH
7. CD DOOR
21. BAND SWITCH
8. MODE BUTTON
22. AUX JACK
9. FM ST. INDICATOR
23. FOLDING HANDLE
10. CD DOOR OPEN AREA
24. BATTERY COMPARTMENT
11. STOP BUTTON
25. FM TELESCOPIC ANTENNA
12. PROGRAM/EQ BUTTON
26. AC SOCKET
13. 10+/ALBUM BUTTON
1
6
7
8 9
10
11
12
Power Supply
Operation