1 - p, 2 - p, 3 - i – Rite-Ride 2189 User Manual
Page 3
S
TEP
1 - P
REPARE
THE
VEHICLE
With the vehicle on a solid, level surface chock the rear wheels. Remove the
negative battery cable. Raise the vehicle by the front axle and remove the front
wheels. After the removal of the wheels, lower the vehicle so the axle rests on jack
stands rated for your vehicles weight. Remove the jounce bumpers by unbolting
them from their location under the frame rail directly above the axle see Figure "B".
Do not discard the jounce bumpers, bolts, or nuts used to secure the jounce bumper
as they will be used again in this installation.
S
TEP
2 - P
RE
-
ASSEMBLE
THE
KIT
Pre-assembly will begin with the left (driver's) side of the vehicle. All pictures
show the installation on the left side of the vehicle unless noted otherwise.
Two-Wheel Drive
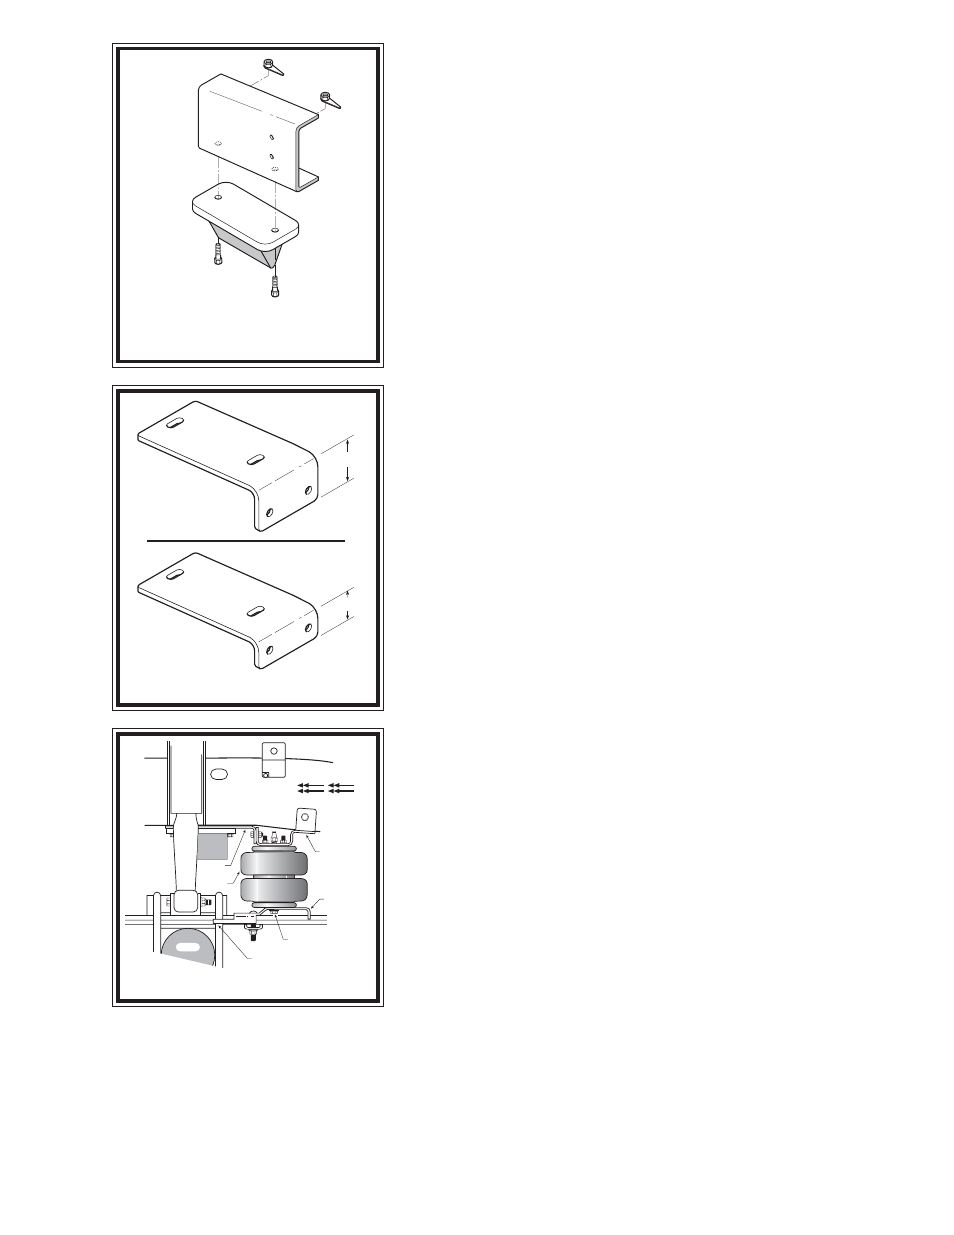
Select the left upper bracket and one tall spacer (5283) from you kit see Figure
"C". Fasten the bracket and spacer together using two 3/8" -16 x 3/4" hex bolts and
3/8" -16 flanged hex nuts see Figure "A".
Four-Wheel Drive
Select the left upper bracket and one short spacer (5282) from your kit see Figure
"C". Fasten the bracket and spacer together using two 3/8" -16 x 3/4" hex bolts and
3/8" -16 flanged hex nuts see Figure "A".
Select one air helper spring and one upper bracket from your kit. Insert the studs
on the air spring in the mounting holes in the upper bracket. Make sure that the
air inlet hole on the air spring is visible though the access hole in the upper bracket.
Fasten the upper bracket to the air spring by installing two 3/8" -16 flanged hex nuts
on the air spring's studs. Next, install the air fitting into the air spring through the
access hole in the upper bracket. Tighten the air fitting securely to engage the
orange thread sealant. Select one lower bracket from you kit. Fasten the air spring
to the lower bracket using a 3/8" -16 x 3/4" flanged hex bolt in the slot in the lower
bracket (finger tight).
S
TEP
3 - I
NSTALL
THE
ASSEMBLY
TO
THE
VEHICLE
Fasten the upper bracket and jounce bumper to the bottom of the bracket and
frame rail using the two bolts and nuts that retain the jounce bumper see Figure "A".
The upper bracket will also be attached to the side of the frame rail. Insert a
3/8" -16 x 1-1/2" bolt through the hole in the vertical tab on the upper bracket and
through the existing hole in the frame rail. Secure the upper bracket by installing
a 3/8" large flat washer and 3/8" -16 flanged hex nut on the inside of the frame rail
see Figure "A". Next, insert the 3/8" -16 x 3" carriage bolts through the square holes
in the lower bracket. The lower bracket should be aligned over the leaf spring with
the hook capturing the leaf spring U-bolt see Figure "D". The carriage bolts should
be straddling the leaf stack. Slide the bracket strap on to the carriage bolts and
secure it with two 3/8" -16 flanged lock nuts. Four-wheel drive vehicles will require
the use of a 3/8" -16 x 2-1/4" hex bolt on the inside of the leaf stack on the driver's
side instead of the standard 3" carriage bolt. Once the assembly is in place, ensure
that there is at least 1/2" of clearance around the air spring. Tighten the 3/8" hex
bolt to secure the lower bracket to the air spring see Figure "D".
Figure "C"
Figure "B"
UPPER
BRACKET
LOWER
BRACKET
3/8"-16 HEX BOLT
TIGHTEN AFTER ALIGNING
AIR SPRING
AXLE
FRONT
DRIVER’S SIDE
AIR
SPRING
FRAME
RAIL
HOOK MUST CAPTURE
AXLE U-BOLT
SPACER
Figure "D"
UNBOLT AND REMOVE
JOUNCE BUMPER
USE
TALL
SPACER
FOR 2WD VEHICLES
USE
SHORT
SPACER
FOR 4WD VEHICLES
2-1/2”
1-1/2”