Rite-Ride 2580 User Manual
Page 3
STEP 1 — PREPARE THE VEHICLE
With the vehicle on a solid, level surface chock the front wheels.
Remove the negative battery cable. Your vehicle is equipped with
rubber jounce bumpers. The jounce bumpers are bolted to the frame
above the rear axle. Remove the jounce bumpers from the vehicle.
Remove the bolt holding the brake line bracket to the lower jounce
bumper pad.
STEP 2 — PRE-ASSEMBLE THE KIT
Locate the ¼" PTC elbow fitting. Install the elbow fitting in the top of
the air spring. Be sure to tighten the fitting to point in direction the air
line will be installed. Locate bracket 5793, one air spring, and two
3/8"- 16 flange nuts. Attach bracket 5793 to the top of the spring so
the studs go through the holes on the bracket and the hole for the
air fitting is in the correct place. Install the flange nuts and tighten to
hold the spring on the bracket. Locate bracket 5795 and one 3/8"- 16
X .75" flat head cap screw. Attach the bracket to the bottom of the air
spring using the flat head cap screw. Leave this loose enough to allow
the bracket to rotate for now. Repeat this with the second air spring
using bracket 5794 for the upper bracket.
STEP3 — INSTALLING THE UPPER BRACKETS TO YOUR
VEHICLE
Locate the two brackets labeled 5792 and four M10 X 30mm flat head
bolts. Install bracket 5792 with the longer side toward the back of
the truck using the threaded holes left open from the jounce bumper
brackets.
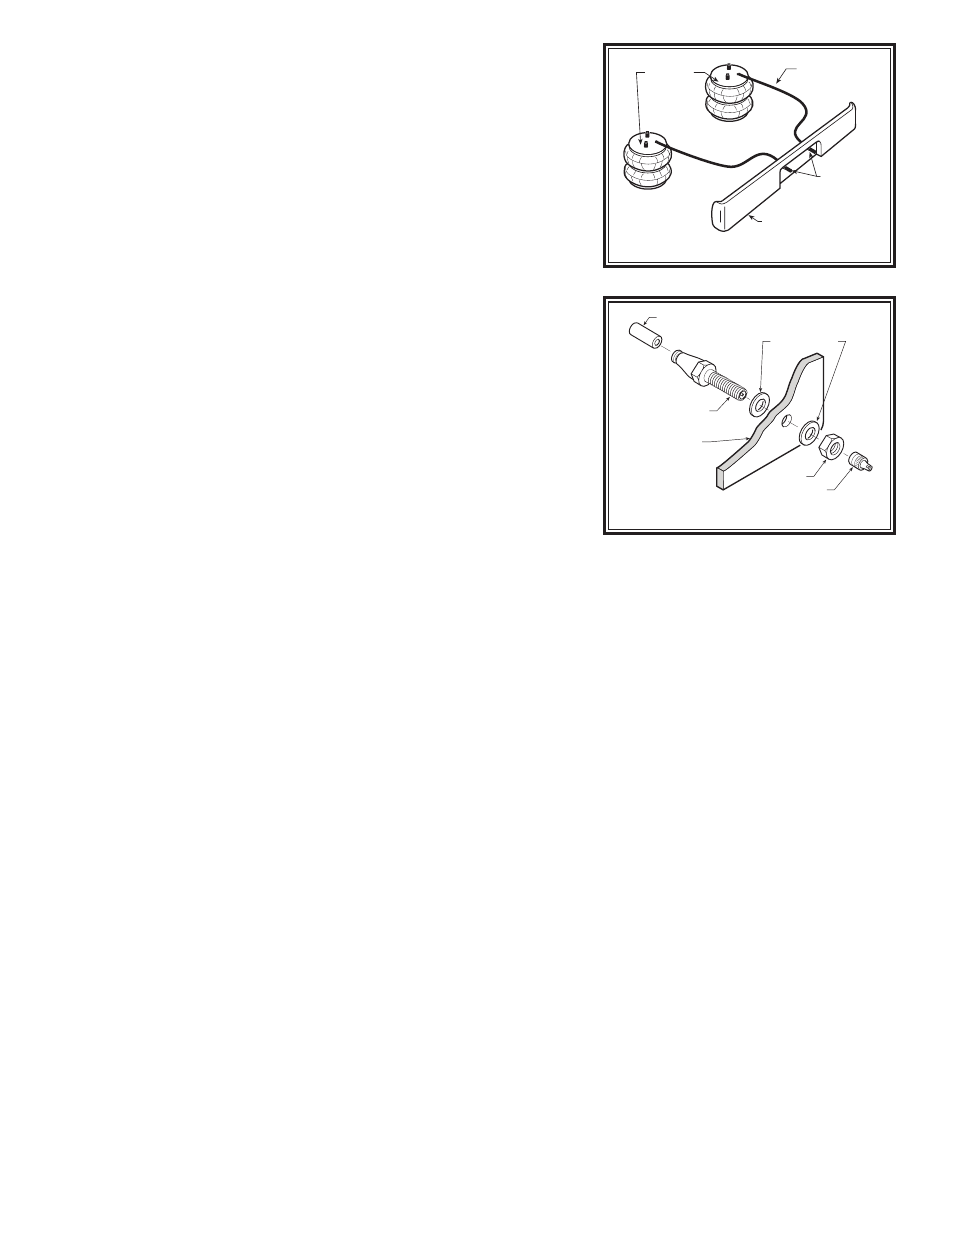
STEP 4 — INSTALLING THE ASSEMBLY TO THE VEHICLE
Note: Installing the air line to the vehicle with inflation valves
and connecting it to the fitting on the top of the spring is recom-
mended at this point.
Locate two 3/8" -16 X 3.5" hex bolts with two 3/8"-16 flange nuts.
Connect the upper bracket on the spring to the frame bracket using
the two bolts with flange nuts. The bracket should be installed so that
the spring is offset toward the outside of the frame. Line the lower
bracket up so that the curved end faces the back of the truck. Tighten
the bolt holding the lower bracket to the spring once it is lined up cor-
rect. Locate the spacer (5796) and the M8 X 1.25 X 140mm bolt. Install
the lower bracket over the jounce bumper pad so that the curved end
is toward the back. The spacer should be placed between the front of
the lower bracket and the jounce pad. Insert the 140mm bolt through
the bracket from the front, through the spacer, and through the jounce
pad. Thread the bolt into the back hole on the jounce pad where the
brake line bracket bolt was removed. Once the bolt is through, place
the brake line bracket over the bolt and secure with the m8 X 1.25
flange nut. Repeat this procedure for the right side of the truck.
STEP 5 — CHECKING THE AIR SYSTEM
Once the inflation valves are installed, inflate the air helper springs to
70 psi and check the fittings for air leaks. Using a spray bottle, apply
a solution of soap and water to the fittings. If a leak is detected at an
airline tubing connection then check to make sure that the airline tube
is cut as square as possible and that it is pushed completely into the
fitting. The airline tubing can easily be removed from the fittings by
exhausting all the pressure in the air springs and then pushing the
collar towards the body of the fitting and then, with a pull, remove the
airline tubing. Re-install the tubing and reinflate the air springs and
check for leaks as noted above. If a leak is detected where the air fit-
ting screws into the spring, just screw the air fitting into the air spring
until the leak stops.
This now completes the installation. Reattach the negative bat-
tery cable and remove the wheel chocks from the front wheels. Before
proceeding, check once again to be sure you have proper clearance
around the air springs. With a load on your vehicle and the air helper
springs inflated, you must have at least 1/2" clearance around the air
FIGURE “B”
FIGURE “C”
AIR HOSE
INFLATION
VALVES
BUMPER
AIR
SPRINGS
AIR LINE
PUSH-TO-CONNECT
INFLATION VALVE
FLAT WASHER
HEX NUT
VALVE CAP
BODY OF
VEHICLE