E-flite Slick 3D 480 ARF User Manual
Page 19
19
EFL Slick 3D 480
Î NOTICE: Do not cut into the underlying wood.
This will weaken the structure and could cause failure
in flight. As an option, use a soldering iron or hot
knife with light pressure to carefully melt the covering
and avoid the potential of cutting into the wood.
Î HINWEIS: Schneiden Sie nicht in das
darunterliegende Holz. Das schwächt die Struktur
und könnte zum Ausfall während des Fluges führen.
Verwenden Sie alternativ ein Bügeleisen oder heisses
Messer mit etwas Druck und schmelzen damit die
Bespannung, ohne die Gefahr das Holz zu zerschneiden.
Î REMARQUE: Ne coupez pas dans le
bois. Cela affaiblirait la structure pouvant aller
jusqu’à la rupture en vol. Une solution possible
est d’utiliser un fer à souder ou un couteau
chaud avec une légère pression pour découper
l’entoilage et éviter de couper dans le bois.
Î AVVISO: si raccomanda di non tagliare
il legno per non indebolire la struttura e avere
possibili cedimenti in volo. Come opzione si
può usare un saldatore o una lama riscaldata
per non premere troppo sul legno.
5
Use a pin vise and 1/16-inch (1.5mm) drill bit to drill
a hole in the center of each hinge slot to allow the CA
to wick into the hinge. Drill holes in the stabilizer and
elevators at this time. Slide the elevators into the slot
in the fuselage.
Bohren Sie mit einem 1,5mm Handbohrer ein Loch
in die Mitte jedes Scharnierschlitzes, damit der
Sekundenkleber besser eindringen kann. Bohren Sie
auf der Leitwerks- und Ruderseite. Schieben Sie das
Höhenruder in den Schlitz im Rumpf.
Utilisez un porte foret muni d’un foret de 1.5mm pour
effectuer un trou au centre de chaque rainure de
charnière pour permettre à la colle CA de se répandre
sur toute la surface de la charnière. Effectuez ces
trous dans les gouvernes et le stabilisateur. Glissez les
gouvernes dans la fente du fuselage.
Con una punta da 1,5mm praticare un foro al centro di
ciascuna fessura delle cerniere sia sull’elevatore che sullo
stabilizzatore, per permettere alla colla CA di scorrere.
Inserire gli elevatori nell’apertura sulla fusoliera.
6
Install the stabilizer in the fuselage and check the
alignment as described in steps 1 and 2. Wick thin
CA into the joint between the fuselage and stabilizer
to secure the stabilizer to the fuselage. Do not use CA
accelerator, as the CA must be allowed to seep into the
joint between the fuselage and stabilizer to guarantee
the bond between the two.
Setzen Sie das Leitwerk in den Rumpf und prüfen die
Ausrichtung wie in Schritt 1 und 2 beschrieben. Bringen
Sie den Sekundenkleber in den Spalt zwischen Rumpf und
Leitwerk. Verwenden Sie bitte keinen Aktivator, damit der
Klebstoff in den Spalt eindringen kann und die Verklebung
korrekt hält.
Glissez le stabilisateur dans le fuselage et contrôlez
l’alignement comme à l’étape 1 et 2. Glissez de la
colle CA aux jonctions du stabilisateur et du fuselage.
N’utilisez pas d’accélérateur à colle CA, vous devez
laissez la colle CA se glisser entre le fuselage et le
stabilisateur afi n d’assurer un assemblage correct.
Montare lo stabilizzatore sulla fusoliera e verifi care
l’allineamento descritto nei passi 1 e 2. Fissare lo
stabilizzatore alla fusoliera con colla CA. Non usare un
accelerante CA per dar modo alla colla CA di penetrare
nella giunzione tra stabilizzatore e fusoliera e garantire
un buon incollaggio tra i due.
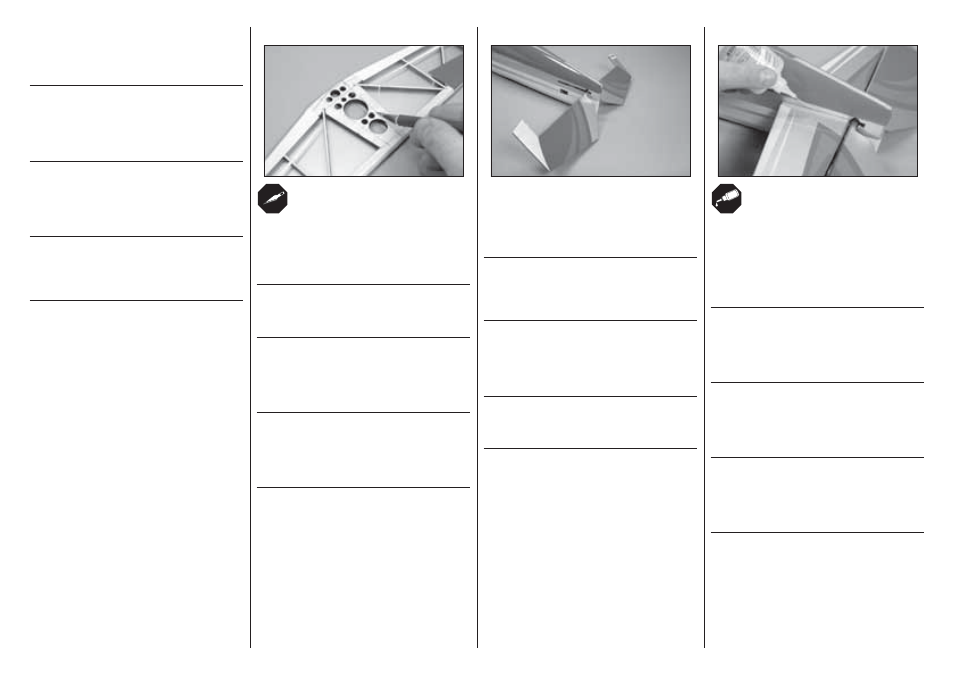
4
Use a ruler and carefully cut the covering 1/8 inch
(3mm) inside the line drawn on the stabilizer to remove
the covering from the center of the stabilizer. Remove
the top and bottom covering. Use care not to cut into
the underlying wood, weakening the stabilizer.
Schneiden Sie 3mm hinter der Linie auf der Innenseite
vorsichtig die Folie ein und entfernen diese vom Mittelstück
oben und und unten. Bitte achten Sie darauf nicht in das
Holz zu schneiden und damit das Ruder zu schwächen.
Utilisez une règle et couper soigneusement le
revêtement à 1/8 inch (3mm) à l’intérieur de la ligne
tracée sur le stabilisateur pour enlever le revêtement
au milieu du stabilisateur. Enlever le revêtement sur le
dessus et sur le dessous. Prendre soin de ne pas tailler
dans le bois subjacent, ce qui affaiblirait le stabilisateur.
Usare un righello per tagliare accuratamente il
rivestimento dello stabilizzatore di 3mm più interno
rispetto alle righe fatte prima, per poi toglierlo dall’interno
dello stabilizzatore. Togliere il rivestimento superiore e
inferiore. Nel tagliare fare attenzione a non incidere troppo
il legno per non indebolire lo stabilizzatore.