Software and driver installation, Configuration and firmware& software upgrade, Linking the transmitter and receiver – DJI Phantom Advanced Manual User Manual
Page 2
©2013
DJI Innovations. All Rights Reserved.
3 |
A1
Software and Driver Installation
Make sure to use the NAZA-M assistant software of 2.0 version (or above 2.0) to carry out firmware upgrade
and parameter configuration. DO NOT use the NAZA-M assistant software bellow 2.0 version.
1.
Please download the driver DJI Driver Installer and NAZA-M assistant software from the PHANTOM
page of DJI website (http://www.dji-innovations.com/products/phantom/downloads/).
2.
Connect the PHANTOM and the PC via the USB cable, power on the PHANTOM system.
3.
Run the DJI Driver Installer, and follow the instructions strictly to finish installation.
4.
Run the assistant software installer, and follow the instructions strictly to finish installation.
A2
Configuration and Firmware& Software Upgrade
1.
Power on your computer. Make sure the computer is connected to the Internet for the first time you
use.
2.
Switch on the transmitter first, then power on the aircraft. Connect the aircraft to the PC with the
USB cable. DO NOT break the connection until configuration or upgrade is finished.
3.
Please refer to the “Assembly &Configuration->Step3” section of NAZA-M Quick Start Guide to
get the detail of assistant software usage.
4.
Refer to the “Appendix-> Firmware & Assistant Software Upgrade” section of NAZA-M Quick Start
Guide to get the detail of assistant software usage.
5.
If Manual Mode is required, please select “Manual” from the drop down list of Basic->RC->Control
Mode Switch in the assistant software. Refer to the “Flying Test-> Step 1 Control Mode Knowledge”
section of NAZA-M Quick Start Guide to get the detail about the Manual Mode.
©2013
DJI Innovations. All Rights Reserved.
4 |
A3
Linking the Transmitter and Receiver
The linking of the transmitter to the receiver of the PHANTOM was carried out before they left the factory. If
necessary you can link the transmitter to the receiver as follows, for example you replace the transmitter. The
default receiver type is PPM.
DO NOT use the PHANTOM transmitter (receiver) with the third party remote control equipment.
1.
Please remove the housing by referring to the section of A8 Maintenance -> Remove the
Housing.
2.
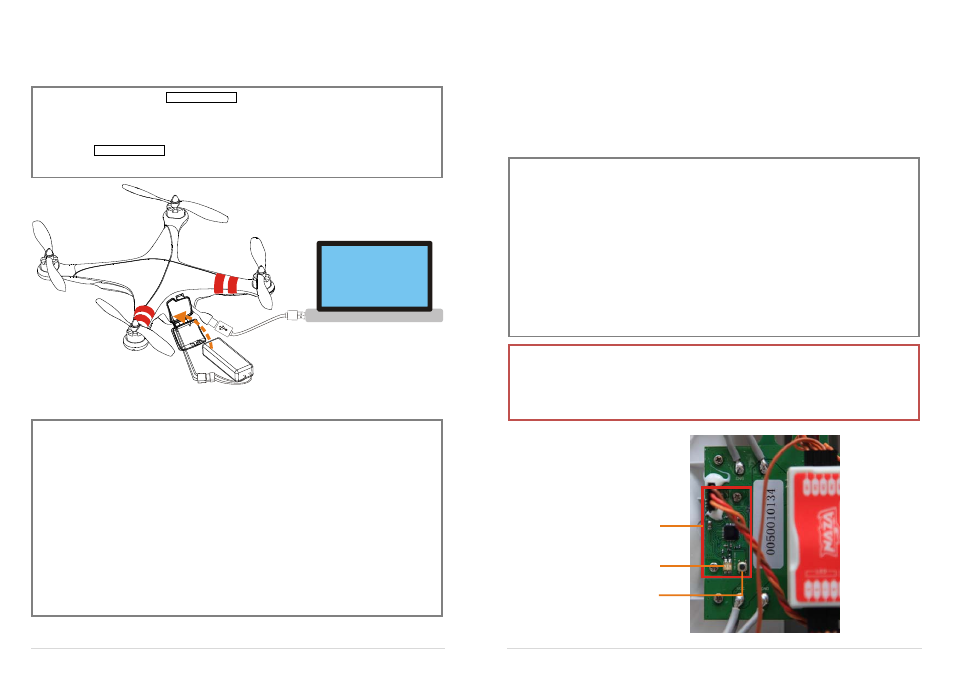
Locate the receiver module according to the following figure.
3.
After powering on the aircraft and the transmitter, if the LED indicator of the receiver on the control
board is lit solid red, this means the receiver currently has no connection with any transmitter.
4.
Press down the link button for more than two seconds until the LED indicator blinks, then release the
button.
5.
Push the throttle stick to the lowest position and turn on the transmitter. Then if the LED indicator of
the receiver turns off, the link between the transmitter and the receiver has succeeded. (Linking
operation can be done only when the LED indicator of the transmitter changes to blinking red .)
Note:
If the transmitter can’t enter the linking mode, please check that the throttle stick lies in the lowest
position.
You can use your R/C system normally only after the linking is done successfully.
Receiver Module
Link Button
Indicator LED