2 playing back samples – Behringer Digital Pro Mixer DDM4000 User Manual
Page 21
21
DIGITAL PRO MIXER DDM4000 User Manual
5.1 Recording samples
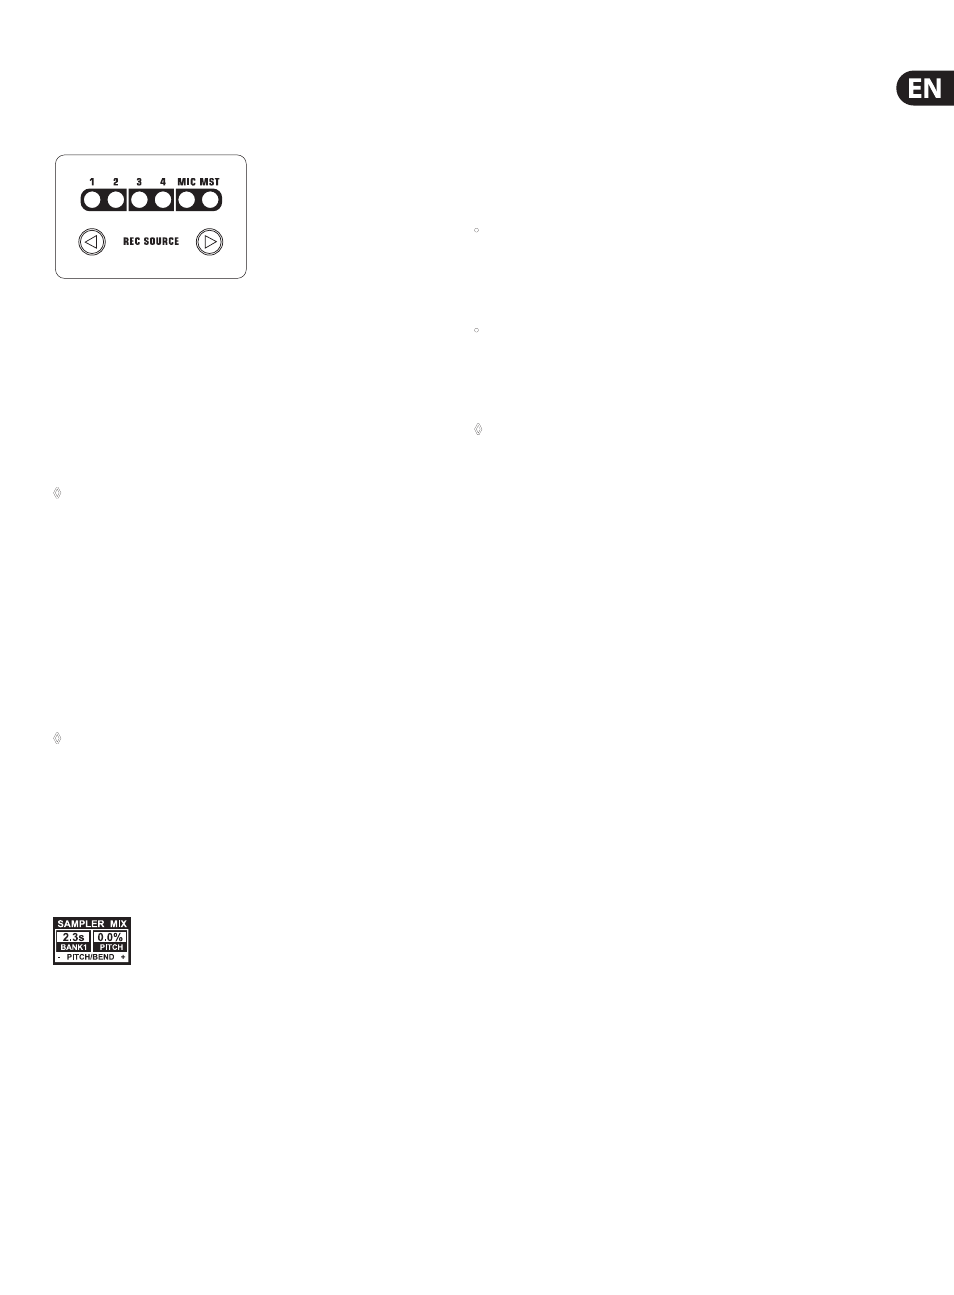
1) Select a signal source with the REC SOURCE push buttons (56).
The signal source is indicated above the REC SOURCE LEDs:
Signal sources:
1, 2, 3, 4: Stereo channel 1, 2, 3 or 4
MIC:
Microphone channel
MST:
Master (stereo sum)
2) Use the SAMPLE LENGTH push buttons (58) to specify the recording
duration you want. The length ranges between 1 and 16 beats or “∞”
(infinite recording).
◊
The actual recording time depends either on the detected BPM tempo
or the MIDI Clock. The Sampler synchronizes with the BPM Counter
provided that the BPM Counter is assigned to Channel 1, Channel 2 or
Master. When this is not the case, the Sampler is synchronized with
the MIDI Clock.
3) Use BANK ASSIGN (60) to select the memory bank. The MODE push button
(61)
of the selected bank lights up yellow to indicate its readiness to record.
4) Start the recording by using the RECORD/IN push button (59).
5) The recording stops after the number of beats specified beforehand.
6) Alternatively, stop the infinite recording (∞) by pressing the PLAY/OUT
push button (45) or by pressing the REC push button again.
◊
The recoding duration of infinite recording (
∞) is specified by pressing
the RECORD/IN push button (59) and the PLAY/OUT push button (62).
In case Loop Mode is activated at the same time, the sampler
immediately switches to playback by pressing the PLAY/OUT
push button.
Memory:
The maximum recording time is 32 seconds for both banks. The recording stops
when the memory is full.
The length of a sample and the time left are shown on the Sampler Mix display.
5.2 Playing back samples
1) Turn the VOLUME/MIX knob (55) to the center position.
2) Press the PLAY push button to start playback.
3) Press PLAY a second time to stop playback.
5.2.1 Insert function
The sample playback is carried out in Mix Mode or Insert Mode. In both cases
the sample is played back on the channel selected with REC SOURCE push
buttons (56). This can also be the stereo sum. When playing back in Mix Mode,
the sample is mixed to the specific channel or is routed to the crossfader.
When playing back the sample in Insert Mode, the sample is crossfaded to the
assigned channel.
•
When playing back in Mix Mode, the INSERT push button (54) is not allowed
to be pressed (push-button LED is off). The VOLUME/MIX knob (55) is used
as a channel fader (volume) with which the sampler signal is mixed to the
signal source. The sampler signal is assigned to the crossfader by pressing
the CF ASSIGN push button (65)
•
Press the INSERT push button (54) to play back the sample in
Insert Mode. The VOLUME/MIX knob (55) can now be used as crossfading
control (Mix). Turn the knob completely to the right to hear only the sample
during playback. When turning the knob to the left, the sample fades into
the signal source of the selected channel.
◊
Assigning the crossfader to the Sampler is only possible in Mix Mode.
As soon as the CF ASSIGN push button (65) is pressed, the Insert function
is automatically deactivated.
5.2.2 Reverse and loop playback
Use the MODE push buttons (61) for Bank 1/2 to determine the type of playback.
Select the playback mode for each bank:
REVERSE:
1) Tap the MODE push button to switch to Reverse Mode. The REVERSE LED
lights up. By pressing PLAY, the sample is played back in the reverse direction.
2) Tap the MODE push button again. The REVERSE LED goes out. The sample is
played back in the forward direction.
LOOP (infinite loop):
1) Press the MODE push button for approximately 1 second to deactivate
Loop Mode. The LOOP LED goes out. The sample is played back as long
the PLAY push button is pressed. This type of playback is ideal for short
inserts/samples.
2) Press the MODE push button again for approximately 1 second to
activate Loop Mode. The LOOP LED lights up. The sample is played back
as infinite loop by pressing PLAY.
5.2.3 Crossfader start
The Crossfader Start function lets you start the Sampler playback with
the crossfader. To be able to use this function, the Sampler needs to be
assigned to the crossfader.
1) Press the CF ASSIGN push button to route the Sampler to one side of the
crossfader (A or B).
2) Press CF START to activate Crossfader Start.
3) Press the BANK ASSIGN push button to select the bank that is to be
triggered by the crossfader.
Playback starts as soon as you move the crossfader to the side assigned
to the Sampler.