Switronix ReconX5 User Manual
Page 4
SDI
IN
SDI
OUT
Power
output
VIDEO
Indicator LED
LINK
Indicator LED
Power
input
+
+
1
2
3
4
5
6
SDI OUT
SDI OUT
1 2
ON
Power Input
IR
1 2
ON
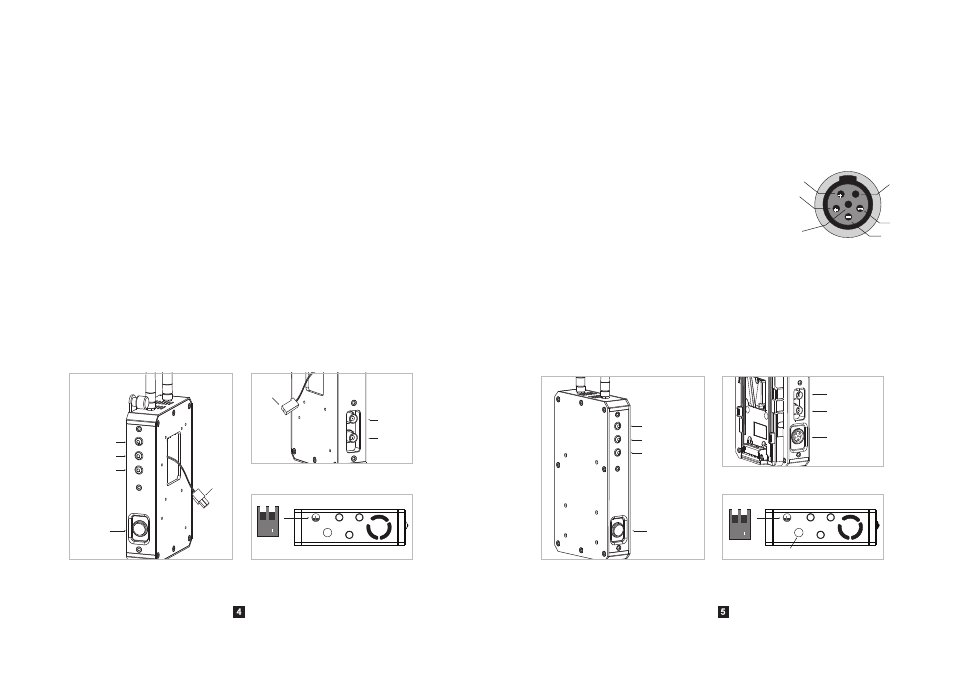
RECON X5 MODULAR MODEL OVERVIEW
RECON X5TX
Operation Panel
。Power Switch with LED indicator
Press to turn RECON X5TX on or off. The above LED indicator turns
green when the power is on.
。LED Lights
VIDEO LED lights up when RECON X5TX receives and transmits signal.
LINK LED lights up when the signal link between RECON X5TX and
RECON X5RX is established.
Back Panel
1. SDI IN
For SDI signal input
2. SDI OUT
SDI signal loop out
Power Interface
1. Power Input Interface
Connect to JetPack or other power supply, input voltage: DC 11V-17V
(RED+, BLACK-)
2. Power Output Interface
Connect to the camera, output voltage: DC 11V-17V(RED+, BLACK-)
Sync Button
When users need to add the transmitter, press this sync button to couple
with the receiver. When adding, press lever 1 to ON, two seconds later,
reset it to OFF.
Power
Switch
Power
Indicator LED
Operation Panel
Back Panel
Bottom Panel
Operation Panel
Bottom Panel
Back Panel
RECON X5RX
Operation Panel
Power Switch with LED indicator
Press to turn RECON X5RX on or off. The above LED indicator turns
red when the power is on.
LED Lights
VIDEO LED lights up when RECON X5RX receives and transmits signal.
LINK LED lights up when the signal link between RECON X5TX and
RECON X5RX is established.
Terminal Connection Panel
1. 2 SDI OUT
SDI signal loop out
2. Power Input Interface (Type: EGG.2B.306)
Connect to external power supply equipment,
input voltage: DC 11V-17V
Pins: 1,2: +; 3,4: -; 5: Contact Judgment, need
to connect the negative: 6: Empty
DIP switch of signal format
When signal input is 1080p50, 1080p25,1080i50, 720p50, turn lever 1
upward to OFF;
When signal input is other formats, turn lever 1 downward to ON.
IR remote control signal receiving window
The remote control setup the system through this window.
Note: The remote control must face to this window when the system is
setting up.
VIDEO Indicator
LED
LINK Indicator
LED
Power Indicator
LED
Power
Switch
Power input