S&S Cycle Replacement Engines Emission-Related User Manual
Page 6
6
7- Install Fuel Tank
A- Install fuel tank making sure it does not come in contact with engine or sensors.
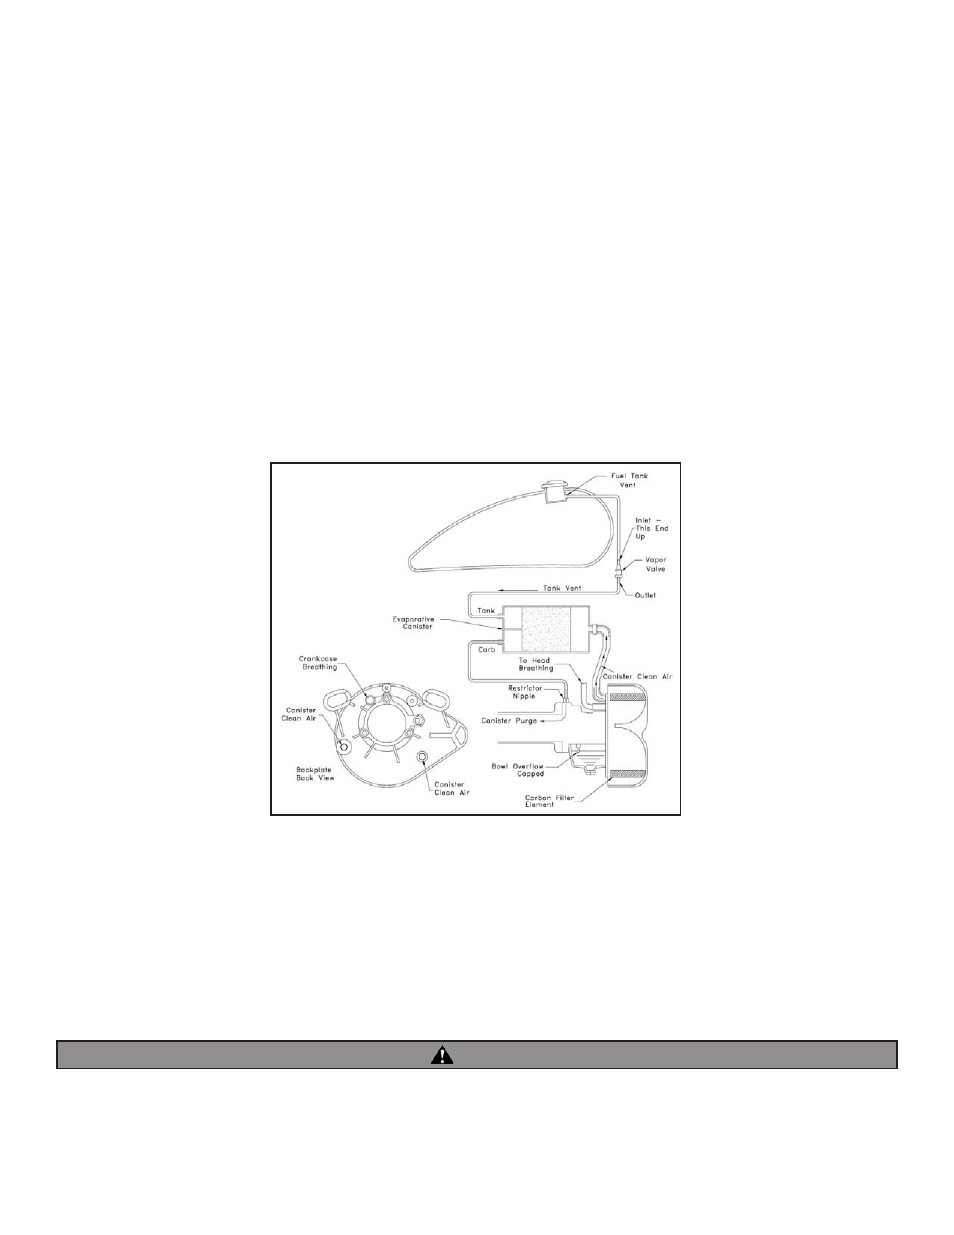
8- Hook up Evaporative System
The stock Harley-Davidson® evaporative system must be used when installing an S&S Replacement Engine.
A- Using the “Evaporative Hose Routing Diagram” provided below, establish a routing for the evaporative system hoses. Ensure that all hoses
are free of contact with any hot or moving parts.
B- After the evaporative hose routing has been determined, cut the hose to length if need be and make the proper connections.
NOTE: The “Canister Clean Air” hose must be routed to the backplate. The backplate used on S&S Replacement Engines has two different locations that
the canister clean air hose may be connected. One location is towards the rear of the motorcycle and one towards the front. From the factory S&S has
installed a socket head plug in each location. Follow the steps below to complete the installation.
1. Determine which backplate location will work best with your application.
2. Remove air cleaner cover and filter element from backplate
3. Remove backplate by removing the three slotted head screws and two head breather screws.
4. Remove socket head plug from backplate and replace with 90° fitting.
5. Install 3/8” ID hose fitting onto 90° fitting.
6. Install backplate, filter element and air cleaner cover using blue thread lock on slotted head and Phillips head screws.
7. Determine a location to install 1/2” ID to 3/8” ID hose reducer fitting. This fitting steps the factory H-D® 1/2” ID canister clean air hose down to 3/8” ID.
8. Cut the factory 1/2” ID hose and the provided 3/8” ID hose to proper lengths.
9. Make all connections using provided spring clamps to secure hose.
C- Cap off the carburetor bowl overflow using the provided 3/16” x 1/2” rubber cap and nylon tie strap. If desired, the overflow may be routed to
the unused canister clean air location on the backplate. To do this you will need to source your own hose and fitting(s).
9- Fuel Hose
A- Slip hose clamp over end of fuel hose that is included with the engine. Lubricate the steel fuel inlet tube attached to the carburetor by
applying a thin coating of oil. Slip end of fuel hose over tube.
B- Position fuel hose to avoid contact with hot cylinders or other engine parts. The steel tube on the carburetor can be rotated as needed.
Tighten hose clamp securing the fuel hose to the carburetor fitting. Slip protective fuel hose covering over fuel hose and position it to
prevent direct contact between fuel hose and cylinders or other engine parts.
C- Connect fuel hose to gas tank petcock using hose clamp provided.
Gasoline is extremely flammable and explosive under certain conditions. Do not smoke or expose gasoline to sparks or open flame.
Gasoline fumes are toxic when inhaled. Perform installation in a well ventilated area away from open flames or sparks. Unwarranted
sparks and inadvertent engagement of starter while working on electrical components can cause serious injury or death.
WARNING
Evaporative Hose Routing Diagram