Dm15a9c/cdm2csa — maintenance – Multiquip CDM2CSA User Manual
Page 23
DM15A9C/CDM2CSA — OPERATION AND PARTS MANUAL — REV. #1 (11/09/05) — PAGE 23
Maintenance
Clutch Adjustment
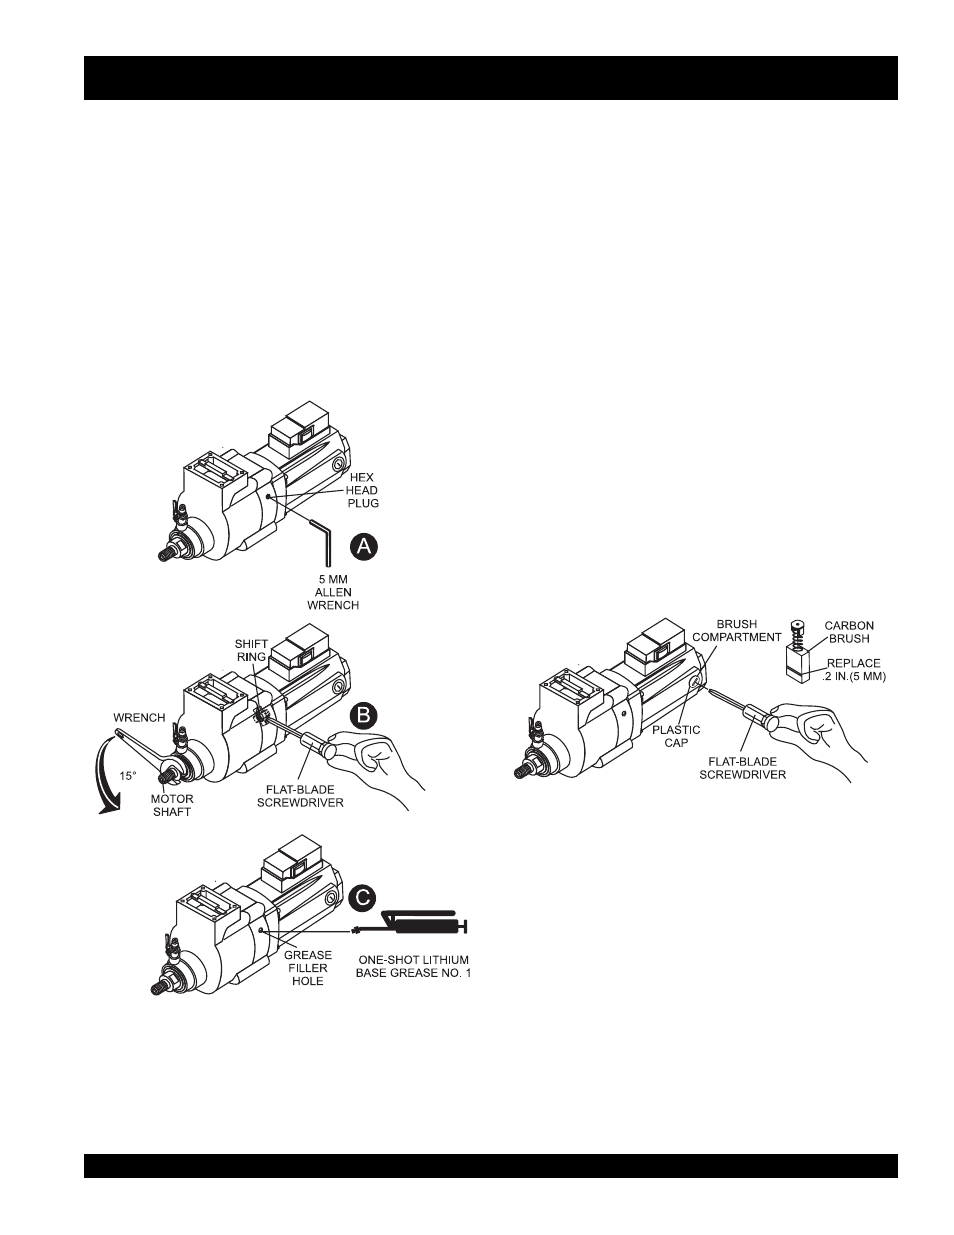
1.
The DM15A9C electric motor is basically maintenance free.
However, it may become necessary at some time to adjust
the clutch.
2. Using a 5 mm allen wrench, remove the hex plug as shown
in Figure 23A to gain acess to the clutch adjustment hole.
3. Insert a small blade screwdriver (Figure 23B) into the access
hole so that it prevents the motor shaft from rotating fully.
4. Using the supplied wrenches (Figure 23B) rotate the motor
shaft counterclockwise about 15 degrees. The screwdriver
will keep the shaft from rotating fully.
Lubrication
1. Using a 5 mm allen wrench, remove the hex plug as shown
in Figure23A.
Figure 8. Wall Application
2. Visually inspect to see if grease is present. It may be
necessary to insert a small blade screw driver or similar
device into the filler hole to determine if the grease level is
low.
3. If the grease level is low, apply 1 shot of
lithium base grease,
grade N0.1. DO NOT over fill. See Figure 23C.
4. Reinstall hex plug and tighten securely.
DM15A9C/CDM2CSA — MAINTENANCE
Carbon Brushes
1. Using a flatblade screw driver unscrew the plastic cap as
shown in Figure 24 to gain acess to the carbon brushes.
There is a plastic cap on each side of the drill motor.
2. Periodically check the carbon brushes for signs of wear.
Typically replace brushes when the wear height is down to
0.2 inches (5mm). Using defective or worn brushes could
cause motor failure.
3. Replace worn or defective brushes with new ones. Keep
them clean so that they can slide freely within the brush
holder. Use only MQ recommended parts.
Cleaning and Storage
1. Clean drill motor and drill rig with a mild soap and a damp
cloth removing dirt and foreign debris that might have
accumulated on the equipment during operation. DO NOT
use gasoline or harmful chemical as a cleaning agent some
of these chemicals are harmful to plastics.
2. Remove any dirt and dust from the motor vents
3. Store equipment in a clean dry location that is moisture free
out of the reach of children and unauthorized personnel.
Figure 23. Clutch Adjustment/Lubrication
Figure 24. Carbon Brush Replacement