Multiquip HAL 300 User Manual
Page 14
PAGE 14 — Bullfloat HAL 150 & 300 — PARTS & OPERATION MANUAL — REV. #1 (05/27/99)
HAL 150 AND 300 — OPERATIONS
Careful! :
When pushing the tickler lever (
4
) half way down,
the fuel will flow directly into the engine and will
create
starting
problems.
Be
sure
to push the tickler lever fully down.
Careful! :
Never change the adjustment of the main jet screw
on the carburetor
(
5
).(Fig 2.5)
6.
Open the throttle-handle half way.
7.
Give the starter rope (
6
) (Fig 2.6) a rapid vigorous pull
until the engine fires.
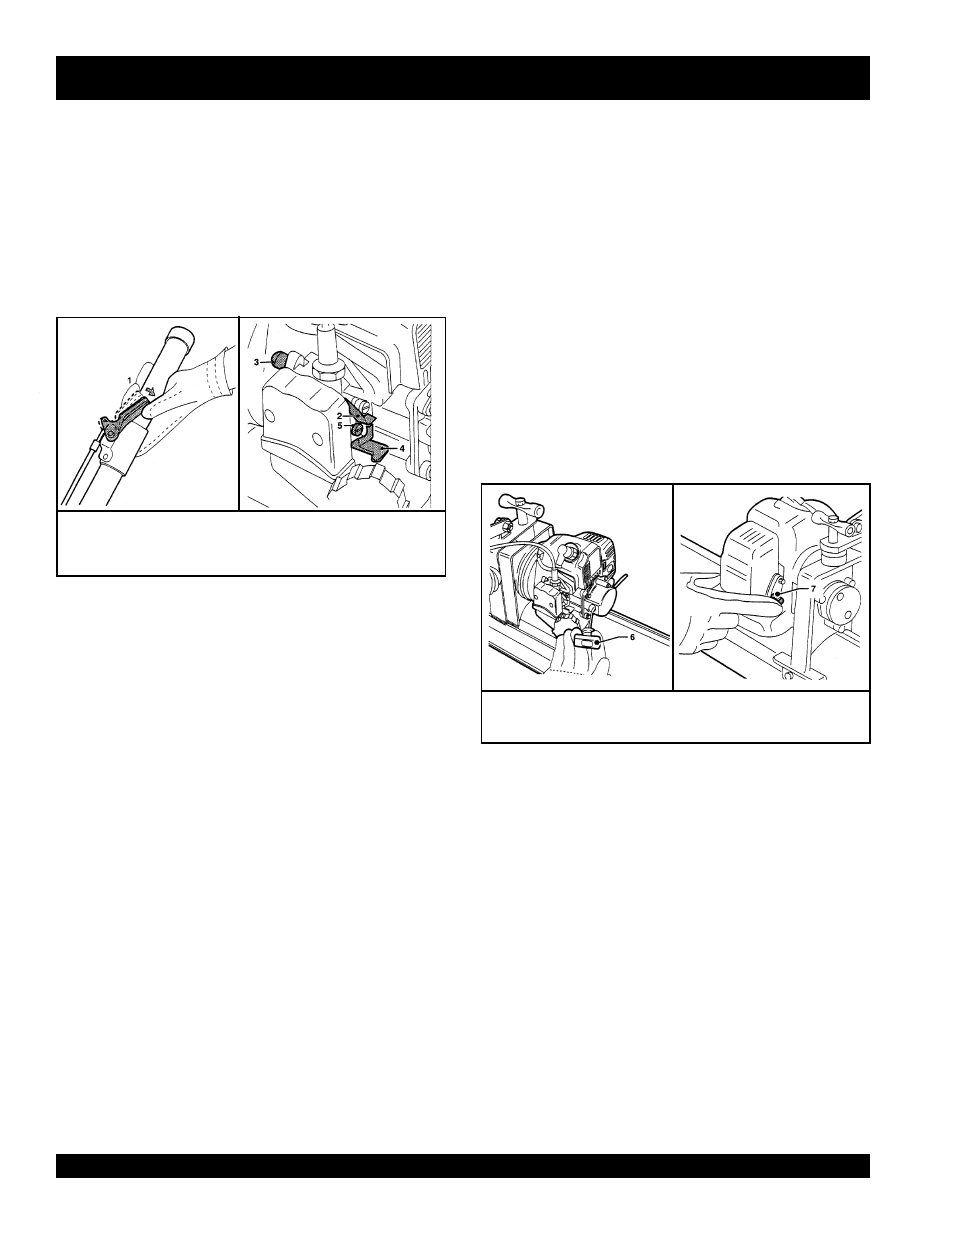
Figure 2.5
Idle position of the throttle-handle and
components of the carburator
WARNING:
Do not pull the starter rope all the way. The rope
might break. Use 3/4 of the starter rope’s length.
8.
If you have executed the starting procedure in the correct
way, the engine will run after approx. 2 pulls of the starter
rope.
9.
Allow the engine to run for approx. 10 seconds. Push the
choke lever (2) (Fig 2.5) slowly down. The period of time
depends on the ambient temperature.
Starting Procedure
1.
Check that the Bullfloat is properly assembled, and the
fuel tank is filled.
2.
Place the Bullfloat in the direct vicinity of where your are
going to smooth the surface of the concrete.
3.
Adjust the throttle-lever (
1
) to the idle-position.(Fig 2.5)
4.
Put the choke-lever (
2
) in the upper position.(Fig 2.5)
5.
Push simultaneously the black priming pump (
3
) and the
tickler lever (
4
) (Fig 2.5) until fuel comes out of the
overflow pipe (
c
). (Fig 2.4)
Smoothing concrete
11.
Adjust the right trowel blade angle. (read paragraph 2,
page 11)
12.
Smooth the freshly poured concrete.
Tip:
Repeat procedure
12
in the event the treated surface is
not smooth or level enough.
13.
Switch “off” the Bullfloat after you have finished the
concrete lane:
— Put the throttle lever (
1
) in the idle position. (Fig 2.5)
— Press the black stop-button (
7
) for a couple of
seconds until the engine stops. (Fig 2.6)
14.
If you do not expect to use the engine for a long period
of time, drain the fuel tank of fuel and let the engine run
at idle speed until the fuel in the carburetor is used and
the engine stops.
15.
After use, place the Bullfloat on a dry and clean surface.
WARNING!
Make sure to refill the fuel tank before you run out
of fuel during operation. Do not let the engine run until all the
fuel is used. This might cause starting problems. The average
operation time is approx. 45 min. (per tank).
Figure 2.6
Location of the starter rope and the stop button
10.
After allowing a three-minute warming-up period set the
throttle handle to the desired engine speed. The Bullfloat
is now ready for use.