Meade Instruments Polaris Series User Manual
Page 7
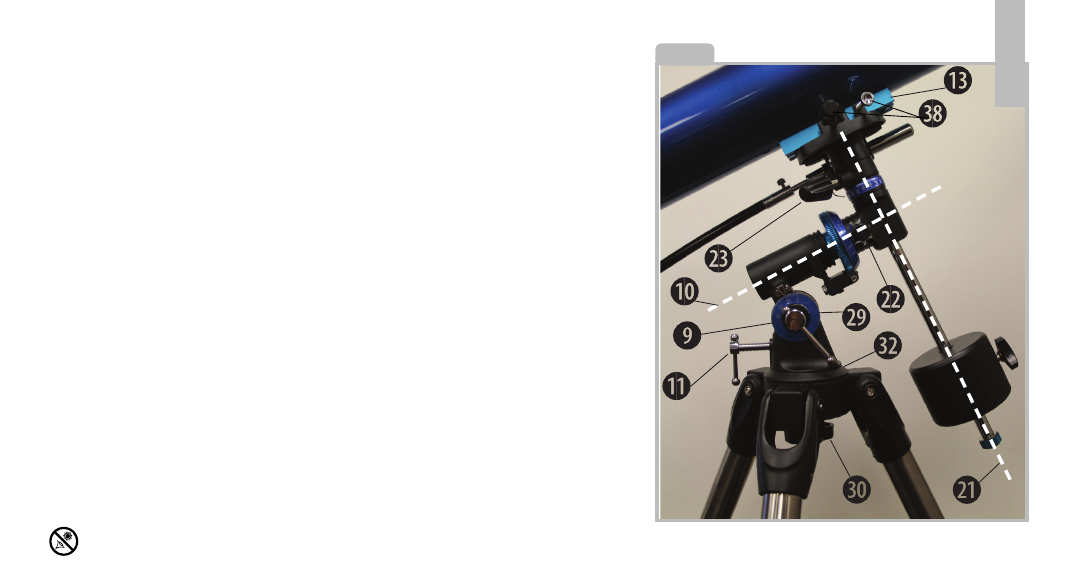
Fig. 3
5
PREPARE THE MOUNT
1. Attach the flexible cables (3) and (4).
These cables are secured in place with
a firm tightening of the thumbscrews
located at the attachment ends of each
cable.
2. Tilt the polar axis of the telescope to
roughly a 45° angle with the horizon:
Loosen the latitude adjustment lock (9) so
you can move the mount to the desired
position.
3. Turn the latitude adjusting screw (11)
clockwise until the latitude scale (29) on
the side of the mount reads approximately
45°.
4.Re-tighten the latitude adjustment lock
(9) to secure the mount in place.
ATTACH THE OPTICAL TUBE TO THE
MOUNT
1. Lay the optical tube saddle plate (13)
onto the top of the mount as shown in
Fig 1.
2. Tighten the ota saddle plate lock
knob(s) (38) to a firm feel.
ATTACH THE RED DOT VIEWFINDER
An eyepiece (19) has a narrow field of
view. The red dot viewfinder (24) has
a wider field of view, which makes it
easier to locate objects. Once the red
dot viewfinder is aligned to the optical
tube, the red dot can be used to locate
and place objects more easily in the
telescopes eyepiece.
1. Note the two thumbscrews (16, Fig.
4) thread onto two bolts on the optical
tube. Remove the thumbscrews from
the tube.
2. Line up the two holes on the red dot
viewfinder bracket over the two bolts.
Slide the bracket over the bolts with the
viewfinder lens facing the front of the
telescope.
3. Replace the thumbscrews (16) on to
the bolts and tighten to a firm feel.
NOTE: The Polaris 80 and 90 models
use a dovetail to secure the red dot
viewfinder. For these models, slide the
viewfinder bracket into the viewfinder
holder and secure with the single
Looking at or near the
Sun will cause irreversable damage to your eye. Do not point this telescope at or near the Sun. Do not look through the telescope as it is moving.