Fig. 1 fig. 2 fig. 3 fig. 4 – Mayline Forester Wood 4-Post Table User Manual
Page 2
Lower
Hinge
(Rough Side)
Groove
Fig. 1
Fig. 2
Fig. 3
Fig. 4
9
5
4
7
3
8
E9
E5
E10
E8
6
2
E3
E2
E1
E4
E7
E6
E10
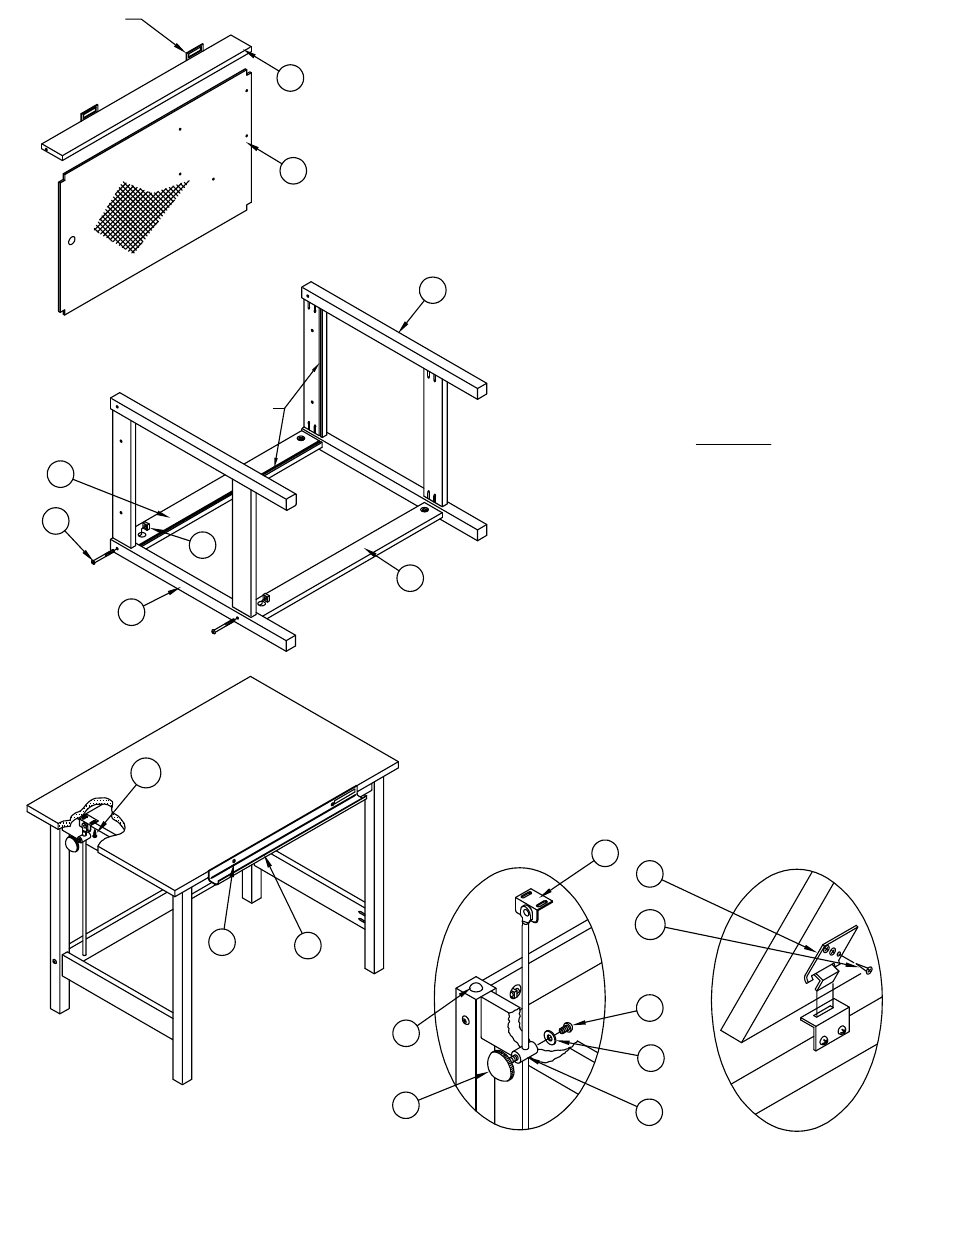
1. Position Table End Assemblies (3 & 4) as
shown per Fig. 1 and assemble Upper and
Lower Back Rail (7 & 8 - rails without hinges)
using Bolts (E9) and Square Nut (E5).
NOTE: Do no tighten any bolts until base is
fully assembled.
2. Align Well Bottom (9) into grooves with the
rough side down and hole cluster to the right
side of the assembly. Slide into position.
3. Attach Front Rail Assembly (5) using Bolts
(E9) and Square Nut (E5) per Fig. 1. Tighten
all previously assembled bolts on base.
Stand table up on legs.
4. Attach Tilt Rod Guides (E1) using Washer
(E6) and Screw (E7) per Fig. 3, do not bolt
tightly. Guides must swivel when top is tilted.
Slip Tilt Rod Assembly (2) through hole in tilt
rod guide at this time. LOOSELY hold in
place with Knob (E4).
5. Attach Rubber Bumpers (E3) to back legs.
6. Align holes in Upper Hinge (E2) with holes
in underside of Top, attach with Screws
(E10) per Fig. 4.
7. Hold top in vertical position , insert ears of
upper hinge sections into slots in lower hinge.
Allow top to rest on Bumpers (E3) in
horizontal position per Fig. 4.
8. Attach Tilt Rod Assemblies (2) to top with
Screws (E10) per Fig. 2.
9. Attach Pencil Trough (6) with Screws (E8)
at desired position per Fig. 2.
(OPTIONAL if using 8187 Light Top)
(2)