Iso grips, Installation – Kuryakyn 6183 ISO GRIPS/06-UP GL 1800 with OEM HEATED GRIPS User Manual
Page 2
PAGE
2
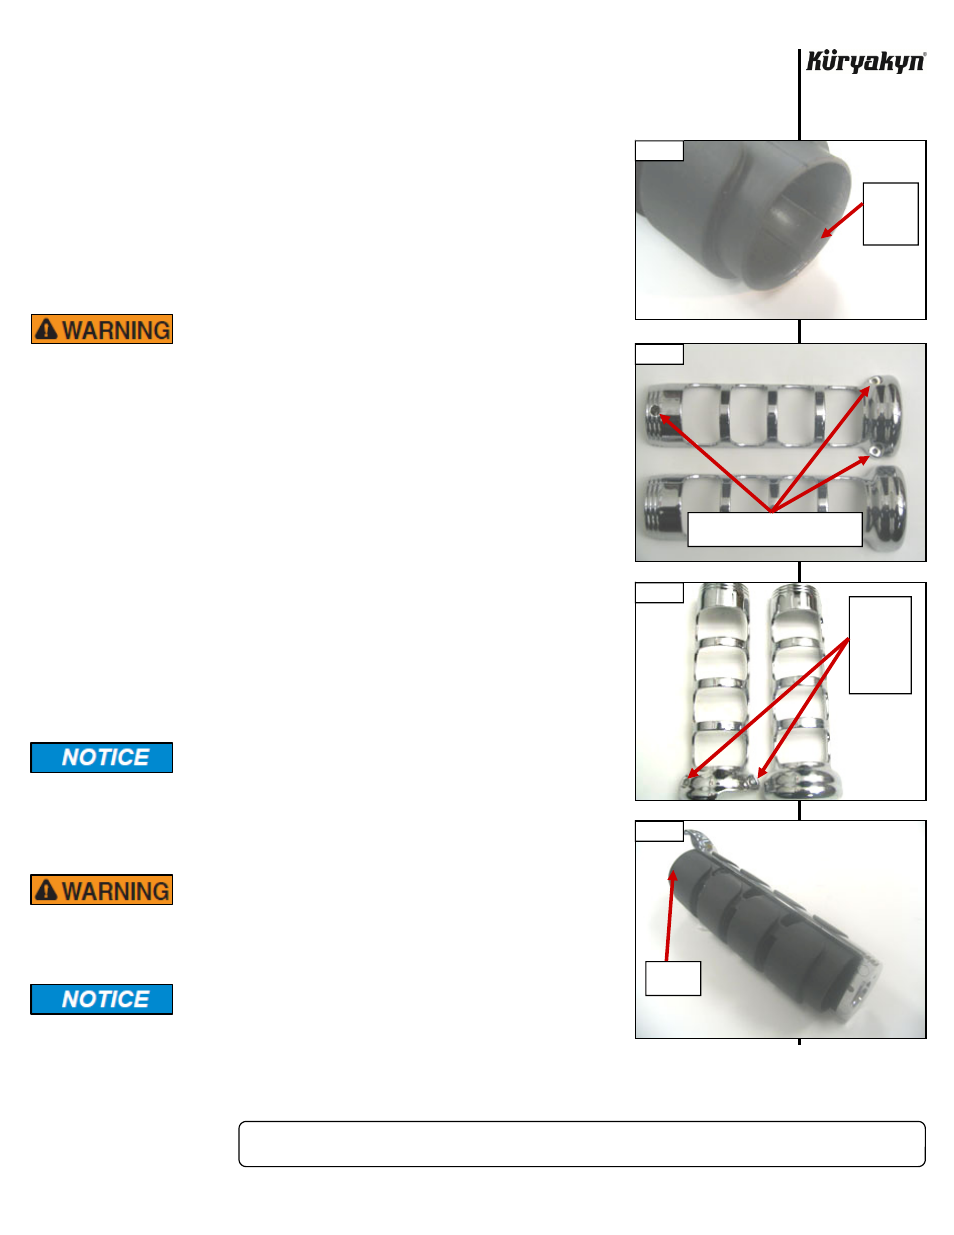
STEP 4
Locate the ISO sleeve and identify the end that will slide on first (it is tapered on the inside edge.)
PIC 2
Right
Side
Procedure
STEP 5
See PIC 3 and PIC 4 to determine front and back covers. Place the ISO
Sleeve into the right front cover with the tapered end facing towards the
hand
controls.
PIC
5
STEP 6
Apply a small amount of window cleaner on the stock grips to ease the
installation of the ISO grips.
STEP 7
Slide the ISO sleeve and front cover all the way on, ensuring that the grip
heater wire is in the cover’s slot and not being pinched.
ALLOW SUFFICIENT TIME FOR THE GRIPS TO DRY
BEFORE RIDING THE MOTORCYCLE. (ROUGHLY AN HOUR
AT 70°). WITH TWO FINGERS CHECK TO MAKE SURE
THAT THERE IS NO TWISTING OF THE COVER BEFORE
RIDING. A LOOSE COVER MAY CAUSE LOSS OF
CONTROL RESULTING IN SERIOUS INJURY OR DEATH.
STEP 8
Position the right side rear cover as shown in PIC 6. Ensure that the tabs in
the rear cover align with the slots in the front cover; squeeze the covers
together until the tabs and slots positively engage. It may be helpful to
push/pull back on the rubber pads as seen in PIC 7.
NOTE:
It may help to use cable ties around the ribs on the grip cage and
tighten evenly, to get the tabs and slots to positively engage. PIC 7
STEP 9
Secure the cover with the three #4-40 x 3/8” SHCS screws from the front
side, finger tighten for now, their location is shown in PIC 8.
STEP 10
Position the end cap so that the four holes in the end cap align with the four
holes in the covers, insert the four #4-40 x 3/8” SHCS screws; finger tighten
for now. PIC 8
STEP 11
Ensuring that the grip heater wire is not pinched, tighten all the fasteners.
Secure all wiring away from any moving parts, pinch points or
extreme heat. Küryakyn WILL NOT issue a warranty on any
electrical component that fails due to pinched, crimped, broken,
abraded, melted or frayed wires.
STEP 12
Ensure proper throttle operation before moving onto the left side or starting
the
motorcycle.
ROTATE THROTTLE AND CHECK THAT IT MOVES FREELY
AND RETURNS TO CLOSED BEFORE STARTING BIKE.
FAILURE OF THE THROTTLE TO PROPERLY RETURN
COULD RESULT IN LOSS OF CONTROL CAUSING
SERIOUS INJURY OR DEATH.
It is the installer’s responsibility to ensure that all of the
fasteners (including pre-assembled) are tightened before
operation of the motorcycle. Küryakyn will not provide warranty
coverage on products or components lost due to improper
installation or lack of maintenance. Periodic inspection and
maintenance are required on all fasteners.
ISO GRIPS
INSTALLATION
-cont.-
PIC 2
PIC 3
PIC 4
PIC 5
TAPERED
END
GOES ON
FIRST
RIGHT FRONT COVER HAS THREE
SCREW HOLES ON OUTSIDE
LEFT
FRONT
COVER
HAS TWO
SCREW
HOLES ON
OUTSIDE
TAPERED
END