Tech-connect pouch, Installation – Kuryakyn 1797 TECH-CONNECT POUCH W/MIRROR MOUNT User Manual
Page 2
PAGE
2
It is the installer’s responsibility to ensure that there is adequate clearance
between the Tech-Connect Pouch and any painted surfaces.
Küryakyn is not responsible for any damage due to
inadequate clearance.
Avoid damage to the motorcycle. Protect painted surfaces
with a soft cloth or blanket.
STEP 2
Determine which side of the motorcycle that you would like to mount the
Mirror Mount. Remove that mirror.
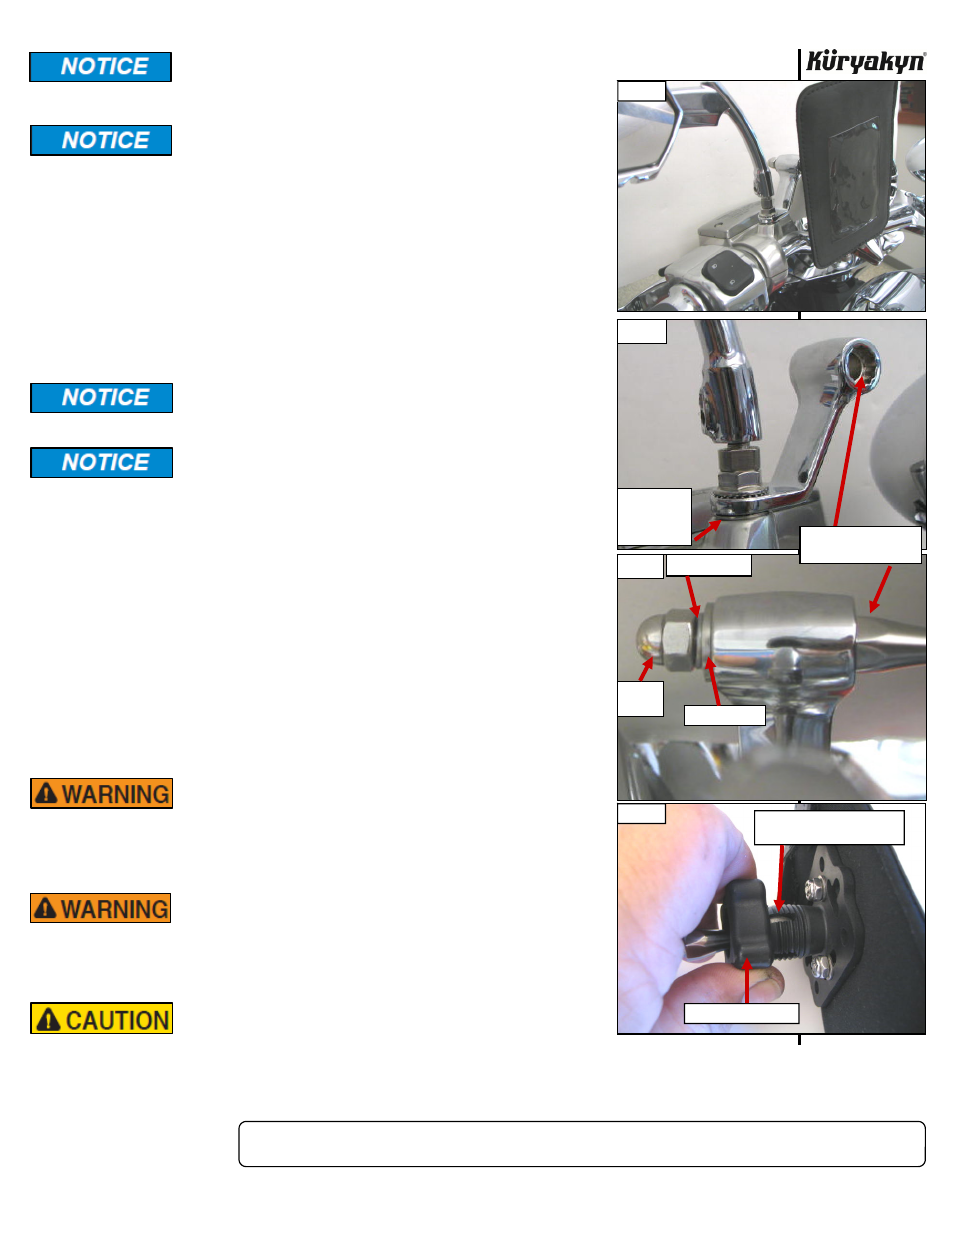
STEP 3
Determine the orientation of the mirror mount so that it will not interfere
with any component on the motorcycle. (The typical mounting position is
opposite the direction of the mirror head.) PIC 1 Insert the threaded
portion of the mirror through the mirror mount. Place the included
internal tooth lock washer under the mirror mount and thread the mirror
back to the mount on the motorcycle. (Depending on the area of
installation you may need to use the included flat washer between
the internal tooth lock washer and the Mirror Mount to give the
Mount a level surface.)
Confirm proper thread depth engagement between the mirror
and the perch. The mirror should thread in to the perch 1-1/2
times it’s thread diameter.
Ensure that the supplied anti-seize is applied to all threaded
fasteners before installation; this will make future removal of
the fasteners easier.
STEP 4
To mount the Tech-Connect Pouch, place the ball stud through the Mirror
Mount, lining up the edges of the flats on the stud with the notches in the
mirror mount. PIC 2 Place the flat washer first, then the lock washer over
the protruding end. Apply anti-seize to the threaded portion of the stud
and secure with the acorn nut. PIC 3
STEP 5
Place the nylon tension nut over the ball end of the Ball Stud. Install the
Tech-Connect Pouch to the Ball Stud by inserting the ball into the fingers
on the Pouch back plate. PIC 4 Thread the nylon tension nut onto the
fingers. Tighten the tension nut to the desired resistance. See Step 9,
Page 3 for further information on the tension nut.
STEP 5
Turn the handlebars in both directions to their full stop position and
ensure that there is clearance between the Tech-Connect Pouch and the
gas tank, dash and other components on the motorcycle.
ENSURE THAT THERE IS CLEARANCE AT ALL POINTS
WHEN THE HANDLEBARS ARE TURNED. INSUFFICIENT
CLEARANCE MAY CAUSE DAMAGE TO THE
MOTORCYCLE OR CAN CAUSE LOSS OF CONTROL
THAT COULD RESULT IN SEVERE INJURY OR DEATH.
TO PREVENT POSSIBLE LOSS OF CONTROL, WHICH
COULD RESULT IN SERIOUS INJURY OR DEATH, WE
DO NOT RECOMMEND REMOVING, REPLACING OR
ADJUSTING THE DEVICE IN THE TECH-CONNECT
POUCH WHILE RIDING THE MOTORCYCLE .
Ensure that the installation of this product does not
interfere with the proper operation of the motorcycle
before riding.
TECH-CONNECT POUCH
INSTALLATION
-cont.-
PIC 2
INTERNAL
TOOTH LOCK
WASHER
GOES HERE
PIC 3
FLAT WASHER
LOCK WASHER
ACORN
NUT
LINE UP EDGES OF
FLATS WITH NOTCHES
PIC 4
PIC 1
INSERT BALL ON STUD INTO
FINGERS ON POUCH
NYLON TENSION NUT