Hypercharger, Installation – Kuryakyn 9420 HYPERCHARGER for YAMAHA User Manual
Page 2
PAGE
2
STRICTLY OBSERVE THE FOLLOWING GUIDELINES IN ORDER TO USE THE PRODUCT
PROPERLY AND AVOID POTENTIALLY DANGEROUS ACCIDENTS.
STEP 1
Read and understand all steps in the instructions before starting the installation. Park the
motorcycle on a hard, level surface and turn off the ignition. Let cool.
DISCLAIMER — PLEASE READ BEFORE PROCEEDING
Any modifications to a motorcycle’s exhaust or intake tract require carburetor re-jetting to
achieve
maximum
performance and maintain drivability. If you are uncomfortable with the
process of tuning your carburetor, we recommend that you bring your motorcycle to a qualified
motorcycle mechanic to have this kit installed. If you choose to attempt this procedure yourself,
refer to the carburetor removal, disassembly, reassembly and installation procedures outlined
in your Road Star service manual. The jets included in this kit were selected based on test
results with various combinations of components that we felt would represent the majority of
the customers purchasing this kit (see Addendum I). However, no two motorcycles are exactly
alike. Depending on the individual case, additional jets may need to be purchased from an
outside source. Küryakyn warrants the parts included in this kit to be free of defects in
materials and workmanship, but makes no claim whatsoever in regard to costs associated with
installation
or
tuning.
WARNING! YOU WILL BE WORKING AROUND THE ENGINE AND EXHAUST SYSTEM
DURING
INSTALLATION.
ENSURE
THAT THE ENGINE AND EXHAUST SYSTEM
HAVE FULLY COOLED TO PREVENT INJURY.
ATTENTION!
A factory service manual may be helpful in performing this installation. Do not attempt
to perform this installation if you are not confident in your ability to complete all of the
steps
in
the
procedure;
consult a trained technician
.
CAUTION! The installation of any high performance exhaust system can cause a “lean”
fuel/air mixture. A “lean” fuel/air mixture can cause engine overheating
resulting in severe engine damage. Küryakyn recommends rejetting
carbureted
bikes.
STEP 2
Remove the seat, fuel tank, and OEM air cleaner assembly. Disconnect the hoses
connected to the air cleaner while leaving them connected to the motorcycle. Save
the clamp that secures the air duct to the carburetor and the OEM fasteners used
to secure the stock air cleaner assembly to the motorcycle as some will be reused.
STEP 3
Remove the carburetor according to the section in your Road Star factory service
manual that outlines procedures for carburetor removal, disassembly, reassembly
and
installation.
NOTE:
Now is a good time to proceed with re-jetting the carburetor. We have
supplied jets to cover many common configurations. For jet locations and
jetting recommendations with various exhaust combinations see
Addendum I. Since the OEM screws retaining the float bowl are easily
damaged, we have included replacement M4 socket head cap screws to
replace
them,
if
necessary.
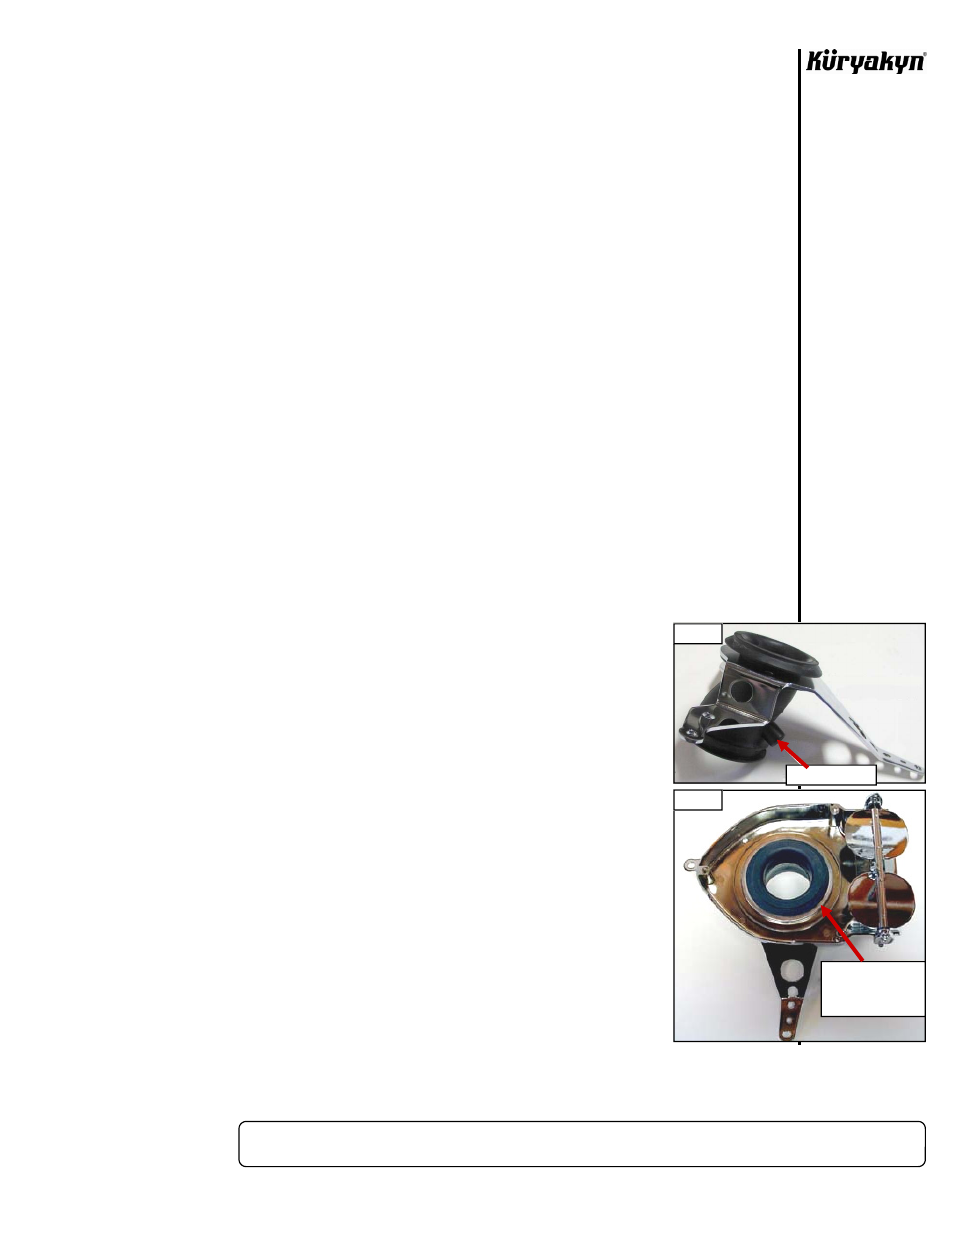
STEP 4
Insert the rubber intake duct into the main support bracket as shown in PIC.1. The
rubber nipple should be pointing toward the longest leg of the bracket.
STEP 5
With a hex wrench, remove the four button head screws securing the trap door
(round cover) to the face of the Hypercharger then remove the trap door and its
gasket.
STEP 6
Insert the rubber intake duct into the Hypercharger in the same fashion it was
installed in the main support bracket. See PIC.2. You may need to use a
screwdriver to help “poke” the flange of the Rubber Intake Boot into position
inside
the
Hypercharger.
HYPERCHARGER
INSTALLATION
-cont.-
PIC 1
PIC 2
RUBBER NIPPLE
RUBBER INTAKE
DUCT INSTALLED
IN HYPER BACK