Ride on, Hypercharger, Installation – Kuryakyn 9400 HYPERCHARGER AIR CLEANER KIT User Manual
Page 5
PAGE
5
STEP 23
Insert one of the supplied 3/8” double ended hose barbs into each end of the
supplied section of 3/8” hose and secure them in place using the supplied hose
clamps. Insert one end of the hose and barb assembly into the breather port
located
at
the
bottom
of the rubber intake duct and secure it using a supplied hose
clamp.
STEP 24
Hold the Hypercharger assembly in position. Slide the rubber intake duct over the
mouth of the carb and secure the mounting bracket to the cylinders with the M6
Hex Head bolts and flat washers provided.
Tighten the hose clamp around the
mouth of the carb.
STEP 25
Route the loose end of the hose and barb assembly installed in STEP 23 to the
crank case breather hose previously connected to the OEM right side air cleaner
back plate and secure using the remaining hose clamp.
STEP 26
Connect the open end of the 1/4” hose installed in STEP 22 to the vacuum nipple
located at the bottom of the vacuum pod on the inner front portion of the hyper
back
plate.
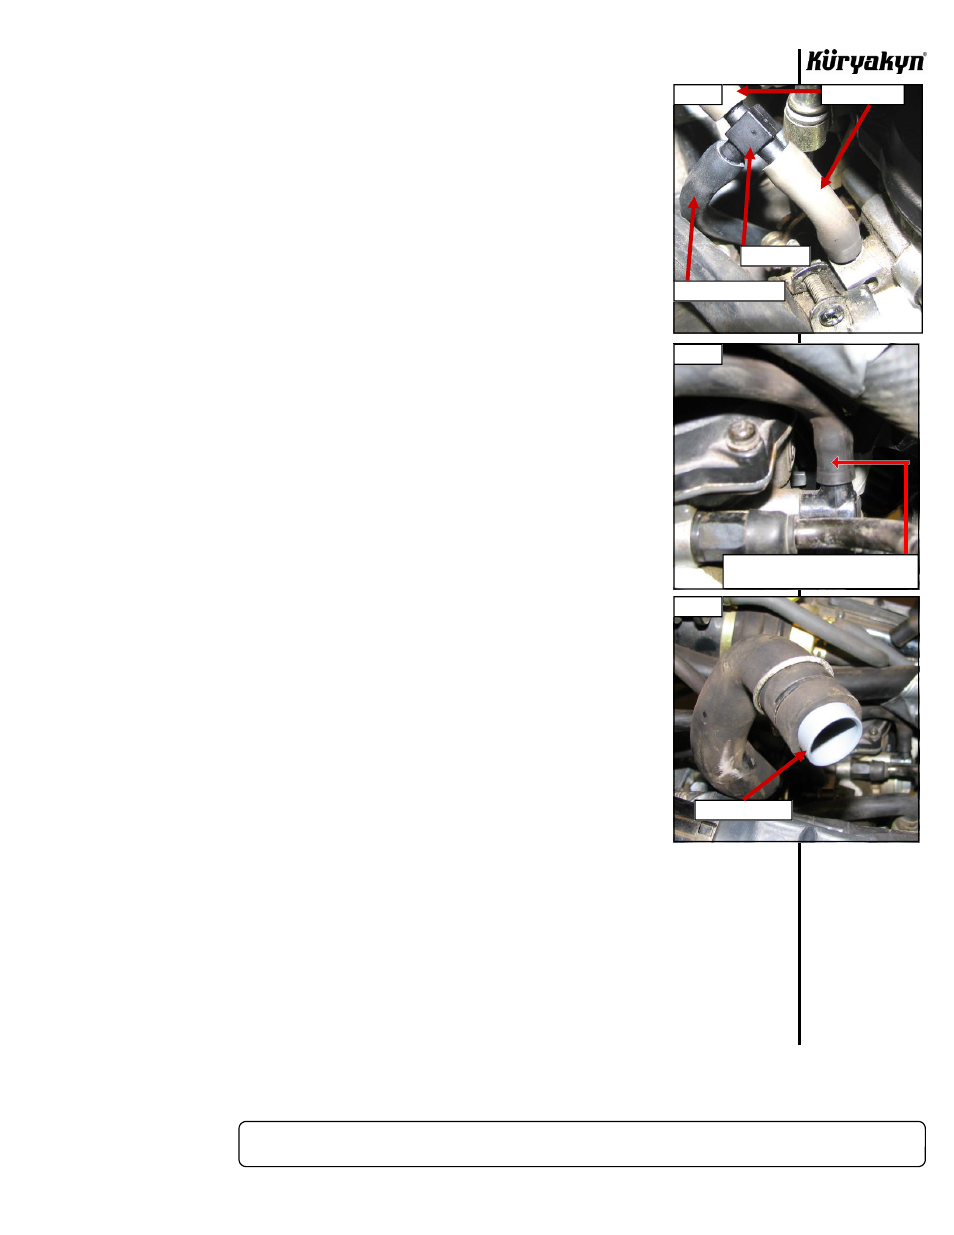
STEP 27
See PIC.7. The float bowl vent hose is connected to the left rear of the carb.
Remove this hose from the bike and cut four inches off of the end that was
previously connected to the carburetor. Reconnect the cut end of the hose to its
original location. Route the vent hose downward under the carb and connect it to
the 90 Degree Elbow that was installed in the back plate of the hyper. See STEP
14.
CAUTION! If the float bowl vent hose is pinched or kinked your bike will not
run
properly!
STEP 28
See PIC.8. Insert the supplied Gray Vinyl Cap in to the fresh air inlet hose that was
connected to the crossover tube. You may choose to spread a thin layer of silicone
inside the hose to help secure the cap inside the hose.
STEP 29
Reinstall the air box.
STEP 30
Work backwards from STEP 8 to STEP 2 to complete the installation.
STEP 31
Double check the tightness of all related fasteners, check for hose
clearance and check throttle for correct operation, making sure it returns
properly, before starting the bike.
ATTENTION!
It is the installer’s responsibility to ensure that all of the fasteners
(including preassembled) are tightened before operation of the
motorcycle. Küryakyn will not warranty components lost due to improper
installation. Periodic maintenance may be required.
Ride On!
HYPERCHARGER
INSTALLATION
PIC 6
PIC 7
PIC 8
VACUUM LINE
“T” FITTING
TO HYPERCHARGER
CONNECT VENT HOSE TO ELBOW ON
BACK OF HYPER
GRAY VINYL CAP