Ride on, Led speaker grills for victory – Kuryakyn 7698 LED SPEAKER GRILLS FOR VICTORY User Manual
Page 3
Ride On!
PAGE
3
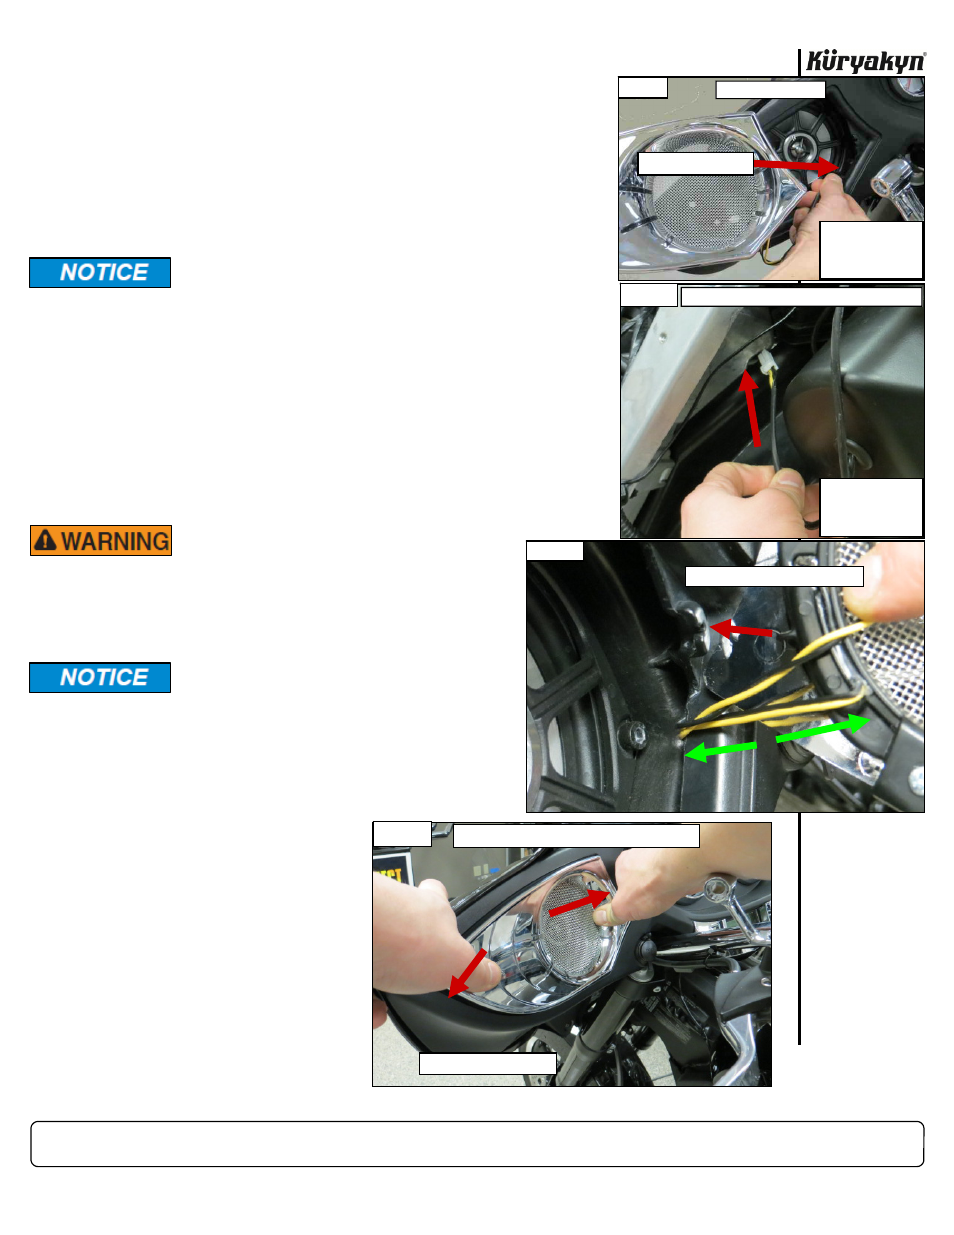
STEP 9
Refer
to
PICs 9 and 10. Route the wiring harness from the clutch-side Speaker Grill through the
inner fairing. Continue to route the wire between the frame and inner fairing, aiming for the Fair-
ing “Run” Adapter. Refer to PIC 11. Let the Grill hang down about three
inches for now.
STEP 10
Repeat
STEP 9
for the brake side.
STEP 11
Apply Dielectric Grease to the open connector ends; link the connectors
from both Speaker Grills to the two adapters on the Fairing “Run”
Adapter. Turn the ignition on and test for proper function of the Speaker
Grill lights.
STEP 12
Reconnect the turn signal connectors; reinstall the outer fairing. Recon-
nect the headlight bulbs; reinstall the headlight assembly and headlight
trim. Reinstall the screws in the outer fairing and speaker area. Torque
all headlight-mounting and fairing screws to 36 in/lbs.
STEP 13
Refer
to
PICs 11 and 12. Align the locating tab on the backside of the
grill with the raised slot in the inner fairing. Snap the Speaker Grill in
place as shown. Repeat for the other side.
LED SPEAKER GRILLS FOR VICTORY
INSTALLATION
PIC 12
1
2
ALIGN THE TAB AND SLOT, THEN PUSH INWARD
PUSH PINS INTO FAIRING
CLUTCH-SIDE (LEFT)
PIC 9
ROUTE THE WIRING
ROUTE THE WIRE
IN BETWEEN THE
SPEAKER AND
INNER FAIRING
PIC 10
ROUTE THE WIRE
IN BETWEEN THE
FRAME AND THE
INNER FAIRING
VIEWED FROM FRONT OF BIKE (CLUTCH SIDE)
Use the included Cable Ties to secure all wiring away
from any moving parts, pinch points or extreme heat.
Kuryakyn WILL NOT warranty any electrical compo-
nent that fails due to pinched, crimped, broken,
abraded, melted or frayed wires.
VISIBILITY IS A MAJOR CONCERN
FOR MOTORCYCLISTS. A LIGHT
MALFUNCTION COULD RESULT IN
DEATH OR SERIOUS INJURY. EN-
SURE PROPER LIGHT OPERATION
BEFORE RIDING THE MOTORCY-
It is the end user’s responsibility to
ensure that all of the fasteners
(including pre-assembled) are tight-
ened before operation of the motorcy-
cle. Küryakyn will not provide warranty
coverage on products or components
lost due to improper installation or lack
of maintenance. Periodic inspection
and maintenance are required on all
fasteners.
CLUTCH-SIDE (LEFT)
PIC 11
ALIGN THE TAB WITH THE SLOT
3”