Ride on, Velociraptor for 750 shadow, Installation – Kuryakyn 9446 VELOCIRAPTOR for 750 SHADOW User Manual
Page 3
PAGE
3
STEP 10
Verify the manifold aligns with the throttle body and is not twisted; rotate the manifold for proper
fit, if necessary. Tighten the clamp on the rubber manifold securely. Tighten the
two mounting bracket fasteners to secure the mounting bracket. The top mounting
leg with rubber bump stop will be positioned toward the inside edge of the gas
tank. If the Rubber manifold was moved, ensure the two hoses are still properly
attached
to
it.
ATTENTION!
It is the installer’s responsibility to ensure that all of the fasteners
(including preassembled) are tightened before operation of the
motorcycle. Küryakyn will not warranty components lost due to improper
installation. Periodic maintenance may be required.
STEP 11
Before removing the paper backing on the included gasket, place it up to the
Velociraptor mounting bracket to determine the correct mounting holes. Remove
the paper backing and attach the gasket to the mounting bracket lining up the
three
mounting
holes.
STEP 12
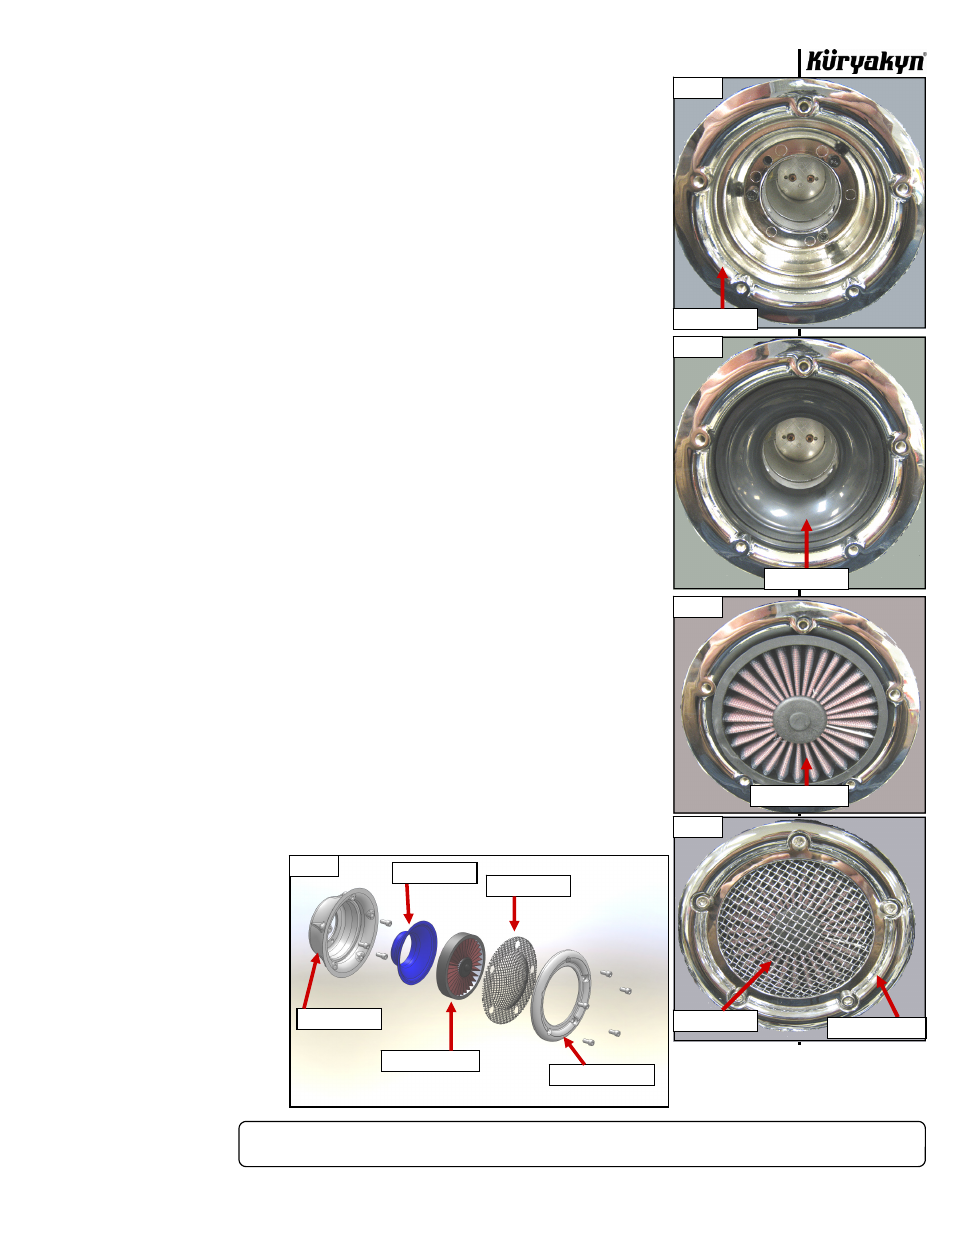
Completely disassemble the Velociraptor Air Cleaner, pay attention to the location
of the parts, as it will be reassembled in reverse order. FIG 1
STEP 13
Locate the velocity stack (chrome cone) from the Velociraptor Assembly. PIC 6
Attach the chrome cone to the rubber manifold and mounting bracket with the
included 1/4”-20 X 5/8” Socket Head Cap Screws. Tighten securely.
STEP 14
Place the plastic cone inside the velocity stack, this will snap into place. Install the
filter
element
and
secure
with the outer trim ring and mesh screen. PIC 7, PIC 8
and
PIC
9
NOTE:
The installation of this air cleaner kit requires the installation of a
Kuryakyn Wild Things Fuel Injection Controller, P/N 9218, or a
comparable fuel injection controller, to adjust the air/fuel mixture.
Failure to do so may cause severe damage to the engine.
STEP 15
Reinstall the seat and fuel tank; refer to your factory service manual for specific
information on this procedure. Ensure all hoses are installed correctly before
securing the fuel tank. The top leg of the Velociraptor mounting bracket rests
against the inside edge of the gas tank.
STEP 16
Double check the tightness of all related fasteners, check for hose
clearance and check throttle for correct operation, making sure it returns
properly, before starting bike.
CAUTION! Ensure that the installation of this product does not interfere with
the proper operation of the motorcycle before riding.
ATTENTION!
It is the installer’s responsibility to ensure that all of the fasteners
(including preassembled) are tightened before operation of the
motorcycle.
Küryakyn will not
warranty
components lost
due
to
improper
installation.
Periodic
maintenance
may
be
required.
Ride On!
VELOCIRAPTOR for 750 SHADOW
INSTALLATION
FIG 1
CHROME CONE
PLASTIC CONE
FILTER ELEMENT
MESH SCREEN
OUTER TRIM RING
CHROME CONE
PLASTIC CONE
FILTER ELEMENT
MESH SCREEN
OUTER TRIM RING
PIC 6
PIC 7
PIC 8
PIC 9