Velociraptor for 750 shadow, Installation – Kuryakyn 9446 VELOCIRAPTOR for 750 SHADOW User Manual
Page 2
PAGE
2
CAUTION! The installation of any high performance air cleaner can cause a “lean” fuel/air
mixture. A “lean” fuel/air mixture can cause engine overheating
resulting in severe engine damage. Küryakyn recommends using
our Wild Things Fuel Injection Controller, P/N 9218, or having fuel
injected bikes tuned by an experienced tuner, on a dyno, with an
exhaust
gas
analyzer.
WARNING! YOU WILL BE WORKING AROUND THE ENGINE AND EXHAUST
SYSTEM
DURING
INSTALLATION. ENSURE THAT THE ENGINE AND
EXHAUST SYSTEM HAVE FULLY COOLED TO PREVENT INJURY.
ATTENTION!
A factory service manual may be helpful in performing this installation. Do
not attempt to perform this installation if you are not confident in your
ability to complete all of the steps in the procedure; consult a trained
technician
.
ATTENTION!
Some of our high performance air cleaners extend beyond the stock/OEM
unit to achieve smoother airflow and better performance. Riding position
may be affected.
STEP 2
Remove the seat. Remove the rear fuel tank mounting bolt. Gently slide the tank
towards the rear of the bike to release the front tank mounts; refer to your factory
service manual for specific information on this procedure. Securely prop the tank
up. You may want the assistance of a friend to help secure the tank.
STEP 3
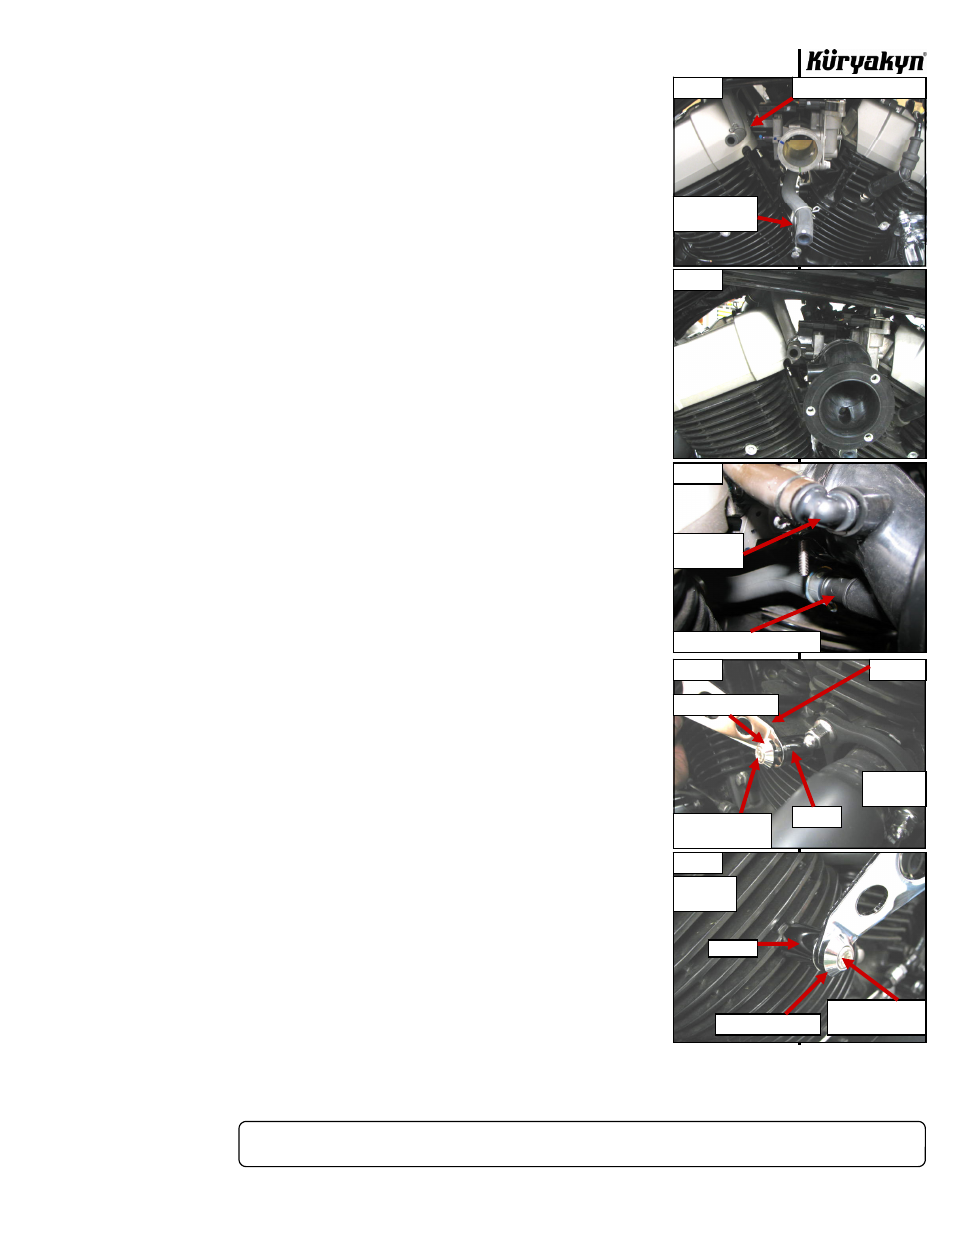
Remove the air cleaner assembly as outlined in the service manual. PIC 1 Save
the clamp securing the rubber manifold to the throttle body, it will be reused later.
STEP 4
Install the plastic 90° elbow into the side port on the rubber manifold. Insert the
straight barbed fitting into the bottom port of the rubber manifold. The smaller
end of the straight barbed fitting goes into the rubber manifold.
STEP 5
Install the clamp saved during STEP 3 on the manifold. Position the clamp so that
the anti-rotation plate on the clamp fits into the notch in the rubber manifold and
the screw head faces the back of the motorcycle. Install the rubber manifold to the
throttle body in the position shown in PIC 2. Leave loose for now.
STEP 6
Install the double-ended hose barb into the large hose under the throttle body.
The larger end of the barb goes into the existing hose on the bike, (PIC 1)the
smaller end into the rubber manifold. PIC 1 Insert the 90 degree barb into the
breather hose by the rear head. Secure these hoses with the OEM wire clamps.
PIC 3
STEP 7
Insert the rubber bumper into the top leg of the mounting bracket. Position the
bumper so that the large, flat surface faces out, away from the motorcycle.
STEP 8
Loosely fasten the Velociraptor mounting bracket to the front cylinder using one of
the included spacers, one of the included M6 X 1.0 X 45mm Socket Head Cap
Screws and one of the Tapered Bolt Caps. PIC 4 The chamfered end of the spacer
goes against the cylinder. Be sure to apply anti-seize compound to the fastener
threads before installing in the cylinder.
STEP 9
Loosely fasten the Velociraptor mounting bracket to the rear cylinder using one of
the included spacers, one of the included M6 X 1.0 X 45mm Socket Head Cap
Screws and one of the Tapered Bolt Caps. PIC 5 The chamfered end of the spacer
goes against the cylinder. Be sure to apply anti-seize compound to the fastener
threads before installing in the cylinder.
VELOCIRAPTOR for 750 SHADOW
INSTALLATION
-cont.-
PIC 1
PIC 2
SPACER
BRACKET
TAPERED BOLT CAP
M6 SOCKET HEAD
CAP SCREW
M6 SOCKET HEAD
CAP SCREW
TAPERED BOLT CAP
SPACER
PIC 4
PIC 5
PIC 3
DOUBLE ENDED HOSE BARB
90 DEGREE
ELBOW
FRONT
CYLINDER
REAR
CYLINDER
TO 90 DEGREE ELBOW
TO STRAIGHT
FITTING