Velociraptor air cleaner – Kuryakyn 9442 VELOCIRAPTOR AIR CLEANER User Manual
Page 3
INSTALLATION
PAGE
3
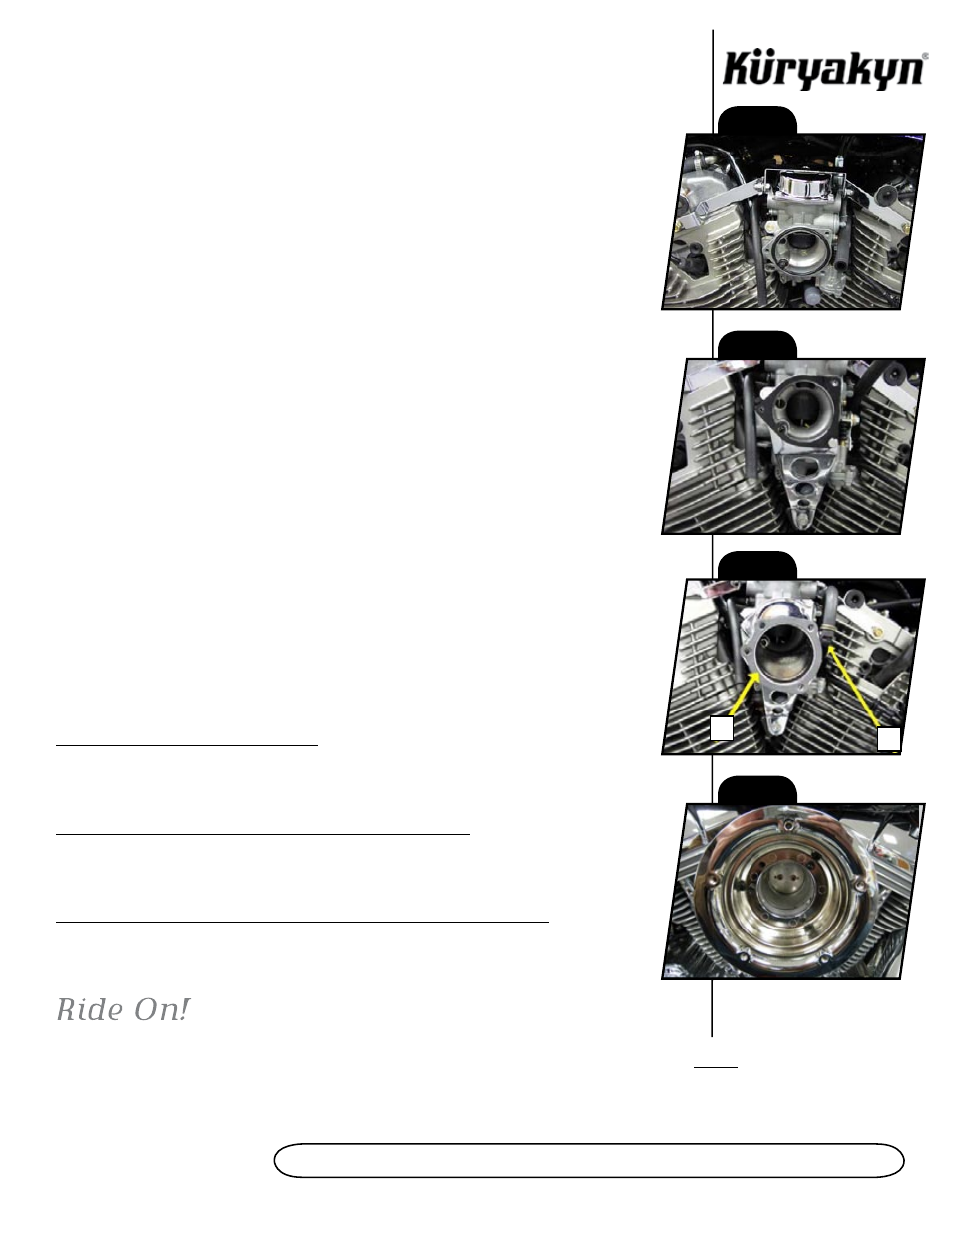
STEP 10
Using the stock fasteners, carefully install the new Chrome Carburetor Top/Inner Cup.
Make sure the slide spring is centered in the new top, the slide diaphragm is in place in the carburetor
body, and that the raised boss is in the correct orientation as noted in STEP 9. See PIC.4.
STEP 11
Loosely mount the Main Support Bracket. Install the supplied M6 X 1.0
X 30mm Socket Head Cap Screw and the Chromed, Tapered Bolt Cap at the bottom
of the bracket. With the supplied gasket on the outside of the bracket, start an M5
X .80 X 16mm Hex Head Cap Screw with an M6 Split Lock Washer in the lower right
air cleaner mounting hole. See PIC.5.
STEP 12
Thread one of the supplied 90 Degree Elbows into the threaded hole on
the side of the Carburetor Manifold included in the kit (labeled as “A” in PIC.6). Put
the Carburetor Manifold in place, slipping the slotted mounting hole into position
on the fastener you installed in STEP 11. Install M5 X .8 X 16mm Hex Head Cap
Screws with M5 Split Lock Washers in the remaining two mounting holes. Once all
fasteners are in place, tighten them all securely. Connect hose “C” from STEP 5 to
the 90 Degree Elbow with the supplied 7/16” Spring Wire Clamp. See PIC.6.
STEP 13
Adhere the supplied Adhesive Gasket to the exposed end of the Carburetor Manifold
labeled as “B” in PIC.6.
STEP 14
Locate the velocity stack (chrome cone) from the Velociraptor Assembly. Line the holes
up from the velocity stack through the manifold. As shown in PIC 7, secure using the 3 1/4-20 x
1/2" Socket Head Cap Screws.
STEP 15
Place the plastic cone inside the velocity stack, replace the filter element and secure
with the outer trim ring and mesh screen.
STEP 16
Check all hose connections and tighten all hardware.
ATTENTION!
It is the installer’s responsibility to ensure that all of the fasteners (including pre-
assembled) are tightened before operation of the motorcycle. Küryakyn will not warranty
components lost due to improper installation. Periodic maintenance may be required.
TUNING
The following recommendations are to be used as a starting point only, but should work well in the
majority of cases. Individual bikes may need additional tuning to achieve maximum performance.
These baselines were established at 700 feet above sea level.
VTX 1300 with Velociraptor and stock pipe
#65 Pilot Jet
#185 Main Jet
0.8 Shim under needle
VTX 1300 with Velociraptor and Hard Chrome 2.5” Classic Straights
#65 Pilot Jet
#185 Main Jet
0.8 Shim under needle
VTX 1300 with Velociraptor, Stock headers and Cobra Slash-Cut Slip-on Mufflers
#65 Pilot Jet
#185 or a #182.5 Main Jet
0.8 Shim under needle
PIC. 4
PIC. 5
PIC. 6
A
B
PIC. 7
VELOCIRAPTOR AIR CLEANER