Ride on, Rear lighting kit for flhx/fltrx, Installation – Kuryakyn 5415 REAR LIGHTING KIT for FLHX/FLTRX User Manual
Page 4
PAGE
4
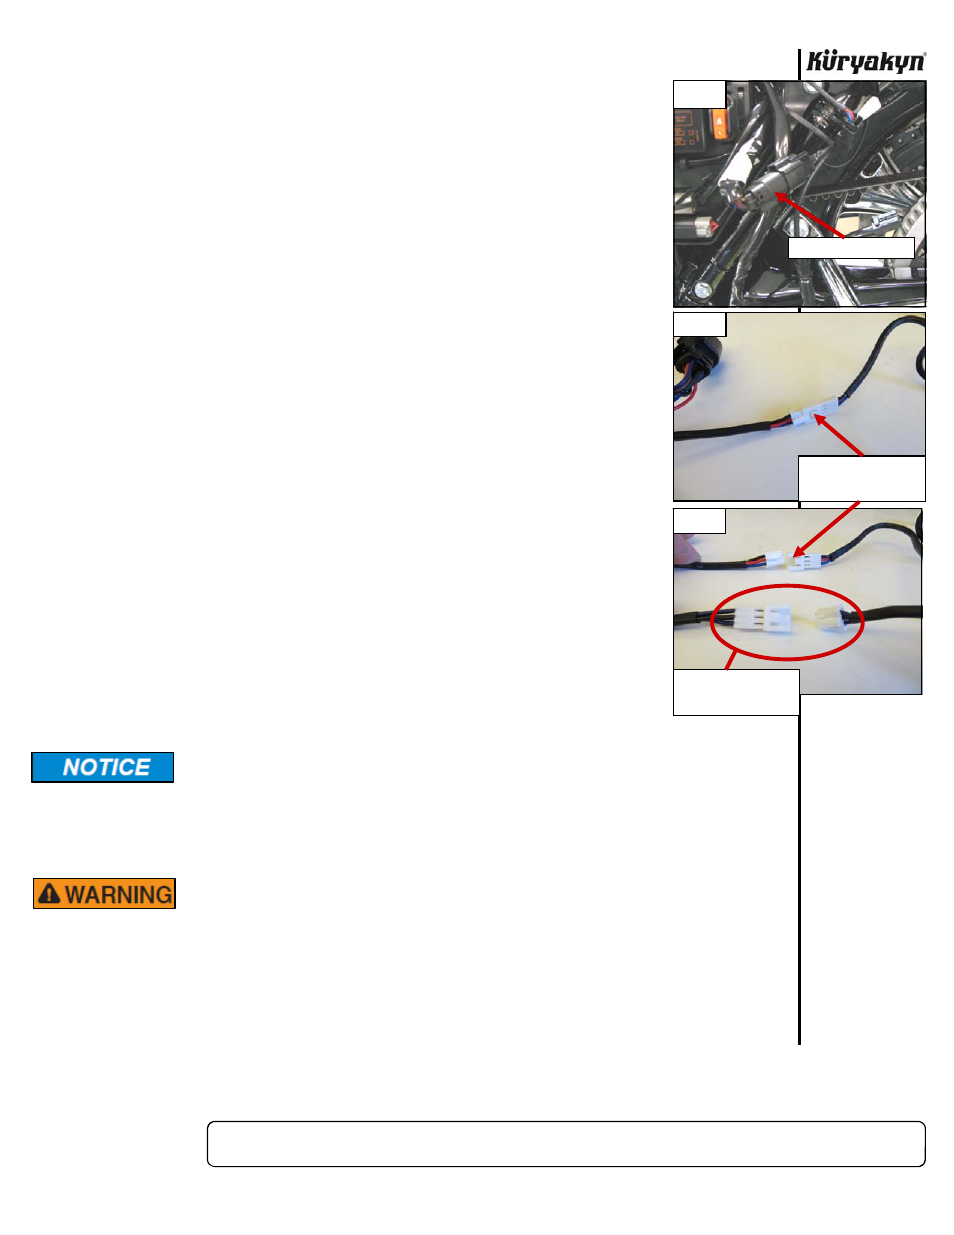
STEP 22
Unplug the connectors. Place a little of the included dielectric grease on each
connector. Locate the Pulsating Brake Light Controller from the hardware kit and
plug into both ends of the connectors.
STEP 23
Locate the 3-Pin Accessory Harness from the hardware kit. Apply a little of the
included dielectric grease to the small female connector and connect it to the small
male 3-pin connector on the Pulsating Brake Light Controller. PIC 13 and PIC 14
STEP 24
Place a small amount of dielectric grease on the large male 3-pin connector on the
Accessory harness and plug it into the 3-pin female connector from the Turn
Signal Bar filler Panel.
STEP 25
Locate the Self-Regulating Load Equalizer from the hardware kit. Place a small
amount of dielectric grease to the male 3-pin connector on it and plug it into one
of the small female 3-pin connectors on the Pulsating Brake Light Controller.
PIC
14
NOTE:
This Load equalizer will compensate for front and rear L.E.D. turn signals.
All Küryakyn or other load equalizers will need to be removed.
NOTE:
When using the four-way flashers the load equalizer will turn off. The
alarm “key” indicator light on the dash will light. This will not effect the
operation of the turn signals and will reset when the four way flashers are
turned off and the ignition switch is turned off.
NOTE:
Abnormally prolonged activation of a turn signal may cause the alarm
“key” indicator to light and or cause the turn signal to flash rapidly.
Turning the turn signal off and allowing the equalizer to cool will restore
normal
flashing.
The
alarm
“key”
indicator will remain lit, but the
motorcycle
will
function normally, until the ignition is turned off, to reset
the
load
equalizer.
NOTE:
If, after the load equalizer is installed, the turn signals flash rapidly, you
may need to synchronize the load equalizer to the turn signal system. Do
this by turning either turn signal on for 5 flashes. Turn that signal off and
turn on the other signal for 5 flashes. Turn the motorcycle off. Turn the
motorcycle on and verify the signals flash at the correct rate.
STEP 26
Secure all wiring out of harms way.
Secure all wiring from the newly installed and/or from existing parts, away from
any moving parts, pinch points or extreme heat. Küryakyn WILL NOT issue a
warranty on any electrical component that fails due to pinched, crimped, broken,
abraded, melted or frayed wires.
STEP 27
Start the motorcycle and test that all lights operate correctly and that the brake light pulses when
the lever is pulled or the pedal is depressed.
ENSURE PROPER LIGHT OPERATION BEFORE RIDING THE MOTORCYCLE.
VISIBILITY IS A MAJOR CONCERN FOR MOTORCYCLISTS. A LIGHT
MALFUNCTION COULD RESULT IN DEATH OR SERIOUS INJURY.
STEP 28
Replace the side cover and saddlebag.
Ride On!
REAR LIGHTING KIT for FLHX/FLTRX
INSTALLATION
PIC 12
USE THIS CONNECTOR
PIC 13
PIC 14
ACCESSORY HARNESS
TO PULSATING BRAKE
LIGHT CONTROLLER
LOAD EQUALIZER TO
PULSATING BRAKE
LIGHT CONTROLLER