L.e.d. rear saddlebag accents, Installation – Kuryakyn 7263 L.E.D. REAR SADDLEBAG ACCENTS User Manual
Page 2
PAGE
2
YOU WILL BE WORKING AROUND THE ENGINE AND EXHAUST SYSTEM
DURING INSTALLATION. ENSURE THAT THE ENGINE AND
EXHAUST SYSTEM HAVE FULLY COOLED TO PREVENT INJURY.
Due to manufacturing and assembly variances, some adjustments
may be necessary after the initial installation to achieve proper fit
and/or function. Küryakyn recommends “mocking up” components
secured with non-removable fastening devices, such as double-sided
tape or silicone, before full installation.
STEP 2
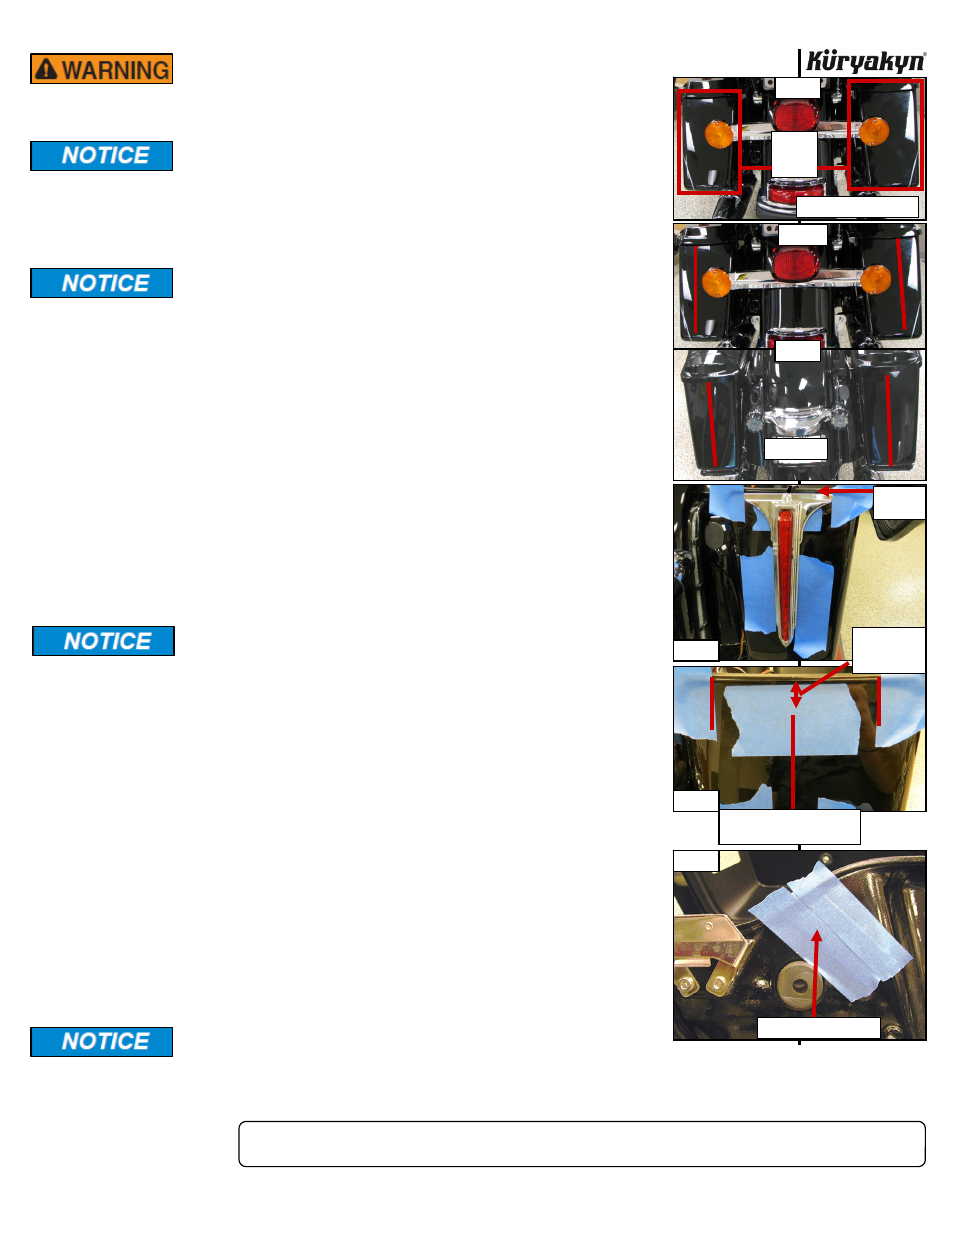
Thoroughly clean the back surface of both saddlebags. PIC 1
Ensure the area of installation is free of grease, oil, dirt or other
debris including wax/polish products and bugs to ensure proper
adhesion. Küryakyn WILL NOT issue a warranty on any parts lost due
to improper installation.
STEP 3
Place one of the Accents on the rear of the right saddlebag. The top of the Accent
will fit up to the lip on top of the bag. PIC 3 Decide if you would like to center (on
bikes with short turn signal bar) the Accent on the bag or offset it (on bikes with
long turn signal bar) to the outside of the bag. PIC 2 (You may want to use a
couple pieces of masking tape to temporarily hold the Accent in place,
stand back, and check to see which location appeals to you the best.)
STEP 4
Making sure the Accent is straight top to bottom and in the location chosen in
Step 3, make reference marks along both sides of the top of the Accent and along
both
sides
of
the Accent. PIC 3
STEP 5
Remove the Accent from the saddlebag. Place a piece of tape between the two top
reference marks. PIC 4 Measure the distance between the top reference marks
made and mark the center. Measure down from the top lip of the saddlebag
approximately 1/2” at this location and make a reference mark using a center
punch.
PIC
4
MEASURE TWICE – DRILL ONCE. Double check all reference marks
made on the saddlebag and that there is nothing inside the
saddlebag BEFORE drilling. Kuryakyn will not be responsible for
incidental or consequential damages resulting from this installation.
STEP 6
Using a drill with a 1/4” bit, carefully drill a hole at the mark made with the center
punch in Step 5. Drill slowly, using light pressure, the saddlebag will drill
easily.
STEP 7
Remove the tape from around the hole just drilled and using one of the included
alcohol pads, thoroughly clean the installation area to remove any residue. Let dry
completely.
STEP 8
Rub the backing on the Accent with the back of your fingernail to activate the
adhesive. Remove the backing. Insert the wire harness from the Accent through
the hole just drilled. Using the reference marks made in Step 4, attach the
Accent to the back of the saddlebag. Press in place for one minute, full bonding
will occur in 24 hours.
STEP 9
Repeat Steps 3 through 8 for the left saddlebag and the other Accent.
NOTE:
If the motorcycle is to be operated before the 24 hour cure time has
expired, use a good quality masking or painter’s tape over the Accent to
assist in holding the Accent in place until the cure time is over.
Avoid damage to the motorcycle. Protect painted surfaces with a soft
cloth or blanket.
L.E.D. REAR SADDLEBAG ACCENTS
INSTALLATION
-cont.-
PIC 1
CLEAN
THESE
AREAS
TOP OF ACCENT TO LIP
PIC 5
MARK AND DRILL HERE
OFFSET
CENTERED
PIC 2
PIC 3
MEASURE
DOWN FROM
LIP 1/2”
PIC 4
MEASURE THIS DISTANCE
AND MARK THE CENTER
TOP LIP
OF BAG