Ride on, Deluxe neck covers, Installation – Kuryakyn 7834 DELUXE NECK COVERS User Manual
Page 3
PAGE
3
NOTE:
On Road Kings STEP 16 is not performed because the clutch cable runs along the forks.
STEP 16
On the left side of the neck, secure the clutch cable to the wiring harness with an
included cable tie so that the clutch cable is under the very front of the cover as
shown in PIC 6.
When installing the neck covers on Road King models, you will need
to slightly push down while tightening the top fastener. This will
allow adequate clearance between the top of the neck covers and the
headlight shroud when the bars are rotated all the way side to side.
STEP 17
Secure the clutch cable to the down tube in the same location that the cable tie
that was removed in STEP 2 was located.
STEP 18
Slide the rubber stops on the forks as far down as they will go.
Step 19 through Step 22 are not necessary for Road King Models.
STEP 19
Clean the forks above the rubber stops with the included alcohol-cleaning
pad and allow the area to dry.
Ensure the area of installation is free of grease, oil, dirt or other
debris including wax/polish products and bugs to ensure proper
adhesion. Küryakyn WILL NOT issue a warranty on any parts lost due
to improper installation.
The adhesive will not bond correctly if applied at temperatures less
than 50°F. Do not attempt this installation in temperatures less than
50°F.
STEP 20
Using the back of your fingernail, rub the adhesive backing on two of the foam
pads to activate the catalyst.
NOTE:
The additional foam pads are included in the hardware kit in case there
are any other points of contact between the forks and neck cover when
the handlebars are turned to their full stopping position.
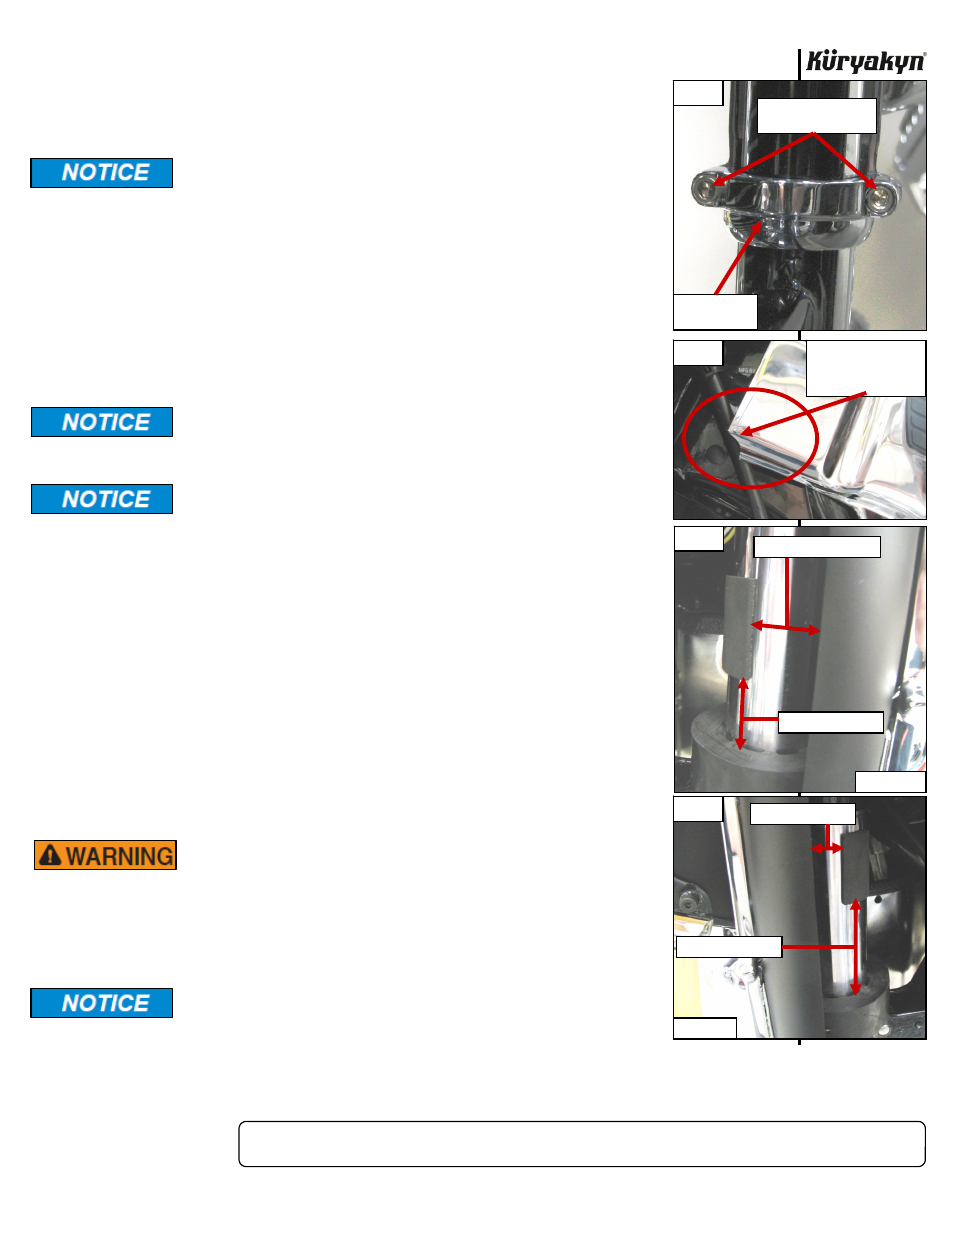
STEP 21
Remove the adhesive backing, and place a foam pad on the right fork in the
approximate location as shown in PIC. 7.
STEP 22
Remove the adhesive backing, and place a foam pad on the left fork in the
approximate location as shown in PIC. 8.
STEP 23
Turn handlebars in both directions to their full stop position to make sure that the
clutch cable, throttle cables, wiring or any other component of the motorcycle, is
not stretched or pinched.
ENSURE THAT THE CLUTCH CABLE, THROTTLE CABLES,
WIRING OR ANY OTHER COMPONENT OF THE MOTORCYCLE
IS NOT PINCHED OR STRETCHED AT ANY POINT WHEN THE
HANDLEBARS ARE TURNED TO THEIR FULL STOP POSITION
ON EITHER SIDE. STRETCHED OR PINCHED COMPONENTS
CAN CAUSE LOSS OF CONTROL THAT COULD RESULT IN
SERIOUS INJURY OR DEATH.
It is the installer’s responsibility to ensure that all of the fasteners
(including pre-assembled) are tightened before operation of the
motorcycle. Küryakyn will not provide warranty coverage on products
or components lost due to improper installation or lack of
maintenance. Periodic inspection and maintenance are required on
all fasteners.
Ride On!
DELUXE
NECK
COVERS
INSTALLATION
PIC 5
#8-32 X 1/2” SOCKET
HEAD CAP SCREWS
DOWN TUBE
COVER CLAMP
CLUTCH CABLE UNDER
VERY FRONT OF
COVER EXCEPT ON
ROAD KINGS
RIGHT FORK
PIC 6
PIC 7
PIC 8
LEFT FORK
APPROXIMATELY 2-1/4”
APPROXIMATELY 2”
APPROXIMATELY 1”
APPROXIMATELY 3”