GreenGuard DC14 Drainage Mat User Manual
Page 8
G R E E N G U A R D
®
D C 1 4 I N S T A L L A T I O N G U I D E F O R C O M M E R C I A L A N D R E S I D E N T I A L C O N S T R U C T I O N
7
Step 1:
Begin by unfolding several feet of the GreenGuard
®
DC14
bundle and aligning the product with the bottom edge of the
wood sheathing at the bottom of the wall.
Step 2:
Attach the GreenGuard
®
DC14 using common roofing
nails spaced 2 feet on center around the perimeter of the
wall and along vertical framing members. Nails should
penetrate the framing member a minimum of 1/2 inch.
Care must be taken not to overdrive nails, since this may
result in moisture leakage in areas where the damage
extends completely through the product. Damaged
areas should be repaired using GreenGuard
®
Contractor
Sheathing/Housewrap Tape.
Step 3:
Trim the GreenGuard
®
DC14 at all window and door openings
and at wall penetrations so that gaps are minimized. At pipe
and other small penetrations, gaps should be sealed using a
silicone sealant or an expanding spray foam sealant.
Step 4:
All vertical and horizontal seams of the GreenGuard
®
DC14
must be sealed using GreenGuard
®
Contractor Tape or
GreenGuard
®
Flashing (minimum 2-inch wide strips). As
an alternative, a “Z-furring” horizontal seam treatment may
be constructed using 16-inch wide straps of GreenGuard
®
Housewrap sealed to the GreenGuard
®
DC14 as shown.
Step 5:
Install GreenGuard
®
Flashing or GreenGuard
®
SuperStretch
self-adhering flashings at window openings by first installing
the sill flashing. Install the jamb flashing so that it overlaps
the sill flashing, and then install the head flashing so that it
overlaps the jamb flashing.
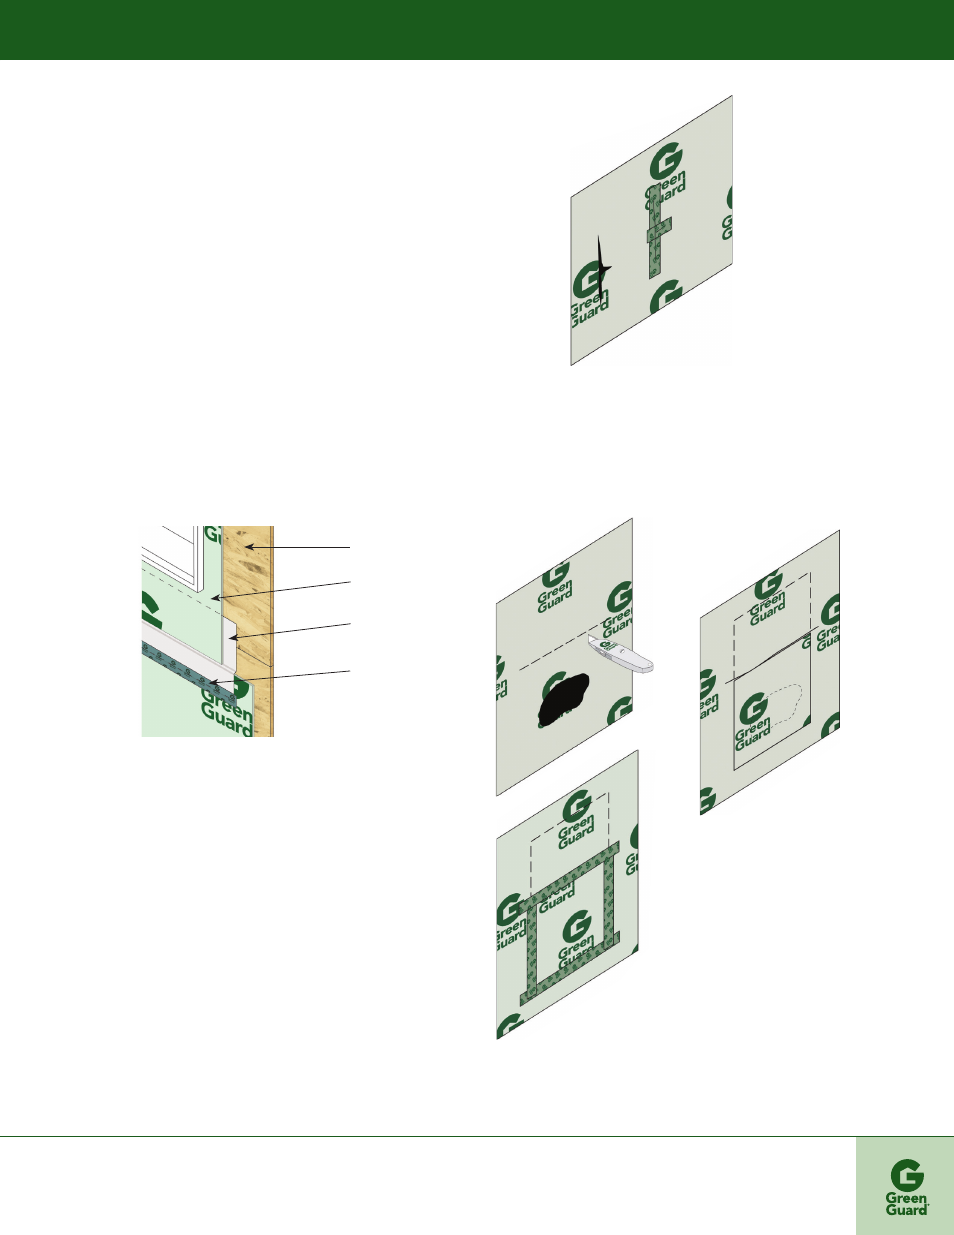
10. .
Small Tears and Holes
Use GreenGuard
®
Contractor Tape or Flashing to cover small tears
or holes as shown in Figure 10a.
Large Damaged Areas
If the damaged area is large, a building wrap patch may be
required. Begin by making a cut several inches above the
damaged area. Tuck the piece of building wrap up underneath
the cut with most of the building wrap piece extending out over
the building wrap on the wall. Then, tape all edges of the building
wrap patch area as shown in Figures 10b, 10c and 10d.
To repair a GreenGuard
®
Drainage Mat damaged area, cut out the
damaged area and replace with a new piece of drainage mat that is
cut to size. Tape all seams around the newly installed drainage mat
replacement piece.
Plywood
GreenGuard
Foam Sheathing
GreenGuard
Housewrap
GreenGuard
Contractor Tape
Figure 10a: Repair of Small Damaged
Area
Figure 10b:
Cut Out Damaged Area
Figure 10c: Install New
Building Wrap Piece
Figure 10d: Tape Edges of New Piece
with
2 in. Wide Minimum Strips
REPAIRING DAMAGED BUILDING WRAP
AND DRAINAGE MAT