Dascom T2150 Installation Guide Automatic Sheet Feeder Rear User Manual
Page 2
Spingere la guida fogli singoli verso il basso fino ad agganciarla (ca. 5 mm).
Presione hacia abajo el alimentador de hojas sueltas hasta que se engatille (5 mm,
aprox.).
Align the left-hand paper guide with the mark for the first printing position.
T3010/T3110: The left paper guide has to be adjusted 10 mm to the right of the
mark for the first printing position.
Die linke Papierführung an der Markierung für die erste Druckposition
ausrichten.
T3010/T3110: Die linke Papierführung muß 10 mm rechts von der Markierung
positioniert werden.
Alignez le guide-papier à gauche sur le repère pour la première position
d’impression.
T3010/T3110: Le guide papier gauche a été ajusté à 10 mm du repère droit pour
la première position d'impression.
Allineare la guida carta sinistra con il contrassegno della posizione di inizio.
T3010/T3110: Regolare il guida carta sinistro 10 mm a destra dal riferimento per
la prima posizione di stampa.
Alinee la guía de papel izquierda a la marca para la primera posición de impresión.
T3010/T3110: La guia izquierda del papel se debe ajustar 10 mm a la derecha de
la marca para imprimir en la primera posicion.
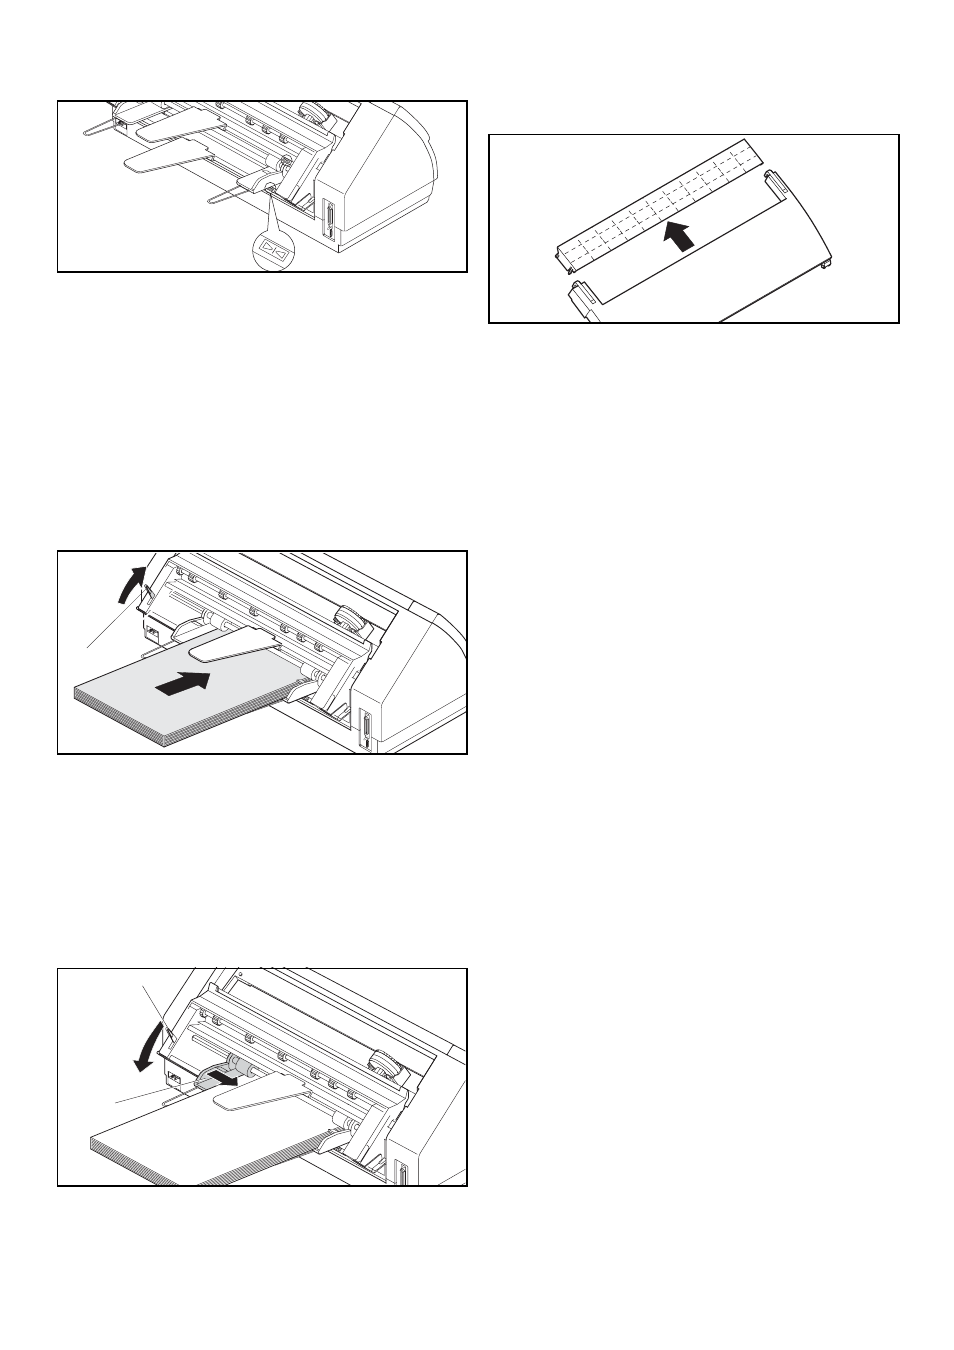
Fan the paper and then align the edges before loading it into the paper tray. Raise
the fixing lever
c
and insert the paper stack.
Das Papier vor dem Einlegen in den Papierschacht gut auffächern und
anschließend Ränder bündig ausrichten. Den Arretierhebel
c
nach oben stellen
und Papierstapel einlegen.
Avant le chargement dans le bac de papier, ventilez bien le papier et alignez les
bords à fleur. Poussez le levier de verrouillage
c
vers l’AV et chargez la pile de
papier.
Prima di inserire la carta nel cassetto, smazzarla accuratamente e quindi allinearne
i bordi. Sollevare dal avanti la leva di blocco
c
e inserire la carta.
Afloje la pila de papel antes de colocarla en el alimentador y ponga a ras los
bordes. Levante la palanca de fijación
c
y coloque la pila de papel.
Adjust the right-hand paper guide
c
to the width of the paper used. Align the
paper support plate at the centre of the paper stack. Close the fixing lever
d
.
Die rechte Papierführung
c
entsprechend der Papierbreite einstellen. Die
Papierstütze mittig zum Papierstapel ausrichten. Den Arretierhebel
d
schließen.
Ajustez le guide-papier à droite
c
en fonction de la largeur de papier. Alignez le
support de papier au milieu de la pile de papier. Fermez le levier de verrouillage
d
.
Regolare la guida carta
c
di destra in funzione della larghezza della carta.
Disporre i supporti carta in posizione centrata rispetto alla risma. Chiudere la leva
di blocco
d
.
Ajuste la guía de papel derecha
c
a la anchura del papel. Alinee el soporte de
papel en el centro de la pila de papel. Cierre la palanca de fijación
d
.
Remove the tear edge of the top cover and remount the cover.
Die Abreißkante der oberen Abdeckung entfernen und die Abdeckung wieder
einsetzen.
Déposez l’arête de découpage du capot supérieur et remettre le capot en place.
Rimuovere il bordo di strappo del coperchio superiore e reinstallare il coperchio.
Quite la hoja de corte de la cubierta superior y reinstale la cubierta.
Switch the printer on again keeping the Setup key pressed. Press the key Online
until the printer has completed initialisation. Press the Setup key again. The
printer changes to Setup mode.
To access the printer menu, press the Menu key (1). Press the Back key (1)
several times until the display indicates PapOpt. Press the button under PapOpt
and than the ASF-R key (2). Use the < (2) or > (3) key to select Installed.
Confirm the setting by pressing the Set key (1).
Subsequently select the ASF-R either in setup mode or via the paper source quick
selection function or via an application program. (For the detailed procedure, refer
to the Reference Manual on the online CD-ROM.)
Schalten Sie den Drucker mit gedrückter Taste Setup ein. Halten Sie die Taste
gedrückt, bis der Drucker initialisiert hat. Drücken Sie die Taste Setup erneut.
Der Drucker wechselt in den Setup-Modus.
Um in das Druckermenü zu gelangen, drücken Sie die Taste Menü (1). Drücken
Sie die Taste Rück (1) so oft, bis die Anzeige PapOpt erscheint. Drücken Sie die
Taste unter PapOpt und dann die Taste ASF-R (2). Durch Drücken der Taste <
(2) oder > (3) Vorhanden wählen. Bestätigen Sie die Eingabe durch Drücken der
Taste Setze (1).
Danach den ASF-R entweder im Setup-Modus, über die Papierweg-
Schnellumschaltung oder über ein Anwendungsprogramm auswählen
(Einzelheiten zum Vorgehen finden Sie im Referenzhandbuch auf der Online-
CD-ROM).
Mettez l'imprimante en marche en appuyant sur la touche Setup. Tenez la touche
Online enfoncée jusqu’à ce que l’imprimante soit initialisée. Appuyez sur la
touche Setup à nouveau. L’imprimante passe au mode Setup.
Pour accéder au menu de l’imprimante, pressez la touche Menu (1). Appuyez
répétitivement sur la touche Ret (1) jusqu’à ce que l’affichage indique Option.
Appuyez sur le bouton sous Option puis appuyez sur la touche ASF-R (2).
Appuyer sur la touche < (2) ou > (3) pour sélectionner Installée. Validez l’entrée
en appuyant sur la touche Valid (1).
Sélectionnez ensuite l’ASF-R soit en mode Setup, par la commutation rapide du
chemin de papier, soit par un programme d’application. (Vous trouverez tous les
détails sur la procédure dans le Manuel de Référence, sur le CD-ROM Online.)
Accendere la stampante tenendo premuto il tasto Setup. Tenere premuto il tasto
Online fino all’inizializzazione della stampante. Premere il tasto Setup
nuovamente. La stampante passa alla modalità Setup.
Per accedere al menu della stampante premere il tasto Menu (1). Premere il tasto
Giu (4) fine a quando sul display non compaia OpCarta. Premere il tasto sotto
OpCarta; quindi premere il tasto ASF-R (2). Premere il tasto < (2) o > (3) per
selezionare Installato. Dopo aver inserito i dati d’impostazione, premere il tasto
OK (1).
Successivamente selezionare l’ASF-R o nel modo set-up, tramite la
commutazione rapida del percorso carta, oppure tramite un programma
applicativo. (Dettagli relativi alla procedura sono contenuti nel manuale di
riferimento sul CD-ROM Online.)
Conecte la impresora teniendo pulsada la tecla Setup. Mantenga presionado el
pulsador Online hasta que se haya inicializado la impresora. Pulse la tecla Setup
de nuevo. La impresora cambia al modo Setup.
Para entrar en el menú de la impresora, presione el pulsador Menue (1). Presione
el pulsador Retro (1) tantas veces hasta que aparece PapOpt en el visualizador.
Pulse la tecla debajo de PapOpt. Pulse la tecla ASF-R (2). Presione el pulsador
<
(2) o > (3) para seleccionar Instalar. Confirme la entrada presionando el
pulsador Set (1).
A continuación seleccione el ASF-R o en el modo setup o a través de la selección
rápida del origen de papel o mediante un programa de aplicación. (Para el
procedimiento detallado, consulte el Manual de Referencia en el disco CD-ROM
en línea.
059 673c
➀
➀
➁