Daisy 840C Mossy Oak Grizzly User Manual
Page 4
STEP 1. PUT “ON”
TRIGGER SAFETY
Push trigger safety from
left to right so no red is
showing. It is a good prac-
tice to get in the habit of
keeping the trigger safety
“ON” until ready to fire the
gun. (Fig. 2)
STEP 2.
OPEN BOLT
Tilt muzzle down
about 30° and pull
bolt handle rear-
ward. The gun can-
not fire with the bolt
open. (Fig.3)
STEP 3. PUMP
ONE TIME
IMPORTANT: Do
not pump more
than one time. May
cause serious
damage to your
gun. This gun was
designed and
intended as a single
pump. For greater
safety, we recom-
mend that the bolt
remain open while
pumping, and that
you close the bolt
only when the barrel can be pointed in a safe direction. Grasp
the forearm at rear and pull down and forward as far as pos-
sible, then return forearm to original closed position. (Fig. 4)
CAUTION:
Be sure to grasp forearm firmly as you
close the lever to prevent it from snapping back and causing
possible injury. Also, be careful to keep fingers out of cocking
mechanism when closing lever (See “PINCH POINTS”, Fig. 4).
Never put your finger on the trigger until you are ready to fire.
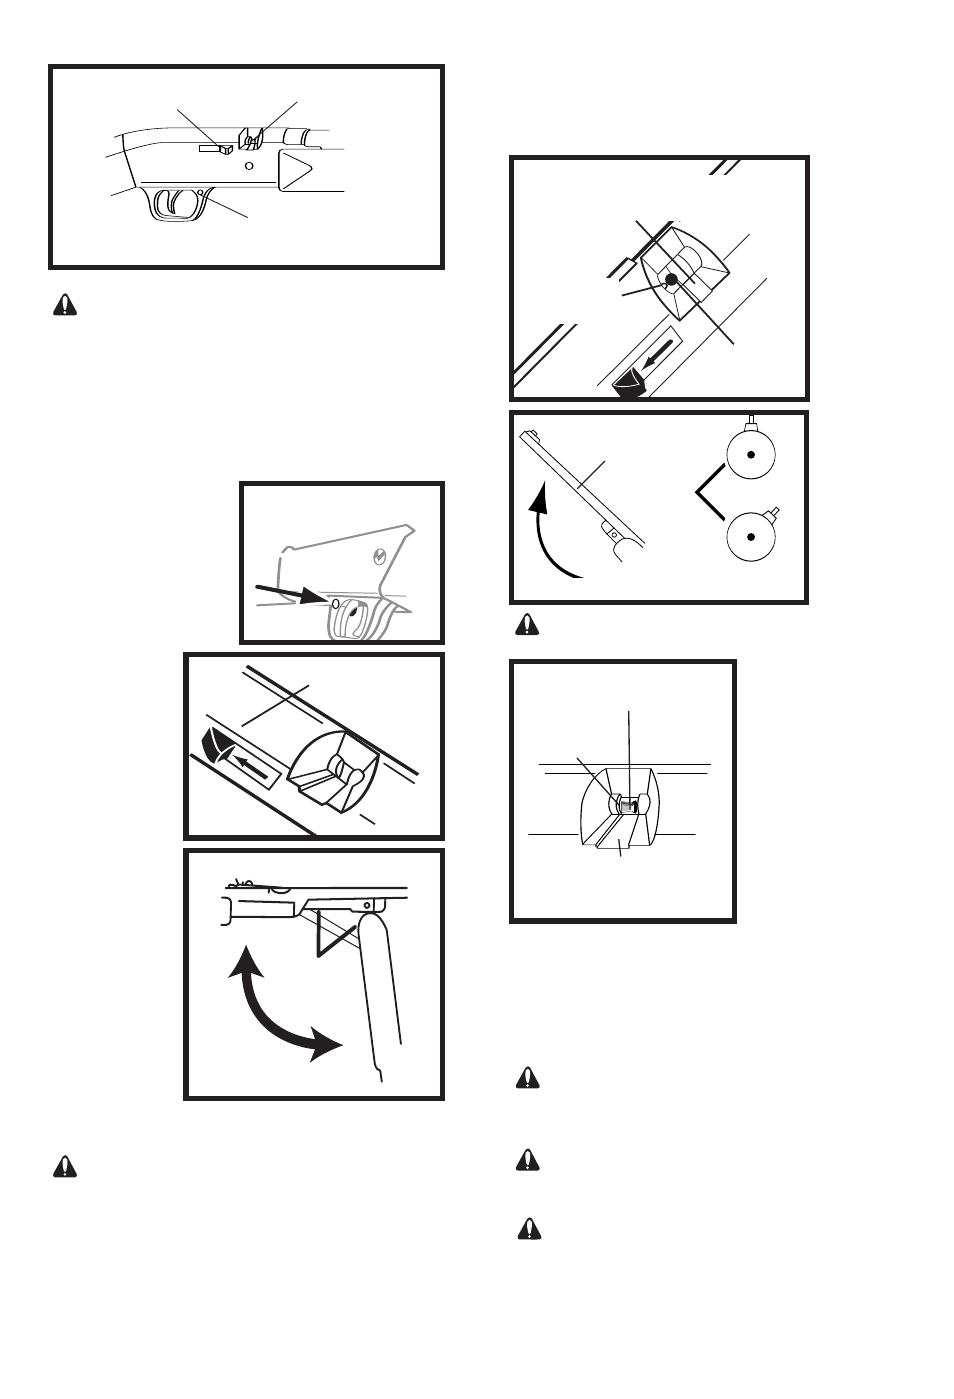
FILL BB MAGAZINE
The loading door is located on the left side of the receiver.
(Fig. 1) Push door rearward and fill magazine with a maximum
of 350 BBs. Then close door.
FEED TRACK
CARRIL DE ALIMENTACIÓN
PISTE D’ENTRAÍNEMENT
BOLT HANDLE
MANGO DEL CERROJO
LEVIER D’ARMEMENT
FIG. 1A
RIGHT SIDE
LADO DERECHO
CÔEÉ DROIT
BOLT REARWARD
CERROJO HACIA ATRÁS
ARRIÉRE DE CULASSE
PINCH POINTS
PUNTOS PELIGROSOS
POINT DE PINCEMENT
FIG. 2
FIG. 3
FIG. 4
HOW TO OPERATE
CAUTION:
Be sure gun is always pointed in a safe
direction.
Step 1: PUT “ON” TRIGGER SAFETY
Step 2: OPEN BOLT
Step 3: PUMP (ONCE)
Step 4: LOAD
Step 5: CLOSE BOLT
Step 6: AIM AT SAFE TARGET
Step 7: TAKE “OFF” TRIGGER SAFETY
Step 8: FIRE
STEP 4. LOAD
LOADING BBs: To load a BB from the magazine, raise the
muzzle 45 degrees to 60 degrees and pull the bolt handle
fully to the rear. (Fig. 5) A BB is gravity fed onto the magnetic
tip of the bolt (Fig. 5) When raising the muzzle, be sure the
front sight is
pointed
upward,
because the
gun will not
feed properly
if it is on its
side.
(Fig. 6) The
BB can be
seen on the
magnetic tip
(after the
bolt handle
is released)
by looking
into the feed
track. If a BB
did not feed
onto the
magnetic tip,
shake the
gun slightly
and repeat
the “LOAD-
ING BBs”
instructions.
WARNING:
BBs feed from the magazine by gravity
which requires that the muzzle be raised. NEVER ASSUME
THE MAGAZINE OR
CHAMBER IS EMPTY,
even if the gun does not
fire a projectile.
LOADING PELLETS:
With BBs removed from
the magazine (See
“EMPTY BB MAGAZINE,
Page 8), lower muzzle
slightly and pull bolt han-
dle rearward. Then place a
pellet (solid end forward)
in feed track. (Fig. 7)
IMPORTANT: Care
must be exercised when
shooting pellets while
the magazine contains BBs. Loading a BB and pellet at the
same time may result in a jammed or obstructed barrel.
IMPORTANT: Do not allow a pellet to fall into the rear of
the feed track and become jammed in the BB feed hole. If
this occurs, have a qualified gunsmith remove the left receiver
and clear the feed track, or return the gun to Daisy. DO NOT
load pellets in the BB loading door.
STEP 5. CLOSE BOLT
CAUTION:
Gun must always be pointed in a safe
direction.
Push bolt handle forward. The gun is now loaded and should
be handled with care.
CAUTION:
Always view the BB or pellet when clos-
ing the bolt and loading port.
STEP 6. AIM AT SAFE TARGET
CAUTION:
Pick targets with a backstop that cannot
be penetrated and that will not cause a ricochet because of
their hard surface. Do not shoot at water. Never point a gun,
loaded or unloaded, at anyone.
To be a consistent marksman, use the correct sight picture
each time you fire the gun. (Fig. 8)
FEED TRACK
CARRIL DE ALIMENTACIÓN DE PERDIGONES
PISTE D’ENTRAIÎNEMENT DES PLOMBS
MAGNETIC TIP
PUNTA MAGNÉTICA
BOUT AIMANTÉ
BB
BALINES BB
BALLES BB
FIG. 5
MUZZLE
BOCA DEL CAÑÓN
BOUCHE
BARREL
FIG. 6
WRONG
INCORRECTO/NON
RIGHT
CORRECTO/OUI
PELLET SOLID END FORWARD
PERDIGÓN EXTREMO SÓLIDO HACIA DELANTE
PLOMB EXTRÉMITÉ PLEINE EN PREMIER
6
7
SAFETY ON
SERURO ACTIVO“ON”POIGNÉE
SECURITE ENGAGÉE
TRIGGER SAFETY
SEGURO DE GATILLO
SÉCURITÉ DE DÉTENTE
FEED TRACK
CARRIL DE ALIMENTACIÓN DE PERDIGONES
PISTE D’ENTRAIÎNEMENT DES PLOMBS
MAGNETIC TIP
PUNTA MAGNÉTICA
BOUT AIMANTÉ
FIG. 7