Warning, How to operate: caution, Step 1. open bolt – Daisy PowerLine 901 User Manual
Page 2: Step 2. put “on” trigger safety (“push safe”), Caution, Step 3. pump
WARNING:
THIS GUN CAN CAUSE
DEATH. READ AND FOLLOW THE INSTRUCTIONS
CAREFULLY. DO NOT LOAD A BB OR PELLET INTO THE
CHAMBER UNTIL YOU ARE READY TO SHOOT. IF YOU
DO LOAD A BB OR PELLET AND DECIDE NOT TO
SHOOT, REMOVE EITHER MANUALLY OR BY SHOOT-
ING IT IN A SAFE DIRECTION. AN UNCOCKED,
UNLOADED GUN IS SAFEST. ACCIDENTS HAPPEN
FAST, AND ACCIDENTALLY INJURING OR KILLING
SOMEONE IS A TERRIBLE THING. SHOOT SAFELY.
2
This safety alert symbol indicates important safety mes-
sages in this manual. When you see this symbol, be alert to
the possibility of personal injury and carefully read the mes-
sage that follows.
This air gun shoots with much more power than the tradi-
tional spring air BB gun. More power means greater chance
of serious injury or death.
Although your new PowerLine
®
Air Rifle is not a firearm, it
has lethal potential and should be treated with the caution
and respect due any conventional firearm. Like a firearm, your
PowerLine
®
Air Rifle, when misused or carelessly used, can
kill or seriously injure the shooter or other persons.
Always remember, the first and most important safety
aspect of any gun is the shooter. All safeties are mechanical
devices and the shooter is the only part of the system that
can make a gun safe –or unsafe. DON’T DEPEND ON
MECHANICAL SAFETIES;
think ahead and avoid situations
that might lead to accidents.
Guns differ in their operations and you are never ready to
fire any gun until you are thoroughly familiar with it. Read the
following operating instructions and WITHOUT LOADING A
PROJECTILE, proceed several times through the operating
steps with your gun (dry fire the gun at a safe target) so that
you will be able to operate the PowerLine
®
Air Rifle properly
and safely.
HOW TO OPERATE:
CAUTION:
Be sure gun is always pointed in a safe
direction.
Step 1. OPEN BOLT
Step 2. PUT “ON” TRIGGER SAFETY (“PUSH SAFE”)
Step 3. PUMP
Step 4. LOAD
Step 5. CLOSE BOLT
Step 6. AIM AT SAFE TARGET
Step 7. TAKE “OFF” TRIGGER SAFETY (“PUSH FIRE”)
Step 8. FIRE
3
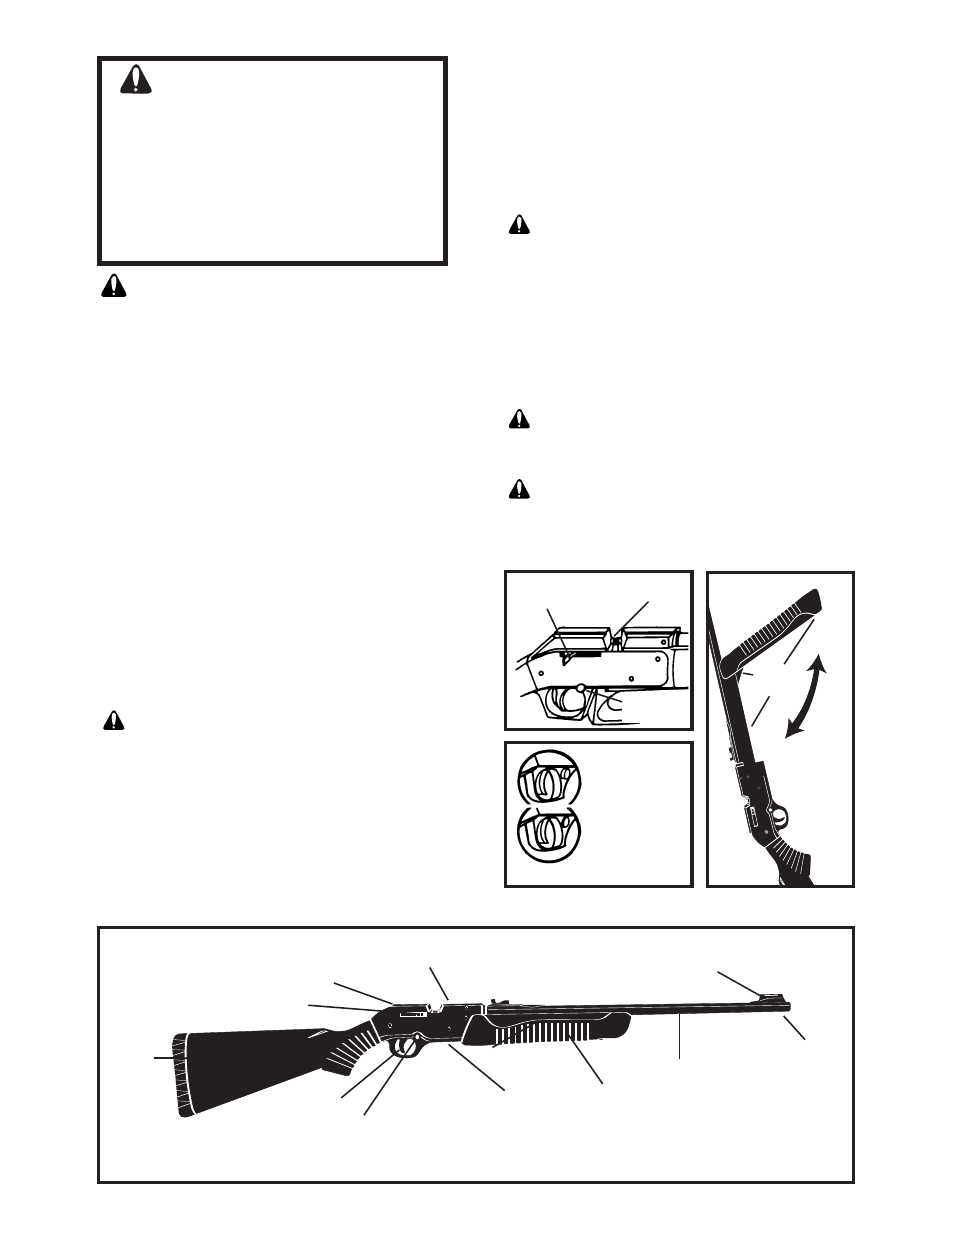
STOCK
Model 901
BB LOADING DOOR
(on left side)
DOVETAIL
GROOVE
BOLT HANDLE
RECEIVER
REAR SIGHT
BARREL
FRONT SIGHT
MUZZLE
FOREARM
PUMPING
HANDLE
TRIGGER SAFETY
TRIGGER
Fig 1
Step 1. OPEN BOLT
Pull straight back on bolt handle, pulling it fully to the rear (Figure
2). The gun cannot fire with bolt open.
Step 2. PUT “ON” TRIGGER SAFETY
(“PUSH SAFE”)
The bolt must FIRST be opened, then the trigger safety is pushed
from the left to right so that NO red is showing (See Figure 3)
(“PUSH SAFE”).
CAUTION:
Gun must always be pointed in a safe
direction.
Step 3. PUMP
The bolt should be opened when pumping the gun. For greater
safety, we recommend that the bolt remain open while pumping and
that you close the bolt only when the barrel can be pointed in a safe
direction. With the muzzle pointed in a safe direction, pump the gun
the desired number of times up to 10. More power means greater
chance of serious injury. Never put finger on trigger until ready to fire
the gun. NOTE: Do not pump your gun more than 10 times. Muzzle
energy increases produced by more than 10 pumps are minor, and
increased pumping may damage your gun.
CAUTION:
Be sure to grasp forearm firmly as you close
it to prevent it from snapping back and causing possible injury. Also
be careful to keep fingers out of cocking mechanism when closing
forearm. (See “PINCH POINTS,” Figure 4)
WARNING:
Do not open the bolt, close the bolt and
then pull the trigger before pumping. This procedure can result in a
loaded gun and a projectile being expelled from the gun during
pumping. Recock the gun by opening the bolt and put “ON” trigger
safety before pumping as in Steps 1 and 2.
BOLT HANDLE
LOADING
PORT
TRIGGER
SAFETY
Fig 3
TRIGGER
SAFETY ON
TRIGGER
SAFETY OFF
red showing on
opposite side
Fig 2
PINCH
POINTS
Pull Forearm
outward for
full stroke,
then return.
Fig. 4