6 fill the fuel tank (engine models), 7 check motor oil (engine models), 8 pto driveline connection – Echo CH45342 Owners Manual v.2 User Manual
Page 12: Warning
4.5 INCH CHIPPER
8
ASSEMBLY
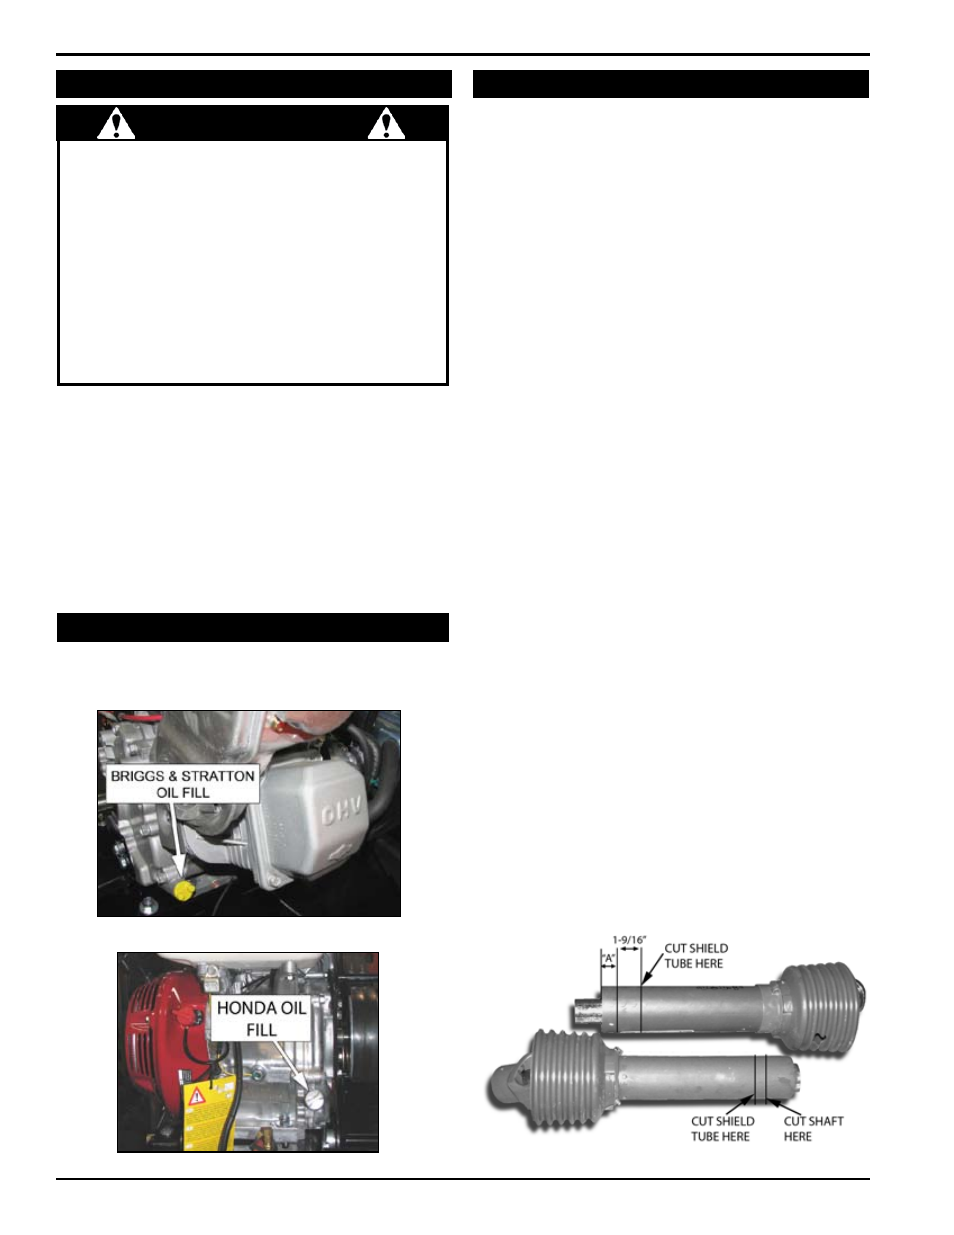
Figure 2.8, briggs oil fill (located on each side of engine)
Figure 2.9, Honda oil fill
2.7 CHECk moToR oIL (ENGINE modELS)
2.8 pTo dRIvELINE CoNNECTIoN
2.6 FILL THE FuEL TaNk (ENGINE modELS)
Figure 2.10, shortening the driveline
Check the oil level and, if needed, fill the engine crankcase
with the type and amount of oil specified in the engine
owner’s manual.
use only those types of fuels that are recommended in
your engine owner’s manual.
Stop engine, wait for all parts to stop moving and
1.
disconnect spark plug wire. Remove key from key
switch. allow the engine and muffler to cool for at least
three minutes.
Clean area around fuel fill cap and remove cap.
2.
using a clean funnel, fill fuel tank to 1/2” below bottom of
3.
filler neck to provide space for any fuel expansion. Install
fuel fill cap securely and wipe up any spilled gasoline.
2.8.1 CHECk LENGTH oF pTo dRIvELINE
attach chipper to tractor with three-point hitch.
1.
you must make sure that the pto driveline supplied
2.
with your machine is the appropriate length for your
tractor. Adjust the chipper up and down and measure
the shortest and longest distance between the chipper
rotor shaft and tractor pto.
the pto driveline has a maximum extension of 24.49”
3.
with a 6.43” overlap. If your longest distance is greater
than 24.49”, contact your dealer to order a longer pto
driveline.
the pto driveline has a minimum compression of
4.
18.1”. If your shortest distance is less than this, cut it
to fit as explained in section 2.8.2.
2.8.2 SHoRTENING a pTo dRIvELINE
pull the driveline into two pieces. Connect one end to
5.
the tractor pto and the other end to the chipper rotor
shaft. line up the two halves parallel to each other.
Measure the distance from the end of one driveline tube
6.
to the bottom of the end shield of the other driveline
half (dimension A in fig. 2.10). measure and mark the
driveline tube 1-9/16” inward from dimension a.
Cut the shield tube in the marked position.
7.
using the cut piece of shield tube as your measurement,
8.
place the cut piece against the end of the shaft. Mark
and cut the shaft.
using the cut piece of shield tube as your measurement,
9.
mark and cut the tube on the other half of the driveline,
and then the shaft.
File both shaft ends, and slide the two halves back
10.
together.
2.8.3 CoNNECTING THE pTo dRIvELINE
When you have confirmed that the driveline is the
11.
correct length for your tractor, connect the driveline
to the chipper rotor shaft using key stock and two set
screws in the owner’s kit.
Connect the opposite end of the pto shaft to the
12.
tractor.
gasoline and diesel fuels are highly flammable and
their vapors are explosive. To prevent personal injury
or property damage:
Store fuel only in approved containers, in well ventilated,
unoccupied buildings, away from sparks or flames.
a container with a capacity of 2 gallons or less with
a pouring spout is recommended. do not fill the fuel
tank while the engine is hot or running, since spilled
fuel could ignite if it comes in contact with hot parts
or sparks from ignition. Do not start the engine near
spilled fuel. never use fuel as a cleaning agent. Do
not MIx oIl WItH Fuel.
WaRNING